Anaperture Single-Shot Anaglyph Apertures
thingiverse
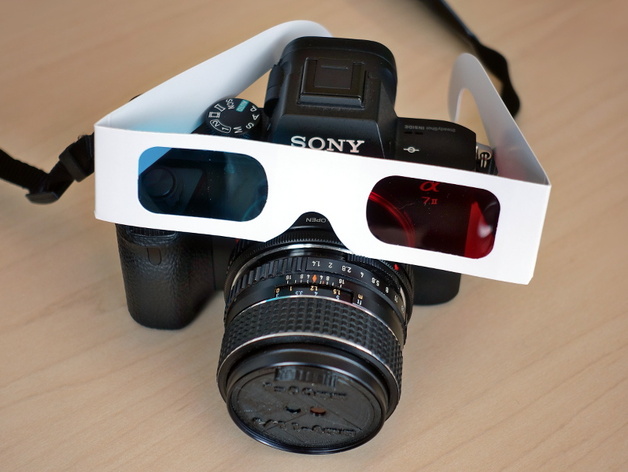
Would you like to capture three-dimensional images using your current film or digital, still or movie camera? An aperture is a Customizer-compatible OpenSCAD program to design special dual-aperture discs that allow single-shot, single-lens, anaglyph stereo capture using a conventional still or video camera. Images captured can be seen in 3D using the usual funny-colored glasses... in fact, you can even see the camera live view in 3D that way! This three-dimensional printed design creates filter masks that can fit inside the threaded filter ring of a typical DSLR lens. The color filter material itself is cut from the colored gels in a pair of viewing glasses that you can buy for under $1. Print Settings Printer Brand: MakerGear Printer: M2 Rafts: No Supports: No Resolution: Doesn't matter Infill: Some Notes: Trivially easy and quick print in PLA. However, you'll want to use the most opaque PLA you can find... or you'll have to paint the PLA to make it light tight. Post-Printing The filter material is simply cut from a pair of the anaglyph viewing glasses and taped/glued over the two holes. Using the two-part design, fix the filters on the part with the tab and then seal them in by pressing the second part in place over them with the holes aligned. It should fit in fairly tightly, but you can use two-sided tape or glue to fix it in place. Once you've assembled the new anaglyph aperture, simply pop it inside the filter thread of your lens (turn it to make the two holes horizontal) and take photos as normal with the lens aperture always set to wide open. The images captured, and even the live view, will be a stereo anaglyph! Enjoy! You say it didn't work for you? First, make sure you didn't let the lens stop-down the aperture; that can even give something like the red and cyan spots in the 6th image. Assuming you kept the lens aperture wide open, the real trick here is sizing. Enter the appropriate data for your lens and the OpenSCAD anaperture design program will attempt to design something reasonable, but it cannot predict lens vignetting, which is a very common and often overlooked defect among fast lenses. A too-long baseline will suffer vignetting that makes each side of the image colored -- vignetting is literally clipping one of the paths through the lens so that the sides only get one view each. If this happens, try targeting something like f/8-f/11 with a very short stereo baseline -- the example images here were shot with f/11 and a baseline of just 8mm. How I Designed This This is really an OpenSCAD version of the CGI script I wrote five years ago to create SVG designs for anaglyph apertures. There are a variety of enhancements because the three-dimensional printed waterhouse stops can be fully three-dimensional printable apertures that are somewhat more robust. You'll want to look at http://www.instructables.com/id/Use-Your-Camera-To-Capture-3D-Anaglyphs/ to understand more of why this works....
With this file you will be able to print Anaperture Single-Shot Anaglyph Apertures with your 3D printer. Click on the button and save the file on your computer to work, edit or customize your design. You can also find more 3D designs for printers on Anaperture Single-Shot Anaglyph Apertures.