Anet A2 fan duct
thingiverse
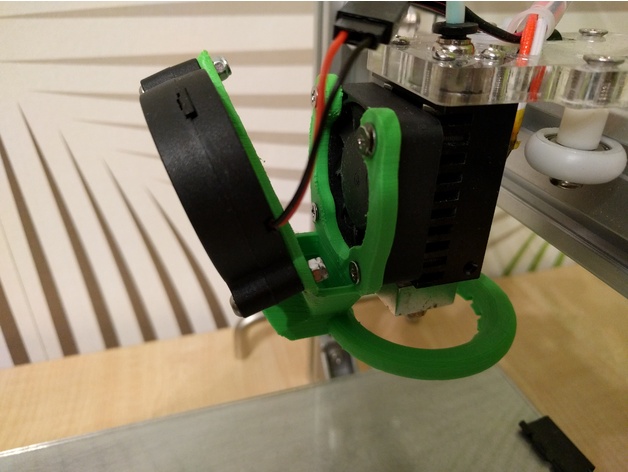
Anet A2 doesn't seem to be getting much love from designers, so I created a fan duct for it. It's for 50x50x15 "turbo" style layer cooling fan. My fan is the cheapest one I found on Aliexpress, the wires were too short, had to extend them. If you have a choice, save yourself the headache and buy a fan with long enough wires (90cm?). In latest version I have beefed up the mount plates, and enlarged the lower holes to hotend fan to make inserting the screws easier. Use the original hotend fan screws for mounting, with this thicker version you can't keep the original grille (need 2mm longer screws, if you want to keep it). You will need two M3x20 (or slightly longer) screws and 2 nuts to fix the layer fan, and obviously the 5015 layer fan itself. Added a version with 18mm autolevel sensor mount, tested and works. WARNING! v12 and earlier versions of this duct are quite low and WILL crash into binder clips, if you use those to fix glass onto your bed, so it will reduce the usable area of your glass significantly. V14 is raised by 1.5mm and clears (my) binder clips. V15 is the same as V14, but without sensor mount. Print Settings Printer: Anet A2 Rafts: Doesn't Matter Supports: No Resolution: 0.2 Infill: 100% Notes: Try printing this on a raft, especially if you are doing this on a stock A2 and have "elephant foot" issues. Without raft the bottom layers on stock A2 can be squished together due to Z mount and coupler flexing, causing the cooling holes to become too small or even blocked. If you have problems separating rafts from prints on your printer, print without raft. I printed mine with 1.6 mm walls, 100% infill. The non-sensor version prints Ok without supports, not the prettiest thing, but functional. You need supports (only from build plate!) for the sensored version. V9 has stronger mount to the hotend fan. V12 has sensor mount and has a bit improved access to the mounting screws. I printed the sensored version in PETG, for previous versions I have used PLA. Both work. How I Designed This Used the ring from Sjouke's design and created pretty much everything else. Layer fan is laid down a bit not to restrict airflow to hotend fan too much. Cooling fan and mount are also not crashing into mainboard mount, so you get to keep full X travel. You DO in fact lose 10mm of X travel due to the duct ring hitting mainboard mount. I didn't originally notice it, since my mainboard is mounted higher and it does not crash at low Z heights. If this is a problem for you, move your mainboard off the frame, or create a mount to rotate it 90 degrees, so it's sideways to the vertical extrusion. Used Fusion 360 to create this, still learning, so it's not perfect, but it works :)
With this file you will be able to print Anet A2 fan duct with your 3D printer. Click on the button and save the file on your computer to work, edit or customize your design. You can also find more 3D designs for printers on Anet A2 fan duct.