Anet A6 X-belt tensioner (tensor del eje X para anet A6) !!! WORKS GREAT!!
thingiverse
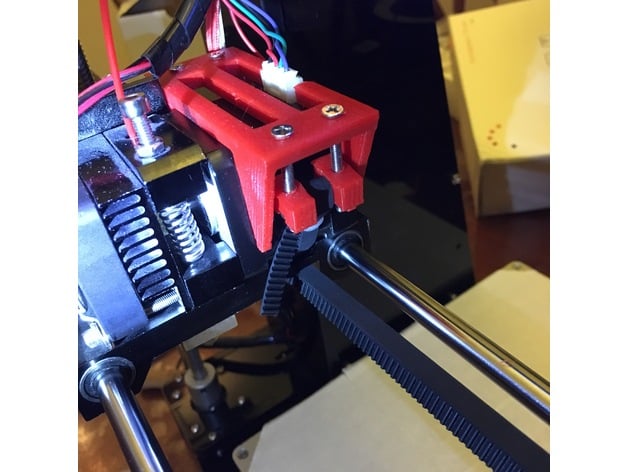
VERSIÓN FINAL FINAL VERSION VERY IMPORTANT: READ PRINTING INSTRUCTIONS CAREFULLY. ESPANOL: Materials (all included with the printer): ·4x screws M3 x 30mm ·4x nuts M3 ·2x small part ·1x big part I created this X-belt tensioner and it's giving me excellent results, so I'm sharing it with you. PRINTING INSTRUCTIONS: ·BIG PART: I highly recommend a 100% infill because it must withstand the tension. I uploaded two versions, THE VERSION 1 is the one in the pictures, and you need to modify it by cutting off a 30mm piece from one side bar. THE VERSION 2 is more up-to-date and rigid, and doesn't require any modifications. ·SMALL PART: It must be placed with the hexagons on top and add support. VERSION 1: IT'S VERY IMPORTANT TO FIX NUTS, APPLY A HORIZONTAL EXPANSION OF -0.3mm ON THE PERIMETER SETTINGS IN CURA (I don't know for other programs... ). FINAL VERSION: It's up-to-date and doesn't require any perimeter settings. PRINT SETTINGS Printer: Anet A6 Rafts: Doesn't Matter Supports: Yes Resolution: 0.2mm Infill: 100% POST-PRINTING To get the maximum tension, I recommend tightening as much as possible the belt with the screws in the lowest position, and then tighten them. Feel free to upload your prints and comment on how they work for you.
With this file you will be able to print Anet A6 X-belt tensioner (tensor del eje X para anet A6) !!! WORKS GREAT!! with your 3D printer. Click on the button and save the file on your computer to work, edit or customize your design. You can also find more 3D designs for printers on Anet A6 X-belt tensioner (tensor del eje X para anet A6) !!! WORKS GREAT!!.