Anet A8 3-point heatbed leveling addon
thingiverse
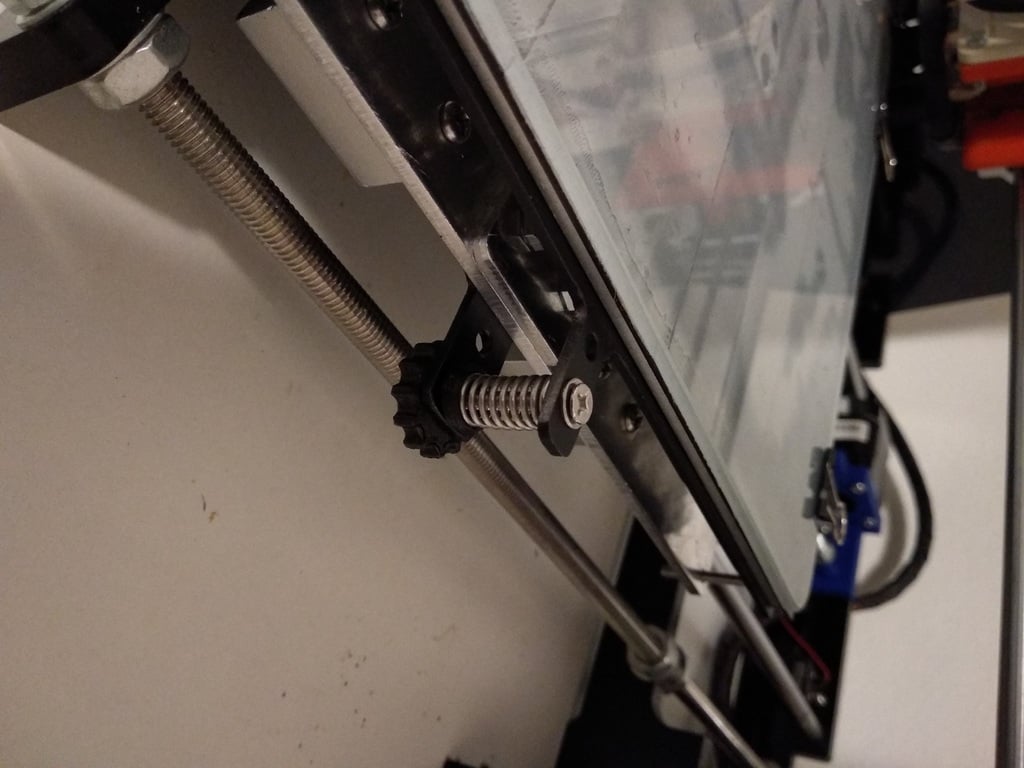
I wanted to have 3-point bed leveling on my Anet A8 printer, but did not wanted to drill or change heatbed, so i have designed this addon. Material used ========== You will need some 2mm thick steel plate and metric screws to make this addon. 218x40x2mm for heatbed side mount 60x25x2mm for carriage side mount 1x Screw M3x30 1x M3 nut 1x M3 thumb nut or standard M3 nut in your favorite printed thumbwheel 3x Screw M4x12 (can be M4x15) 3x M4 nut Making a thing =========== If You have access to laser cutter, you can cut metal parts by laser, but i have fabricated mine by using hand drill and metal saw. Use LibreCad to open and print my drawing as cutting and drilling template. On heatbed piece, all holes should be 3.5mm diameter. On carriage piece, two holes are 3.5mm diameter and 3 holes are 4.5mm diameter. Paint parts with paint of your choice to get better look and protect parts from rusting. Assembly instructions ================= 1) After making metal parts, remove heatbed from carriage, remove original springs from right side of heatbed and add bigger part from this addont under heatbed using original nuts and screws. These screws are left there for better guidance of bed when moving Y axis. 2) Add one M3x30 screw to side hole on new heatbed mount and secure it with M3 nut. You have 2 options. If You have big thumb nut, use hole closer to heatbed, othervise use other hole. Now place original spring on new screw. 3) On carriage, remove 3 original M4 screws connecting aluminium profiles and replace them with 12mm long ones. Add smaller part from this addon under original aluminium profiles and secure it with 3 M4 nuts. 4) Now you can place heatbed back to printer. You should have springs on 2 original screws on left side of printer and on 1 new screw on right side of printer. 5) After assembly, try if heatbed has enough space betwen new leveling mount and right side of printer. You should move heatbed freely by hand. Everywhere should be at least 1mm clearance from other parts. Leveling instructions =============== Turn on printer, preheat it and follow these instructions. During first 3 steps use sheet of office paper betwen bed and nozzle to check height. Paper should move with only little drag. Free moving paper means that you are too far from bed, too big drag means that nozzle is grinding on heatbed surface. 1) Get nozzle down to touch left front corner of heatbed (adjust endstop if you have to). 2) Move heatbed to left rear corner and adjust thumbnut to bed touch the nozzle. 3) Move heatbed to right center and adjust thumbnut to bed touch the nozzle. 4) Repeat steps 1-3 to double check correct heatbed level. 5) Perform test print and watch first layer to be just right. If it is too close or too far, adjust origin position in your firmware or adjust endstop.
With this file you will be able to print Anet A8 3-point heatbed leveling addon with your 3D printer. Click on the button and save the file on your computer to work, edit or customize your design. You can also find more 3D designs for printers on Anet A8 3-point heatbed leveling addon.