Anet A8 3DTouch/BLTouch Auto Leveling Sensor Bracket
thingiverse
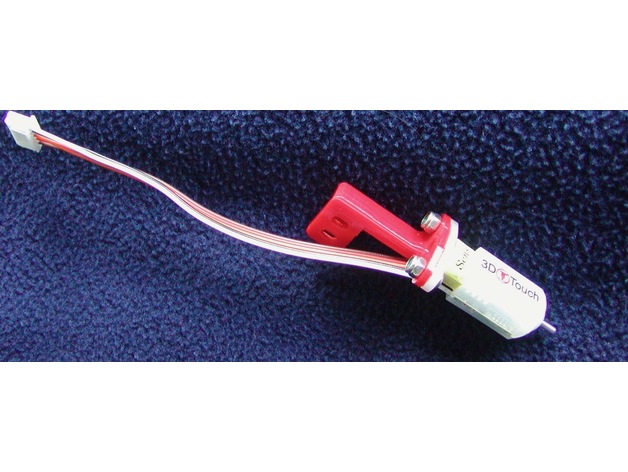
Update 30-APR-2017: I added the config file that people have been asking for. The configuration enclosed is the original 5 button configuration file of SkynetV2.3.1 modified to support 3DTouch/BLTouch. Note that this is for SkynetV2.3.1. --- End of update --- The 3DTouch/BLTouch sensor is a servo-based sensor. Its main advantage is that it allows you to easily switch between printing on glass or directly on the bed without having to adjust auto-leveling parameters. This sensor requires an additional pin that's not easily available on the Anet V1/Sanguinololu control board. To use this sensor on an Anet A8, you either have to move to a different board, modify the LCD cabling (see http://www.thingiverse.com/thing:2091529), or free up a pin on the Anet board by converting the display to I2C. See my design for freeing up a pin: http://www.thingiverse.com/thing:2098646. There are several 3DTouch brackets available on Thingiverse, but most won't fit the Anet A8. The one that might work (http://www.thingiverse.com/thing:2084025) moves the sensor so it's almost in line with the fan and right next to the extruder cooling fins. This limits the bed area available to the probe in the Y direction. My design will only work on Anet A8s with the same hole pattern on the extruder carriage as mine. This is a very tight fit, but it should not touch anything and is greater than the manufacturer's minimum suggested distance of 15mm from the hot end/nozzle. Prints: SensorBracket.stl, AlignmentSpacer.stl I printed both at 100% fill, 0.1mm, support "Touching Bed". I'm not a print settings expert, but I figured the bracket needs to be as rigid as possible. The alignment spacer is the distance from the base of the sensor to the bed when the nozzle is a paper thickness above the bed. The spacer is only as precise as your printer. Mine was spot on (today). It should measure 8.3mm on a good day. Mount the sensor on the bracket before attaching the bracket to the extruder carriage. Use Repetier-Host, Cura, etc., to place the nozzle the thickness of a sheet of paper off the bed. Use the alignment widget to set the height of the sensor above the bed. Some of the Marlin/SkynetV2.3.1 Configuration.h settings: I determined these two offsets using the grid file "Coords mm.pdf" define X_PROBE_OFFSET_FROM_EXTRUDER 59 // X offset: -left +right [of the nozzle] define Y_PROBE_OFFSET_FROM_EXTRUDER 14 // Y offset: -front +behind [the nozzle] The Z_PROBE_OFFSET_FROM_EXTRUDER setting should be set based on your actual results you measure during setup. define LEFT_PROBE_BED_POSITION 15 define RIGHT_PROBE_BED_POSITION 195 define BACK_PROBE_BED_POSITION 205 define FRONT_PROBE_BED_POSITION 25 If you use a non-standard servo pin, you'll need to define SERVO0_PIN. In my case, it's 27. define SERVO0_PIN 27 DO NOT attempt to do an Auto Home after your very first upload. Send one of the test gcodes to make sure you're connected. M280 P0 S10 ; pushes the pin down M280 P0 S90 ; pulls the pin up M280 P0 S120 ; Self-test – keeps going until you do pin up/down or release alarm M280 P0 S160 ; Release alarm Hardware: (2) M3 x 8, (2) M3 x 12, (4) M3 nuts
With this file you will be able to print Anet A8 3DTouch/BLTouch Auto Leveling Sensor Bracket with your 3D printer. Click on the button and save the file on your computer to work, edit or customize your design. You can also find more 3D designs for printers on Anet A8 3DTouch/BLTouch Auto Leveling Sensor Bracket.