Anet A8 Basic Y Axis Upgrade
thingiverse
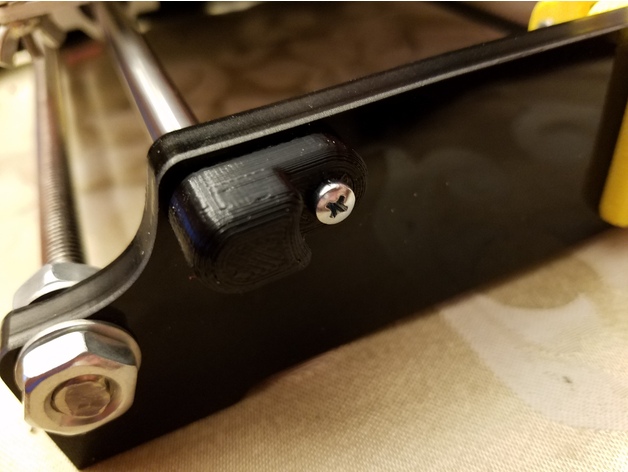
Since I upgraded the X-axis in a previous project, I figured that the Y-axis should be brought up to par. The Y-axis has undersized rods and terrible bearings identical to those found in the old setup. To upgrade the bearings, I used the same Ina Model KH0824PP bearings from my last project, by simply disassembling and reusing the existing metal pillow blocks. There are likely many high-quality bearings of this type available on Ebay for purchase. The rods were upgraded with 400mm long replacement rods from McMaster Carr part number 6112K45. The original rods measure 380mm in length, while the McMaster rods are a slight 20mm longer. Instead of cutting the hardened linear way rods, I designed new rod end caps to accommodate the additional length. The STL for this end cap is included with this project. WARNING: I discovered that the screw holes currently holding standard acrylic end caps in place are actually located at different spots around the printer! As a result, you will have to either expand or re-drill new holes to accommodate the screw in either the frame or the end caps. This may be a bit of a hassle, but the acrylic is easy to drill with a sharp tool. I used a 5/32" drill in both the frame and the end cap to enlarge the holes to fit the different hole locations. One of the front holes was spot on, but the others were scattered all over the place. After the upgrade, the printer table moves quieter and smoother, producing better prints due to reduced play in the table. I found that the PLA-printed endcap flexes less than the acrylic endcaps, adding rigidity to the table support structure. Print Settings Printer: Anet A8 Rafts: No Supports: No Resolution:.3mm Infill: 80% Notes: I used three layers on all sides. Post-Printing WARNING: Make sure that the holes in the frame align with the end cap, and if not, you will have to enlarge or rework the mounting holes. Someone might want to remix the endcaps to allow for different screw mounting hole locations. If you drill out the right back side hole, be careful not to damage the Y-axis rear limit switch! How I Designed This Fusion 360
With this file you will be able to print Anet A8 Basic Y Axis Upgrade with your 3D printer. Click on the button and save the file on your computer to work, edit or customize your design. You can also find more 3D designs for printers on Anet A8 Basic Y Axis Upgrade.