Anet A8 Bowden Extruder - The easy way
thingiverse
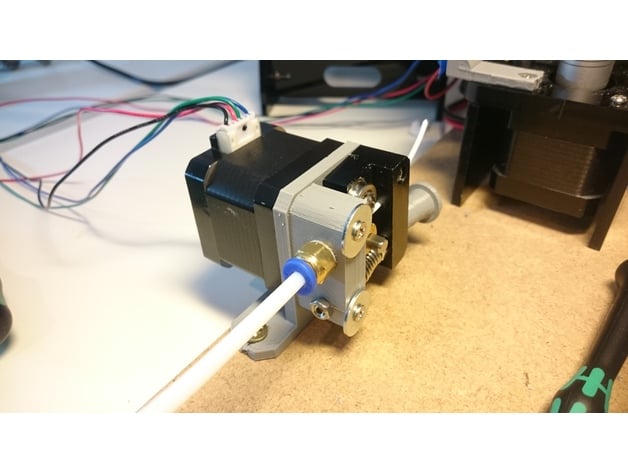
This is an all-in-one upgrade kit designed specifically for your Anet A8 printer. My main goal was to utilize as many components from the original kit as possible, which means most of the parts used in this upgrade are either spare or original components from the kit or can be printed by yourself. In addition to these components, you will also need M10 Push Fittings and some Teflon tube, available as a kit at Banggood: http://www.banggood.com/1M-PTFE-Teflon-Bowden-Tube-For-Reprap-3D-Printer-1_75mm-Filament-p-1089552.html?p=5F23158121713201612L. The only additional parts I included are some M3 and M4 nuts, as well as washers. Credits: * The mounting adapter was taken from 3Dator's Bowden Extruder. * The motor block was customized from Lancervo21's Anet A8 Bowden update. * All screw threads were generated using Poor man's OpenSCAD screw library. Print Settings Printer: Anet A8 Resolution: 0.2 Notes: * Print the pneumatic adapter with 100% infill as it needs to be solid. * The other parts can be printed at 50%, but less may also work well. * Rotate the adapter by 180° before printing. Post-Printing Step 1: Print all the parts and ensure all holes are the correct size. You might need to use a drill to make them wider, especially the one for the filament. Attach the push-in Fittings as shown in the pictures below. Step 2: Disassemble the extruder completely for conversion. Then start reassembling it according to the pictures. For attaching the fan to the hotend, I omitted the heatsink as its purpose is no longer needed. Use your Anet A8 extruder lamp as a spacer between the fan and the aluminum block or some nuts instead. This solution may not be perfect but it works. Make sure everything fits tightly. Step 3: Assemble the Extruder Motor. All necessary parts are available. Position the mounting adapter correctly. Add an additional M4 nut to the screw as a spacer. Assemble the feeder block correctly. Align the pinion gear properly and remove the black part afterward. Attach the feeder block to the motor using two washers instead of fitting screws. Mount the spring between both parts. Step 4: Congratulations, you are almost done! I had trouble finding an appropriate spot to mount the motor on the printer frame, so I mounted the whole printer on a piece of wood and placed the motor next to it. Now, just attach the Teflon tube and reconnect the motor to the mainboard again. Note that the color of the adapter changed during assembly due to the gray part being printed with 50% infill like the other parts but breaking at one point. I had to reprint it.
With this file you will be able to print Anet A8 Bowden Extruder - The easy way with your 3D printer. Click on the button and save the file on your computer to work, edit or customize your design. You can also find more 3D designs for printers on Anet A8 Bowden Extruder - The easy way.