Anet A8 E3D V6 Bowden Mount (With Nut Inserts)
thingiverse
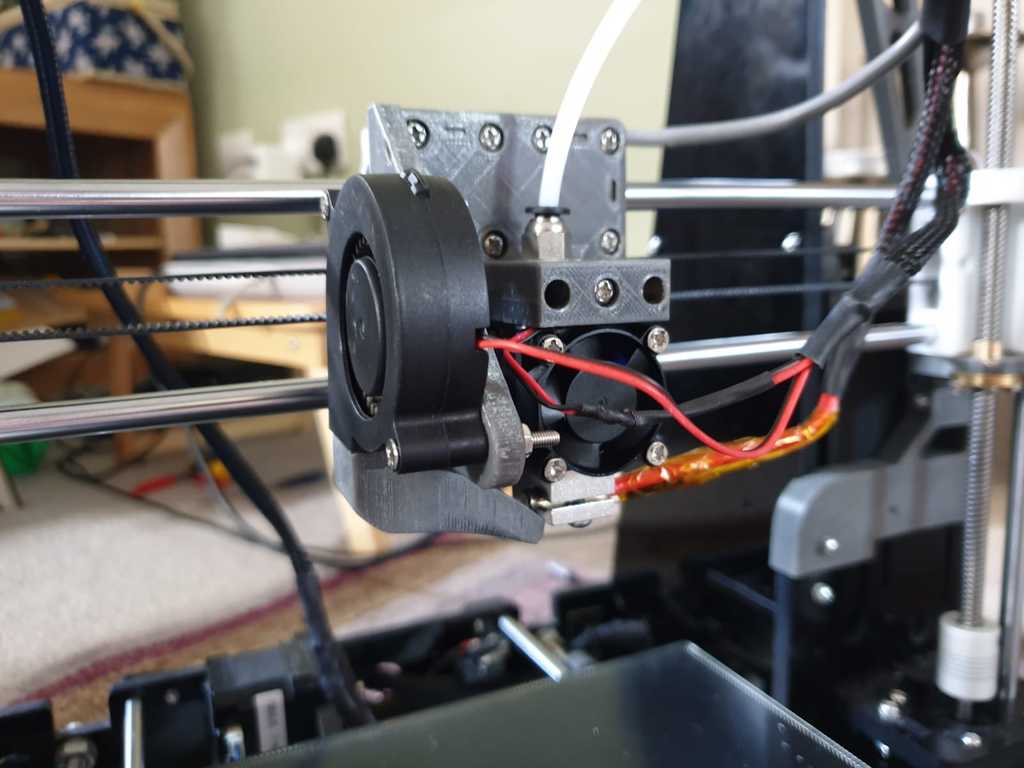
This is a remix of TNS's E3D V6 Mount for the Anet A8. The original version relies on threading straight into the plastic; I changed this to support M3 square nuts (inserted into the square holes of the part); so that there is no stripping of the plastic threads when removing to remove a blockage, maintenance etc. I also decided to widen the circular cutout in the mounting part of the carriage; and give the option to insert a grub screw to hold the hot-end securely in place (this also uses an M3 square nut insert). Depending on the tolerance of your printer you may not need this; although for clones of varying dimensions it could be useful if your hot-end is slightly loose (as mine was) The hot-end I am using is a clone of the E3D V6; However should work with original hot-ends also. Refer to TNS's instructions on measuring the hot-end to make sure this carriage will work for you; mine measured 63mm so that is the file I based my remix on. Install instructions: 1) Insert 6xM3 Hex nuts into the corresponding holes on the face of the carriage (this is for a secure mount with a belt holder of your choosing. You may need to heat up the hex nut and press it into the hole for a tight fit. Install carriage onto the x-axis bearing holders and original screws. 2) Insert 2xM3 square nuts into the holder of the main carriage; making sure the hole of the nut lines up with the hole in the part. 3) Install an M3 nut into the smaller mount part; this is for the grub screw - an 18mm M3 bolt is used as the grub screw, insert the grub screw; making sure it is flush with the semi-circular face of the part. Insert 2x18mm M3 Bolts into the holes on either side of the central grub screw (all screws should be loose in the plastic). 4) Insert hot end into mount, align the two parts and thread the 2 screws of the smaller part into the main carriage (making sure the square bolts are aligned). 5) Tighten the grub screw until the hot-end is stiff and does not rotate. (this may mark the hot-end but this is hidden anyway). 6) Attach desired belt holder to the rear with 6x 22mm M3 bolts. Done! Tidy your wires with the zip tie holes. Parts: 6 x M3 Hex nuts 6 x M3 Bolts of atleast 22mm length (can be longer), this is for the belt holder. 3 x M3 Square nuts 3 x M3 18mm bolts Other 3D Prints Used: Mistral 2.1 (not a): https://www.thingiverse.com/thing:2121279 Bed Level Sensor Mount: https://www.thingiverse.com/thing:2105275 Belt Holder: https://www.thingiverse.com/thing:2427494
With this file you will be able to print Anet A8 E3D V6 Bowden Mount (With Nut Inserts) with your 3D printer. Click on the button and save the file on your computer to work, edit or customize your design. You can also find more 3D designs for printers on Anet A8 E3D V6 Bowden Mount (With Nut Inserts).