Anet A8 e3d v6 Bowden Print Carriage Redux
thingiverse
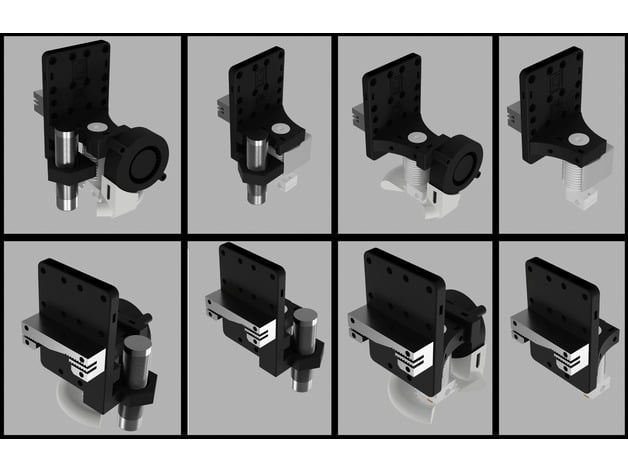
This is a collaborative work project between Dan Rogers and myself. Our goal was to create a print head mount that offers users the flexibility to customize their setup to meet their exact needs. This design is specifically tailored for Bowden setups, with four variations to choose from: * A sensor-equipped version with a cooling fan * A sensor-equipped version without a cooling fan * A sensor-free version with a cooling fan * A sensor-free version without a cooling fan Many parts are interchangeable, allowing users to make changes or upgrades as needed. To assemble the print head, you will need the following materials: * 8 M3 Hex nuts * 7 M3 screws (25mm length) * 1 M3 screw (20mm length) * The existing 12 screws used to mount the carriage to the X axis You can use standard or socket head screws. When printing, we recommend using supports for the print carriage plate and the head lock, but not for the cooling fan duct. Refer to the images provided for recommended part orientations. Before assembly, press-fit four M3 hex nuts into the carriage plate, two into the head lock, and one into the fan mount. To assemble the print head: 1. Attach the belt holder to the back of the carriage plate using four M3x25 screws. 2. Attach the print carriage to the bearings on the X axis using the existing 12 screws, recommending cross-tightening method. 3. Place the E3D V6 into its opening on the print carriage and attach the desired head lock (fan or no fan) using two M3x25mm screws. 4. If not using a sensor or fan, your carriage is now complete. 5. Attach the turbo fan using one M3x20 screw on the uppermost hole and one M3x25 screw on the lower hole. 6. Attach the cooling ring to the turbo fan. 7. If not using a leveling sensor, your carriage is now complete. 8. Attach your leveling sensor (proximity or inductive) to the mount using included hardware. Secure all wires with a zip tie through the slots on the side of the print carriage for stress relief. This design accommodates both 18mm and 12mm sensors. When choosing your print carriage, select the corresponding file. The sensor offset is -28.873mm from the center of the nozzle to the center of the sensor. We encourage users to share their prints and experiences with this design by posting pictures. EDIT: Dan Rogers has released a new cooling fan duct that works in conjunction with this print head at the following link: http://www.thingiverse.com/thing:2086437 . This design aims to create a lower profile cooling duct. Print settings: * Printer: Anet A8 * Rafts: No * Supports: Yes * Resolution: 0.2mm * Infill: 60-70% * Notes: For details on supports, please read through the description
With this file you will be able to print Anet A8 e3d v6 Bowden Print Carriage Redux with your 3D printer. Click on the button and save the file on your computer to work, edit or customize your design. You can also find more 3D designs for printers on Anet A8 e3d v6 Bowden Print Carriage Redux.