Anet A8 | Low profile Lower Frame Rebuild
thingiverse
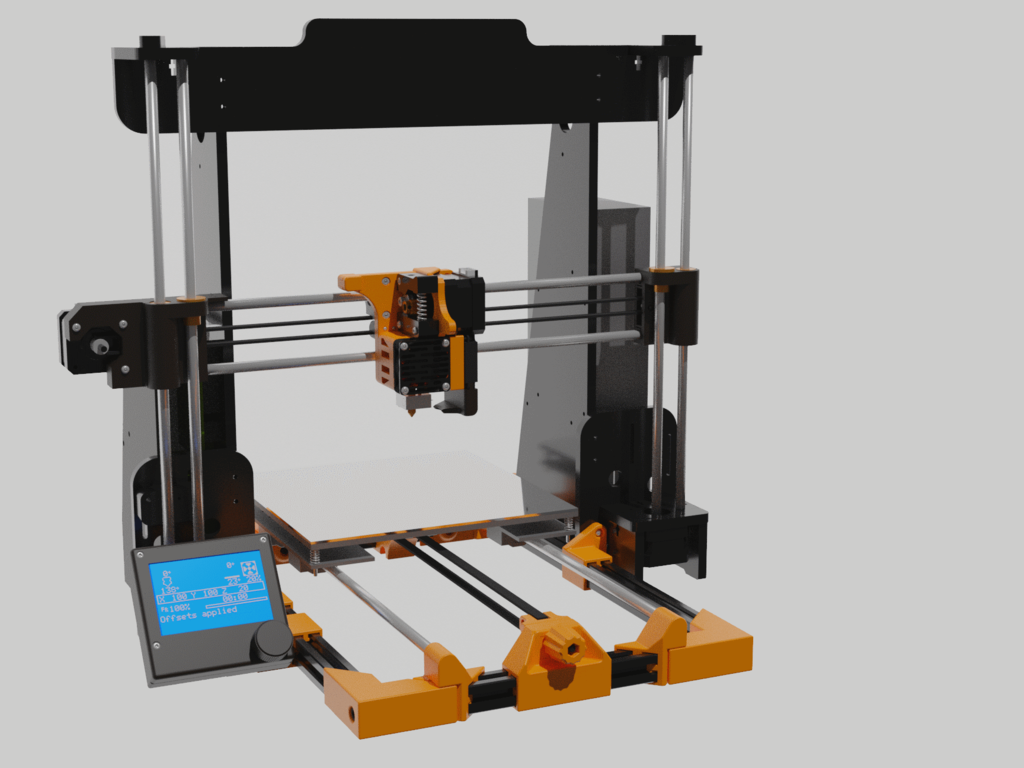
**WARNING. YOU PROBABLY SHOULDN'T DO THIS MOD IF THIS IS YOUR ONLY PRINTER. IF SOMETHING BREAKS OR DOESN'T FIT YOU WON'T HAVE ANOTHER PRINTER TO FIX IT WITH** The Anet A8s stock lower frame is about as bendy as 3D printers get and many of the printable braces and addons only treat the symptoms of the problem. You can of course use [pheneeny's fantastic full-frame replacement](https://www.thingiverse.com/thing:2263216) which will ultimately be more stable and stiff than mine due to the use of 2040 extrusions, however, I'm of the opinion that 80% of the A8's main mechanical issues, such as a constantly shifting bed level and grinding bearings, arise from the lack of stiffness in the bed carriage, so I designed this upgrade to fix those issue without the need for an entire frame replacement. This project aims to replace just the lower section of the A8's frame, providing a much more rigid mount for the bed, belt, and stepper, all for a few $ of extrusions, 300g of filament, and about 20 hours of print time. **Printing** --- All parts are printed in their provided orientation and require no additional supports or rafts, though a brim is advisable. I recommend all parts be printed with 3 walls at about 0.28mm layer height in PETG or better, but they would work fine in PLA or PLA+. **Hardware** --- * 6x M4 10mm Bolts * 6x M4 washers * 6x M4 t-nuts * 4x M5 Bolts for the extrusions and a tap for threading them. **You may need larger bolts if the hole in your extrusion is larger. They are not all the same** * 2 meters of standard 20mm x 20mm aluminium extrusion to be cut into 2x400mm and 2x248mm segments. You could get away with 1.5 meters but if you mess up a cut you will be in trouble and it's generally sold by the meter anyway. * The tensioner will need an M5 hex nut and M5 30mm hex bolt. **Fitting** --- All of these parts are designed to fit snugly over the extrusions and they work perfectly on my machine but they may very well be too tight on yours due to everyone's prints and extrusions being a bit different. **As a result, I highly recommend fitting all of the parts to the extrusions and assembling the frame before fitting anything to the machine,** otherwise you risk giving your machine a good few bruises while trying to hammer parts onto it. A heat gun down the bore of the parts can help them slide on. **Assembly** --- * Cut extrusions to size. You will need 2x 248mm pieces and 2x 400mm pieces. * Tap and drill the extrusions so that they are attached as shown below using the M5 (or larger bolts). It is important to make your cuts straight and the corners even.  * Print one of the components and make sure you can fit it over the extrusions. If it's a little tight you may want to slightly reduce your flow rate or slow down your print speed. * If all goes well, print and clean up all of the parts. You will need to mirror the side parts for both sides. * Before fitting the parts, insert the 6 washers into the holes in the rod, belt and stepper motor mounts. Then insert the M4 bolts through the holes and into the t-nuts on the other side. This can be a real hassle so it might be better to lay the t-nut in the groove of an extrusion and slide the part over it.  * Disassemble the extrusions and reassemble them with the printed parts as shown.  * Remove your linear rods and bed from your printer and fit it in the frame as shown, tightening down the corner extrusion bolts while the frame rests on a flat surface to keep it straight. Run the bed back and forth, adjusting the rod mounts until the bed runs smoothly, then tighten down the t-nuts to lock the mounts in place.  * Unfortunately, this is the part where it can get messy. The middle crossbar on the A8 is very much in the way of our new frame so you have two options. Either cut away the frame as shown in red below or print the provided frame parts, just note that I cut my frame and have not tried the printed parts myself.  * Once again, remove the front extrusion and detach the bed and rods. Attach the new frame to the printer using the existing bolts to mount it. Make sure that the PSU cable runs under the Y stepper mount.  * Finally, reattach the rods, bed and front frame. Test the movement of the bed again and make adjustments if needed. Mount the stepper and the front belt tensioner system, making sure that they are aligned with the bed. Tighten them down once you are happy with the placement.  * **There is no defined end-stop mount on this design yet** Unfortunately, with all the different belt holders, bearing setups and hotends people use on the A8, I can't really come up with an endstop system that will fit all printers so it's going to be up to you to find exactly how you want to mount your endstop. I have my endstop screwed to the stepper mount as shown below.  **Additional part sources** --- * [The Tensioner knob is a remix of donnyb99's CR-10 tensioner](https://www.thingiverse.com/thing:2168903/files) * [The tensioner itself was inspired by mukha521's AM8 tensioner but wasn't directly remixed](https://www.thingiverse.com/thing:3240583) * [The screen mount shown is from Jan_P's CR10 All-In-One design, as this printer is running a Cr-10 main board](https://www.thingiverse.com/thing:2841111) * [Cheers to SmallArtFly for the A8 frame model](https://www.thingiverse.com/thing:2288314/files)
With this file you will be able to print Anet A8 | Low profile Lower Frame Rebuild with your 3D printer. Click on the button and save the file on your computer to work, edit or customize your design. You can also find more 3D designs for printers on Anet A8 | Low profile Lower Frame Rebuild.