Anet A8 Plus Hot-Swappable Heated Bed Upgrade
thingiverse
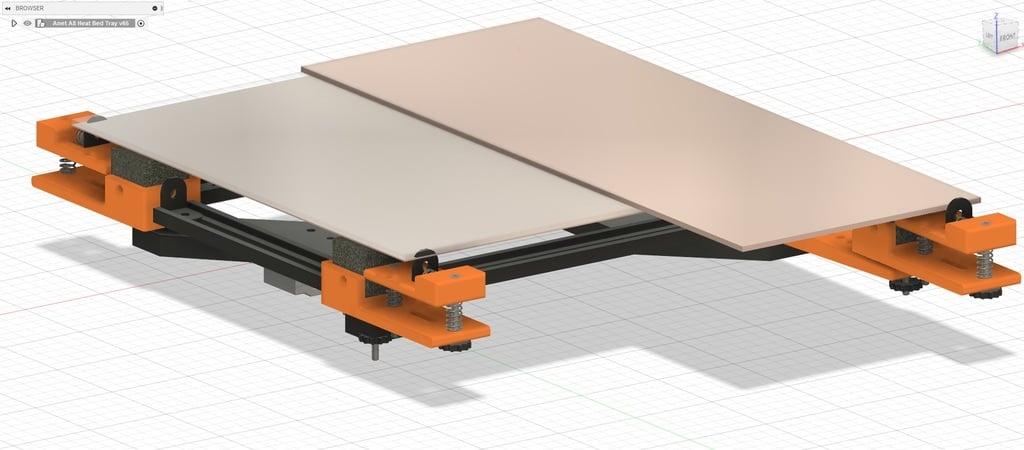
Welcome to the one and only hot-swappable heated bed upgrade for the Anet A8 Plus 3D printer! This design allows you to quickly place a heated bed onto the 4 insulated pads while a set of spring-loaded tension clamps on the corners fasten it into place. There are many advantages to this system: *Does not require drilling into a silicon heater or metal plate to secure it to the Y-Carriage. *Allows for quick de-installation of the bed so getting to the undercarriage becomes much easier. *Height adjustment for the clamping mechanism is independent to manual bed leveling, which allows for flush fastening of any surfaces (glass, PEI, lexin, etc) without alligator clips. (Note: photos show them used still due to a size mismatch between plate and glass) *Design allows you to still use manual bed leveling on each corner. *Bed-Carriage extenders allow support for larger beds. **IMPORTANT NOTICES:** The design was built around a 12x12" (306mm) plate because that was what was readily available at the time. The clamps have enough range to accommodate this but go any shorter and the clamping mechanism may not compress against the plate. In other words, I cannot promise a 300x300mm stock bed will work. However if you would like to go for a larger plate than what I used, you can always use the Y-Carriage extenders to move the clamps further apart! I included a model of the same L-Bracket used in case they are no longer offered on Amazon or you would like to try and save a buck. However, I highly recommend buying the metal brackets from their catalog so that they do not melt upon coming in contact with the heated bed surfaces. **Minimum Hardware Required:** M4x40mm machine screws https://www.amazon.com/gp/product/B000NHVQGM/ref=ppx_yo_dt_b_asin_title_o04_s00?ie=UTF8&th=1 M4 Hex Nuts https://www.amazon.com/gp/product/B087Q7KYSY/ref=ppx_yo_dt_b_asin_title_o04_s01?ie=UTF8&psc=1 M4 Wing Nuts https://www.amazon.com/gp/product/B07QB5NKVW/ref=ppx_yo_dt_b_asin_title_o08_s01?ie=UTF8&psc=1 Compression Springs (8mm OD, 0.8-1.0mm wire size, 20mm length) https://www.amazon.com/gp/product/B076LS5N73/ref=ppx_yo_dt_b_asin_title_o05_s00?ie=UTF8&psc=1 Recommended Additional Hardware: Metal 90 Degree L-Angle brackets 2 hole (20x20x2mm) https://www.amazon.com/gp/product/B08BHXWYTL/ref=ppx_yo_dt_b_asin_title_o08_s00?ie=UTF8&psc=1 12x12" 750 Watt Silicon Heater w/ thermistor (recommended) https://www.amazon.com/gp/product/B07ZFPKHN5/ref=ppx_yo_dt_b_asin_title_o03_s00?ie=UTF8&psc=1 12x12x0.032" copper plate (recommended-- but aluminum works too) https://www.amazon.com/gp/product/B00IDF6J6I/ref=ppx_yo_dt_b_asin_title_o03_s00?ie=UTF8&psc=1 Solid State Relay (to power and regulate the heater element) https://www.amazon.com/gp/product/B00HV974KC/ref=ppx_yo_dt_b_search_asin_title?ie=UTF8&psc=1 Roxul Rock Wool Insulation (or equivalent) https://www.amazon.com/gp/product/B01LZI4T1U/ref=ppx_yo_dt_b_search_asin_title?ie=UTF8&psc=1 **INSTALLATION INSTRUCTIONS (Read in Advance!):** 1) Prepare the top adjustable clamp. Print the 'adjustable top plate' and the 'bracket lock' models. Insert one 8mm (OD) x 20mm long compression springs into the recessed socket of the top clamp plate. Set one of the L-brackets inside the channel of the top clamp plate. There should be very little to no compression while resting at the end of the guide channel. Take the 'Top Bracket Lock' model and two M4 screws and fasten the bracket lock model into the top clamp plate. This will hold the L-bracket in place so the bracket can compress in and out without falling out of the channel guide. 2) Prepare and install the clamp bottom. Print the 'Clamps bottom plate'. Using two M4x40mm screws and two 8mm x 20mm compression springs, fasten the clamp top plate to the bottom plate and screw two wingnuts to the threads from the underside. The wingnuts will allow for adjusting the top plate's height from the bottom and therefore move the clamping bracket mechanism up or down vertically to get a flush clamp against the heated bed surface. 3) Prepare the support beams. Print the two different length support beams. The beams are necessary to prevent buckling and balance issues on each spring for the manual bed leveling. Insert one M4x40mm screw through the top of the 'clamp bottom plate'. Depending on which corner the installing clamp is on, insert a M4 screw (10mm length minimum) in the clamp 'bottom plate' through-holes surrounding the insulation housing. These horizontal screws need to be installed in advanced from the inside out so that the screw's depth does not tear into the insulation pads. These screws fasten together the end clamps to the supportive beams through the use of a set of L-brackets. 4) Finish preparing the frame. Once each corner clamp is fully assembled and fastened securely to the end of each supportive beams, you should have a rigid enough frame that can be lifted and installed to the bed's Y-Carriage. If you have not done so already, cut a piece of 1" thick Roxul insulation (or equivalent) and place onto the square housing of the clamp's bottom plate. Repeat this for each corner. Thread a compression spring onto each screw from the underside screw of the clamping mechanisms, then set the frame into the Y-Bed Carriage and fasten into place with a wingnut on each underside. If you like this design, be sure to leave a comment and a like. Thank you! "Bark bark!" RoscoeTheDog
With this file you will be able to print Anet A8 Plus Hot-Swappable Heated Bed Upgrade with your 3D printer. Click on the button and save the file on your computer to work, edit or customize your design. You can also find more 3D designs for printers on Anet A8 Plus Hot-Swappable Heated Bed Upgrade.