Another DIY Bench Power Supply
prusaprinters
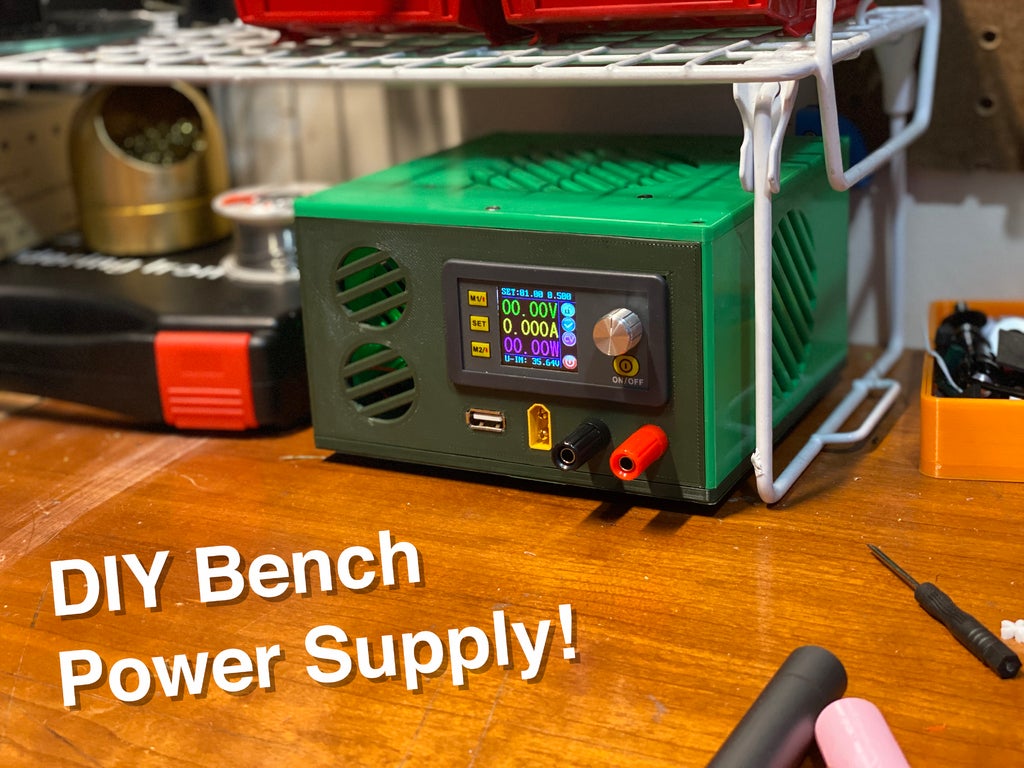
<p>Update: Commenter pointed out that I overlooked the current rating on the buck converters I linked, we should be using something like the XL4015, I updated the<strong>DIYBench_Bottom</strong> file with a XL4015 variant.<em>07/08/2020</em></p> <p>This is yet another DIY bench power supply. It is designed to be printed with minimal supports, be roomy enough to work in comfortably, and for the final product to be nice and strong. All the components I used have been linked below. The supply was designed to rely on m3 bolts tapped into the plastic, I'd recommend getting an m3 tap if you're going to build this, you can also use the bolts to tap the plastic but a tap would be easier. The box goes together with 15 or 16 5mm m3 bolts (a 16mm bolt can go in place over the step down converter as a set screw if tolerance is loose), the fan requires 20mm or 25mm m3 bolts and nuts, and the fused mains plug requires a couple bolts (15mm or 20mm will do) and nuts.</p> <p>The side walls of the box all slot together, when printing there is one area on each wall that requires support, I've modeled a support structure that will need to be aligned with its corresponding wall (you can adjust its Z scale to get the right offset from the parts, depending on your printer). Also the front panel needs support under the XT60 connector housing.</p> <p>Note: The bottom plate does have a 'front', you should be able to see a small notch in the lip around that bottom part, that allows for clearance for the XT60 connector's housing.</p> <p>Note2: The XT60 and USB port may need a dab of super glue to secure them in place.</p> <p>Note3: I'm no electronics expert so I won't be providing a wiring diagram, though if you're going to attempt this project there are a lot of resources or similar diy supply schematics available. Be careful with mains power when wiring up your switch! It can kill! I also included a link for a pre-wired version. The gist is it goes from switch to power supply, then step down converter to power outputs (banana jacks, etc). You can also divert some of the DC power to a buck convert to your fan directly or through the a rocker switch.</p> <p>Features:<br/> 36v 5A power supply mounting points<br/> 2 small buck converter mounting points<br/> 80mm or 92mm x 10mm cooling fan mounts<br/> Fused power switch mount point<br/> Rocker switch mount point (for fan power)<br/> XT60 female jack mount point<br/> USB female jack mount point</p> <p>Components used:<br/> Power Supply - https://amzn.to/3f2cySq<br/> Banana Plug Jacks - https://amzn.to/3h5L2oR<br/> Step Down Converter - https://amzn.to/2YcSea8<br/> Buck Converters (UPDATED) - https://www.amazon.com/Organizer-Lithium-Battery-Converter-Constant/dp/B07V7F5K8T/</p> <p>80mm Fan - https://amzn.to/3dLzLbl<br/> 92mm Fan - https://amzn.to/30mF5Ot<br/> Fused Power Switch - https://amzn.to/2MG176L<br/> Fused Power Switch (Pre-Wired!) - https://amzn.to/3f3xc4z<br/> Rocker Switch - https://amzn.to/2YeIKv8<br/> XT60 Connector - https://amzn.to/2Ur80x1<br/> USB Port - https://amzn.to/2AgcfVm<br/> 20mm Rubber Feet - https://amzn.to/37l2Wja<br/> 3MM Thread Tap - https://amzn.to/2YmasGu</p> <p>Shout out to my buddy Alan who inspired this project!</p> <h3> Print Settings</h3> <p><strong>Rafts:</strong></p> <p>No</p> <p><strong>Supports:</strong></p> <p>Yes</p> <p><strong>Resolution:</strong></p> <p>0.2 - 0.3 is fine</p> <p><strong>Infill:</strong></p> <p>15 to 20% to reduce pillowing</p> <p><strong>Filament:</strong> Any PLA, PETG, or ABS Any<br/> <strong>Notes:</strong></p> <p>Sorry they're not pre-oriented for printing but they should all be easy to place on the bed! Most of the parts print flat on their face so the layer heights don't matter much. The front panel needs to be printed with supports under the XT60 connector, all the side walls have an area that either need slicer generated supports, or they can be printed with the modeled supports also uploaded. You'll need to align the component origins before orienting them together for printing. Let me know if you have any questions, I can't provide help for aligned the support piece for all slicers however, sorry.</p> <h3> Post-Printing</h3> <p>Remove supports and any brim you may have printed with, assemble the box to make sure everything is slotting together properly. Once all the walls are in place and the top and bottom are seated its good to tap the holes all together so the thread runs through both parts. Tap the center top front hole all the way through the front wall part beneath it, this will allow you to use the longer m3 bolt as a set screw to help keep the step down converter from wobbling.</p> <p>Once thats done test fit all the components. The rocker switch is a tight but positive fit, the step down convert may be a tad loose once its in place but that can be corrected with the set screw idea. Also now tap the mounting spots for the power supply and buck converter boards. The usb port may be tight depending on the print results, a light amount of filing may be necessary.</p> Category: Electronics
With this file you will be able to print Another DIY Bench Power Supply with your 3D printer. Click on the button and save the file on your computer to work, edit or customize your design. You can also find more 3D designs for printers on Another DIY Bench Power Supply.