Another Mini-Drill Press
thingiverse
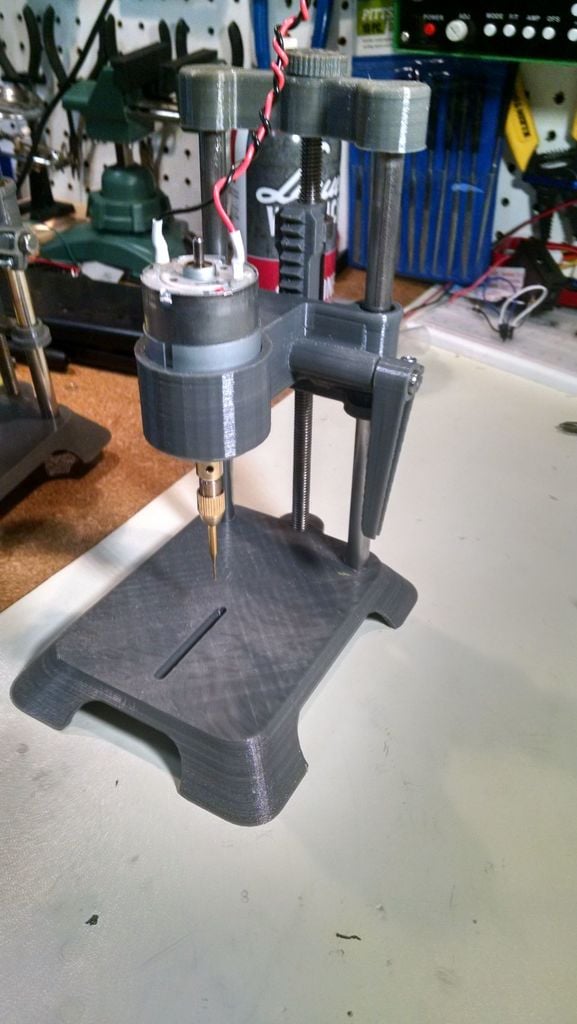
Yet another mini-drill press. There are some very nice ones on this site but I didn't see one I really liked and, since COVID-19 has me housebound, I designed my own. This one is from parts from a HP 637 printer with a 37mm 18VDC motor and power supply. It had a 3/8" smooth rod that I cut to size, and an 8mm rod with splines where rubber wheels fit. The motor bracket is designed to use inexpensive sleeve bearings like these: https://www.mcmaster.com/1688K13-1688K13 The threaded rod I used was a 5/16" 8-8 Stainless Steel and 8" long, but any clean threaded rod 5/16", or even 8mm, should work. It should be about 1/2" longer than the smooth rod. I got mine from here: https://www.mcmaster.com/95412A323-95412A323 The 8mm rod that attaches to the gear wheel to raise and lower the drill motor came from the printer and is close enough to 5/16" to not matter. I cut mine so that there are splines under the lever arm only. The printed gear wheel has wide spot in the gears with a 3mm hole and space for a nut on the inside. File a matching flat spot on the rod where the gear fits. When the screw is tightened, the nut is forced into the printed gear and the screw tip is forced against the rod's flat spot, keeping the gear from turning on the rod. Assembly: It's best to assemble in this order: 1. Check the clearances of the holes using drill bits of the proper size, The ones for the sleeve bearings are 1/2" and the smooth rods are 3/8". The rest are 5/16". If they need to be drilled a little larger be carful, especially on the base and top. Don't make the holes any deeper. Also, don't run the drill any longer than needed and make the holes too wide. 1. Press the sleeve bearings into the motor bracket. They don't need a lot of force; I used a small plastic hobby vise. 2. Attach the gear wheel, 8mm rod, and lever arm to the motor bracket. The screw going through the gear has to screw into the nut and hit the flat spot on the rod. 3. Run the smooth rods through the motor bracket's sleeve bearings one at a time. IMPORTANT: do this before inserting the rods into either the base or top. If you try to install the bracket on rods installed in either the base or the top first you WILL gouge either the bearing or the rod and it will jam, needing to be freed up by hitting with a hammer. They should slide on fairly smoothly. If necessary sand the rods with some ultra-fine (around 1500 grit) sandpaper. 4. Place the drill stop on the rods. 5. Place the rods, with the drill stop and motor bracket attached, into the base. Don't worry about getting them in fully seated at this time. 6. Install the 5/16' threaded rod. I put a nyloc nut on the bottom first, but it's not necessary. The Nutholder fits on the 5/16" nut that fits in the slot in the drill-stop to raise and lower it. 7. Install the top. Tap it down enough so you can fit a nut on the top of the threaded rod. Do not use a wrench with force. The topcover has a cutout the fits over the nut and is used to tighten the threaded rod, and push the smooth rods into the base and top. I made it like this so it is damn near impossible to overtighten and break the plastic pieces. 8. Fit the motor bracket to the drill stop. Push down on the motor bracket so the screw head on the gear is showing as in the picture. The lever arm should then turn easily, lowering the drill motor. Don't force it. It might take a little light pushing up or down on the motor bracket to get it to catch. 9. Install motor. Do not overtighten the screws and break the plastic. Parts Needed: 37mm motor and power supply 2 x 3/8" smooth rod of desired height. I used 7 1/2" 1 x 5/16 threaded rod, 1/2" longer than above smooth rod. 8mm rod with splined end, about 70mm long. 3 x 5/16 nuts (1 nyloc, if desired) 2 x 3mm x 16 screws and nuts for holding 37mm motor. 2 x 3mm x 10 (or longer) and nuts for lever arm. 1 x 3mm x 8 screw and nut for gear wheel
With this file you will be able to print Another Mini-Drill Press with your 3D printer. Click on the button and save the file on your computer to work, edit or customize your design. You can also find more 3D designs for printers on Another Mini-Drill Press.