Another MPCNC Dust Collector
thingiverse
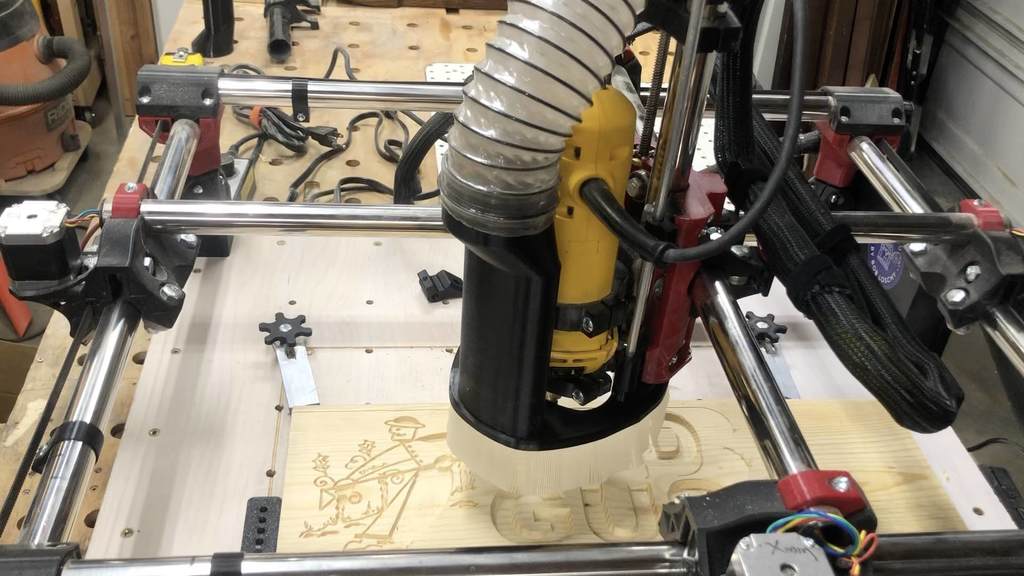
Another MPCNC Primo Dust Collector I am sharing my version of a dust collection attachment for the MPCNC Primo. I have tried several of the different designs offered and took a stab a designing my own (or course using input from, previously published designs). This was designed for use with the DEWALT DW660 tool. If you are using another router, the base and brush bracket might need to be modified to ensure clearance. NOTE: My MPCNC was built using 25.4mm stainless steel tubing. If you used conduit, thee Z-clamp parts might need to be modified to fit the conduit. The key advantages for me are: - Assembly is mounted to the core. I have had little success with designs that attach to the Z-axis frame and move up and down with the router. - Larger vacuum tube that works better for my dust collection. Also it pulls through larger shavings that can get caught in the smaller tube designs. This is designed to fit a 2.5” tube. - The shape of the tube minimizes the amount of adjustment to the X and Y zero switches for install. - The vacuum tube can be easily lifted off and used to vacuum around the workpiece manually. - The brush is printed in Sain Smart TPU and sized to push into the groove in the base. No glue required. Also the length of the bristles can be easily adjusted in the slicer using scaling. - The brush bracket attaches to the base with 8 x 3 mm magnets for easy install and removal. Parts needed: 2 - 1/4” Aluminum rods 13” long with one end tapped to 1/4” 28 pitch threads. I used a die to make the threads about 1/2 long. My rails are ~5” tall. If yours are taller you will want to make these rods longer. 2 - 1/4” 20 pitch screws ~1” long that are used to lock in the height of the assembly 20 - 8 x 3 mm magnets. I purchased mine from amazon. https://www.amazon.com/gp/product/B07B3SDRCP/ref=ppx_yo_dt_b_search_asin_title?ie=UTF8&psc=1 If you need 2 1/2” hose, I purchased this from amazon. https://www.amazon.com/gp/product/B01M35BE8D/ref=ppx_yo_dt_b_search_asin_title?ie=UTF8&psc=1 Printed parts: 4 - Core Z Clamps (1 - upper left, 1 - upper right, 1 - lower left, 1 - lower right). 1 - Base. This is threaded with 1/4” 28 pitch threads that the rods will thread into. There are also 10 pockets in the bottom in which the 8 x 3 mm magnets will be pressed into. 1 - Brush Bracket. There is a groove in the bottom to press fit the brush into along with 10 pockets in the top to press fit in 8 x 3 mm magnets. What works best for me is to press fit all the magnets into the base, then place a magnet on top of each of those already pressed in place, then place the brush bracket over the base aligning the pockets with those magnets and press in with a vise. This ensures proper mating polarity and ensures the magnets will be at the proper depth to mate well. 1 - Vacuum tube. 2 - Bristles strips. These were printed in TPU. I recommend printing some short strips and adjusting the thickness dimension (using the slicer scaling) until you get a good snug fit into the brush bracket. To adjust the dimensions of the bristles, simply scale the individual dimensions in you slicer. I ended up adjusting Z to 125% (thickness) and Y to 200% (length). Print Settings: - The Core Z clamps were all printed in PLA with .2mm layer height, 4 perimeters, 45% infill and no supports for dimensional uniformity of the holes - The base, brush bracket and vacuum tube were printed in PETG for strength using .2mm layer height, 4 perimeters, 45% infill and no supports. - For the bristles, the TPU settings used were the default in Prusa Slicer. - For all printed parts I recommend printing test pieces and adjusting the extrusion rate such that the magnets and bristles will press in firmly and the vacuum tube will slip off the brush bracket easily. Assembly - If you were successful in building an entire MPCNC, no additional instructions necessary for you. If you do have questions comment and I will respond. Note: - I can email the CAD files which were created in Fusion 360 if you want to make adjustments. Be aware that since this was an interactive design the files are pretty messy. - If I have stepped on anyones toes with this design, just let me know and I will add you to credits. 10/21/2021 - Updated corrupt BrushBracket.stl file
With this file you will be able to print Another MPCNC Dust Collector with your 3D printer. Click on the button and save the file on your computer to work, edit or customize your design. You can also find more 3D designs for printers on Another MPCNC Dust Collector.