Anti-derailing spoolholder for Prusa Mini
prusaprinters
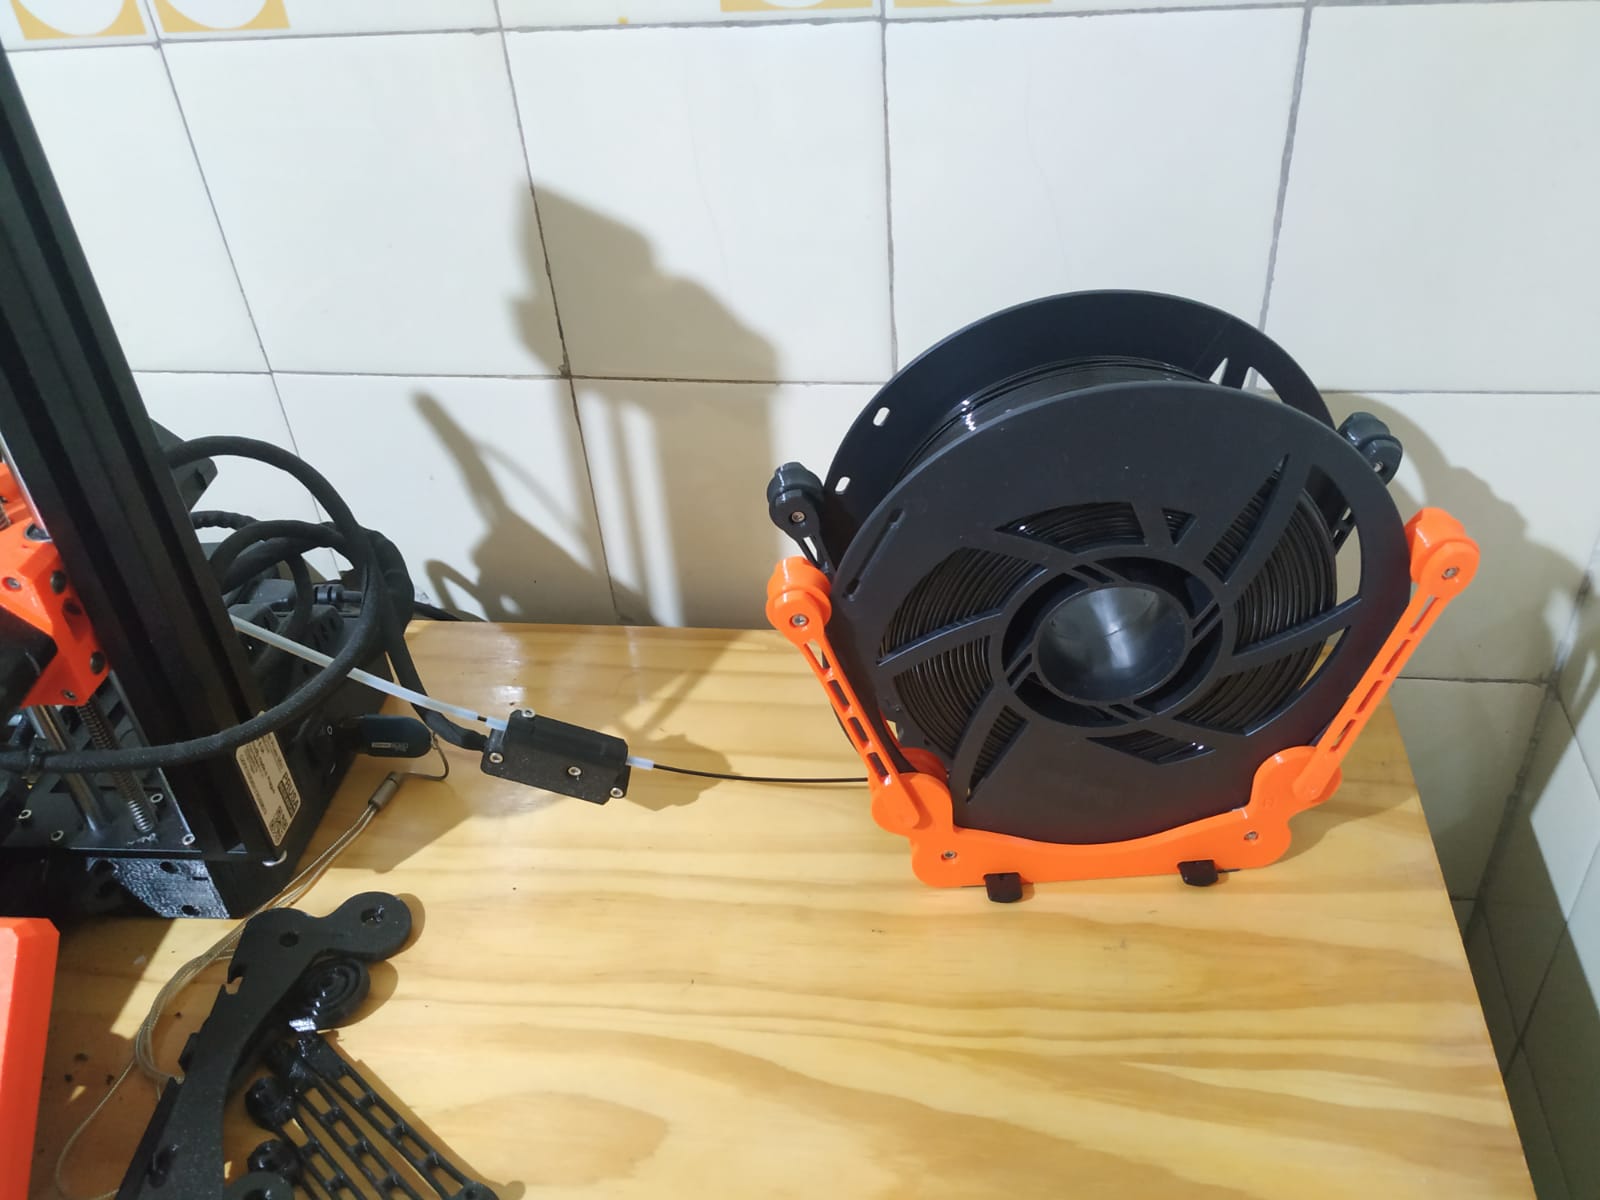
<p>It is a remix of the original spoolholder that uses printed roller arms and springs to press the spool down.</p><p>To improve the stability of the arm, the profile was divided into two halves, the lower one containing the bushing and separated by a gap of 0.20 mm, the upper one containing the printed spring.</p><p>The rollers have a slight curve to try to overcome the alignment deviations of the spool with respect to the holder.</p><p>The OnShape 3D CAD file for this are available here:<br><a href="https://cad.onshape.com/documents/49bbf8f57065cf313647f15b/w/79f602383b284972660d6f5b/e/ac18d49cb493de29b635015a?renderMode=0&uiState=6168a4756900f101d148eec0">https://cad.onshape.com/documents/49bbf8f57065cf313647f15b/w/79f602383b284972660d6f5b/e/ac18d49cb493de29b635015a?renderMode=0&uiState=6168a4756900f101d148eec0</a></p><h3><strong>Print instructions</strong></h3><p>The tests were carried out with PETG and 15% infill at 230 degrees and a flow rate of 0.98 to avoid stringing and plastic debris.</p><p>Print the gcode twice because it only contains the parts of one rail/base.</p><h3><strong>Assemble</strong></h3><ul><li>Separate the springs from the bushing where the arm pivots with a cutter or knife.</li></ul><figure class="image image-style-align-center image_resized" style="width:46.81%;"><img src="https://media.prusaprinters.org/media/prints/78854/rich_content/c9dffc5e-f522-4811-97a6-bee49c4d8ef6/separar_spring_1.jpeg#%7B%22uuid%22%3A%22710bed47-87da-42cf-a1f9-4316c0bf96e1%22%2C%22w%22%3A1600%2C%22h%22%3A1500%7D"></figure><figure class="image image-style-align-center image_resized" style="width:48.57%;"><img src="https://media.prusaprinters.org/media/prints/78854/rich_content/aa543234-a781-4003-bf9d-f108352cb4b4/separar_spring_2.jpeg#%7B%22uuid%22%3A%22a7af9eb7-7602-45cb-8213-e3abc20ac7f3%22%2C%22w%22%3A991%2C%22h%22%3A1280%7D"></figure><ul><li>For proper adjustment, clean the base hex lock with a cutter.</li></ul><figure class="image image_resized" style="width:50%;"><img src="https://media.prusaprinters.org/media/prints/78854/rich_content/06673e65-e34a-43e3-8648-10ae36e3c6f4/clean_arm_lock.jpeg#%7B%22uuid%22%3A%227bdb585b-791a-4f47-9540-55526493ab5d%22%2C%22w%22%3A978%2C%22h%22%3A1280%7D"></figure><ul><li>For proper adjustment, clean the pin hex lock on the arm with a cutter.</li></ul><figure class="image image_resized" style="width:50%;"><img src="https://media.prusaprinters.org/media/prints/78854/rich_content/cbebf74c-f26e-444a-9fef-3a2ea0d91d48/clean_arm_lock_1.jpeg#%7B%22uuid%22%3A%224496c97c-bc06-463e-b813-399696ebf8df%22%2C%22w%22%3A1280%2C%22h%22%3A747%7D"></figure><ul><li>Insert the arms (L and R) into the base, pressing gently until the pin hexagon is in level with the spring.</li></ul><figure class="image image_resized" style="width:50%;"><img src="https://media.prusaprinters.org/media/prints/78854/rich_content/c55ee891-53ee-456e-a659-da1a1f0bd291/insert_arm_left.jpeg#%7B%22uuid%22%3A%22c805cb70-1c72-4d15-9e50-2bd520168c47%22%2C%22w%22%3A1280%2C%22h%22%3A1165%7D"></figure><figure class="image image_resized" style="width:50%;"><img src="https://media.prusaprinters.org/media/prints/78854/rich_content/acf08b92-839e-4016-9e00-84b14458cc40/level_arm_left.jpeg#%7B%22uuid%22%3A%22cfe782c4-0ecd-45cb-85c3-70b99293ab8e%22%2C%22w%22%3A1014%2C%22h%22%3A1280%7D"></figure><ul><li>At this stage you should have the following materials to assemble a base half: two bearings 608Z, two M3x12, two M3x20, and four M3 nuts, plus the printed parts.</li></ul><figure class="image"><img src="https://media.prusaprinters.org/media/prints/78854/rich_content/c452e759-c96e-40db-9011-c9076a492d6a/need_parts.jpeg#%7B%22uuid%22%3A%22baae33e1-142a-4610-adad-e2d54b040848%22%2C%22w%22%3A1600%2C%22h%22%3A793%7D"></figure><ul><li>On the right side aided by the screws insert the M3x1.9 nuts.</li></ul><figure class="image image_resized" style="width:50%;"><img src="https://media.prusaprinters.org/media/prints/78854/rich_content/40983149-6549-45a7-b51f-b77e3a2b917b/insert_nuts.jpeg#%7B%22uuid%22%3A%22345785ac-6bff-443e-bc6e-212c822dde30%22%2C%22w%22%3A616%2C%22h%22%3A1280%7D"></figure><ul><li>In one of the base halves put the two bearings and rollers.</li></ul><figure class="image image_resized" style="width:75%;"><img src="https://media.prusaprinters.org/media/prints/78854/rich_content/1cf825e8-0ce9-4e7c-8b46-aa757730989a/insert_bearings.jpeg#%7B%22uuid%22%3A%226f957185-87a7-4818-aaeb-53f3042fff7f%22%2C%22w%22%3A1280%2C%22h%22%3A1098%7D"></figure><ul><li>On the left side put the M3x20 screw at the top and the M3x12 screw at the bottom, tighten moderately.</li></ul><figure class="image image_resized" style="width:50%;"><img src="https://media.prusaprinters.org/media/prints/78854/rich_content/c7126df3-caff-4e2f-b0d5-59b2e203e74a/screw_m3.jpeg#%7B%22uuid%22%3A%22aac8036d-962f-40d6-a90b-78e4216367b3%22%2C%22w%22%3A504%2C%22h%22%3A1280%7D"></figure><ul><li>When you finish tightening the screws on both halves, the rail should look like this.</li></ul><figure class="image image_resized" style="width:50%;"><img src="https://media.prusaprinters.org/media/prints/78854/rich_content/9b8969bd-a3d3-4678-84d3-b066c5af83ce/one_rail.jpeg#%7B%22uuid%22%3A%22f3d1d582-454d-48b3-873e-54e3b3cfea2f%22%2C%22w%22%3A726%2C%22h%22%3A1280%7D"></figure><ul><li>Two base halves and four M3x8 screws are required to assemble the rails.</li></ul><figure class="image image_resized" style="width:75%;"><img src="https://media.prusaprinters.org/media/prints/78854/rich_content/955d656e-7b4c-4be7-a63b-530aa8aeaf96/asemble_parantes.jpeg#%7B%22uuid%22%3A%2202366ab5-8278-4674-973a-deda26e48d9b%22%2C%22w%22%3A1600%2C%22h%22%3A864%7D"></figure><ul><li>Screw the four M3x8 as shown in the figure.</li></ul><figure class="image image_resized" style="width:50%;"><img src="https://media.prusaprinters.org/media/prints/78854/rich_content/607af3ec-c37a-4402-a309-0bc987776421/screw_m3_in_rail.jpeg#%7B%22uuid%22%3A%22fc63d897-388d-45ab-9bb3-73f2b0242847%22%2C%22w%22%3A810%2C%22h%22%3A1280%7D"></figure><ul><li>Insert the rails as shown in the figure on both bases. Verify that the rails can be moved to fit the width of the spool.</li></ul><figure class="image image_resized" style="width:50%;"><img src="https://media.prusaprinters.org/media/prints/78854/rich_content/4068d702-2fa7-4d20-8989-d3368311897e/insert_rails.jpeg#%7B%22uuid%22%3A%22d4e46945-9058-48bd-9e1e-23692fb7e38d%22%2C%22w%22%3A1599%2C%22h%22%3A899%7D"></figure><ul><li>Attach the 4 anti-slip pads of approximately 14 x 19 mm.</li></ul><figure class="image image_resized" style="width:75%;"><img src="https://media.prusaprinters.org/media/prints/78854/rich_content/468617bb-2e28-4def-8191-1004a14471e0/ant-slip_pads.jpeg#%7B%22uuid%22%3A%22d55458ad-a29f-47ad-a3b5-fc3964d81b79%22%2C%22w%22%3A885%2C%22h%22%3A1280%7D"></figure><ul><li>The finished spoolholder should look like this.</li></ul><figure class="image"><img src="https://media.prusaprinters.org/media/prints/78854/rich_content/335a0de7-1f70-430f-bb4a-b9242ec7de63/look_complete.jpeg#%7B%22uuid%22%3A%22a4655a41-ef9f-4b26-8be5-f64104eca9ce%22%2C%22w%22%3A1261%2C%22h%22%3A1280%7D"></figure><p> </p>
With this file you will be able to print Anti-derailing spoolholder for Prusa Mini with your 3D printer. Click on the button and save the file on your computer to work, edit or customize your design. You can also find more 3D designs for printers on Anti-derailing spoolholder for Prusa Mini.