Anti Wobble Z Nut Mount for Lulzbot Taz 4 or 5 Printers
thingiverse
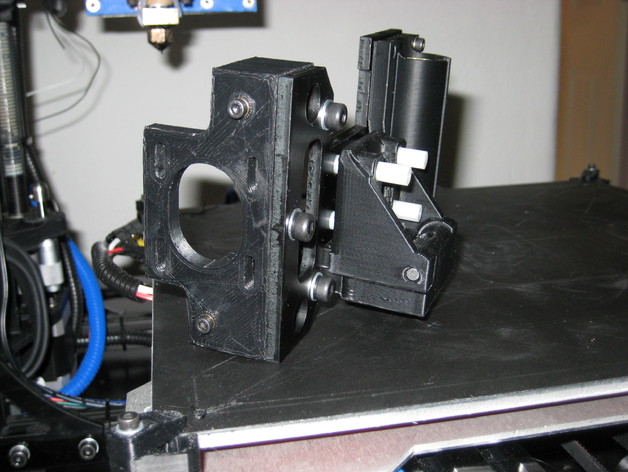
This project is aimed at eliminating the minor Z banding or Z wobble you may encounter when printing with the stock Taz 4 or Taz 5 printers. This is a bolt on upgrade, no firmware or frame modifications are required. Build thread is here: https://forum.lulzbot.com/viewtopic.php?f=16&t=2476 Video with more information about the unit is available here: https://youtu.be/yokdL-T7lW4 Edit 1: Uploaded new files. The bearing holder now has the correct size feet. The changes to the other two parts are mostly cosmetic to address reports of issues with the STL's. if you have previously successfully printed the parts you do not need to reprint them. Edit 2: Uploaded new easier to insert igus bearings lower file Anti_wobble_z_nut_bottom_8_8. Its otherwise identical to 8.7. This file makes it much easier to get a smooth free floating igus bearing with a resonably well dialed in printer. Print Settings Rafts: Doesn't Matter Supports: No Resolution: I used a 0.50mm nozzle with average layer height Infill: 85% or better Notes: This is a structural piece, I printed mine in ABS. PLA should work, but may not be strong enough for long term use. Post-Printing Instructions You will need the following parts: 6 M5 heat set inserts http://www.mcmaster.com/#94180a361/=zhts4o 4 3/16" 1 and 3/4" long steel shafts (locally sourced from Ace Hardware) 8 Igus 2MTRI MYI-03-03 Flanged Bearing, 3/16" IDx 3/16" L (ebay) 8 1/4" threaded nylon spacers, at least 1/2" length 8 bolts that will fit the threaded nylon spacers Print the replacement double bearing nut holder, Upper and lower mount block pieces x 2 (one for either side). Using a 1/4" drill, gently and precisely bore out the 4 1/4" holes in the upper mount block where the nylon pins will go, using a nylon pin as a guide. it should move freely in and out, with no wobble or excess play. if it feels like it is dragging on the surface, you need to clearance it more. if it feels like it can wiggle back and forth, you need to start over and print that part again. Insert the 3 heat set inserts into each half of the lower mount block. They should end up just flush with the surface. Once the lower block cools off, insert 4 of the Igus bearings into their mounting holes on the tabs. There is a slight recess inside the face that the outer tabs lock into. you will probably have to compress the bearing a bit to get it to go in. Then use one of your steel 3/16" shafts to set the bearing into place and ensure it is seated properly. You should be able to smoothly move the rod back and forth in the hole, with minimal drag. if the bearing seems to bind, use a small slot head screwdriver to rotate it in the socket for a better fit. Place the lower half into the upper half and insert the smooth rods. Friction on the end pieces will hold the rods in place. Remove the stock Z bearing holder from your Taz. It can be helpfull to temporarily remove the leadscrew as well at this point. Retain the M5 bolts for the leadscrew as well. Line the new Z nut mount up in the same location the old one was at, then install the 4 nylon posts and bolts. They will self center in the holes. Ensure they are down and tight, but not so tight that the bases mushroom out. . Bolt the leadscrew nut to the heat set inserts using the stock M5 bolt hardware. Swap the Double bearing holder for the new unit. Make sure the smaller tabs are down towards the heat bed. Reuse the stock bearings and hardware. Your Z nuts will stick down lower than they did before this upgrade, but there should be enough room for them to fit. You should not have to modify anything else. Happy Printing!
With this file you will be able to print Anti Wobble Z Nut Mount for Lulzbot Taz 4 or 5 Printers with your 3D printer. Click on the button and save the file on your computer to work, edit or customize your design. You can also find more 3D designs for printers on Anti Wobble Z Nut Mount for Lulzbot Taz 4 or 5 Printers.