Antweight Robot Arena & 80/20 Bracketry
thingiverse
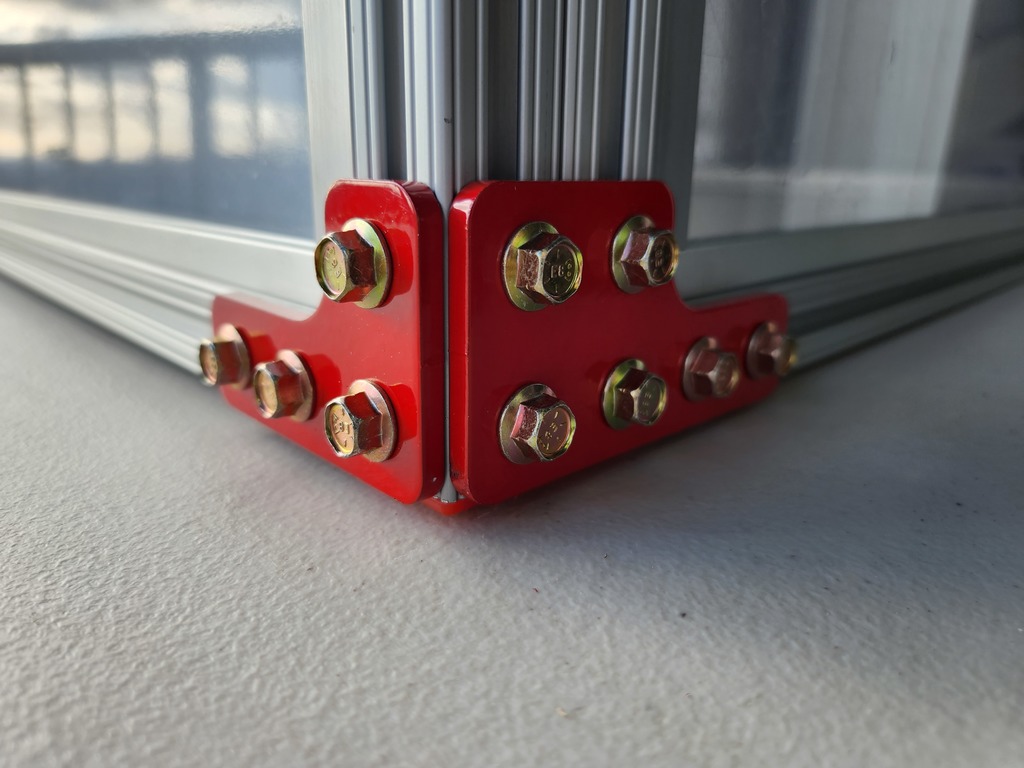
Bracketry: This is the set of bracketry that I designed and had cut by Send Cut Send for 80/20 framing system based combat robot arenas. Material Choice: 3/16" 5052 Aluminum. There are two separate parts labeled 2x3 Bracket. One is L-shaped for connecting a 1010 to a 1010 frame. The other is rectangular for connecting a 1010 to a 1020 frame. 2x4 bracket can either connect a 1010 to a 1020 or can be used at the corner of a 1010 series. *** Proposed 4x4x2 Arena: There is also an Excel file for a proposed 4x4x2 arena using the methodology of dropping 1/4" polycarbonate into the slot in 10 series 80/20 framing. 80/20 Door Track is used for one side of the proposed arena (same method as the arena in the attached photos. The polycarbonate cuts are: Three (3) pcs 24" x 48" of 1/4" polycarbonate Two (2) pcs 23.1" x 24" of 1/4" polycarbonate Locking method and roof attachment method were not developed in this proposal. The C700 sawhorses and 1 set of 2x4s create an adjustable height platform which can support a lot of weight. If you can cut the aluminum yourself and deal with 20 ft long pieces of material, it is cheaper to order the 1010 from Zoro.com as they have free shipping in continental U.S. and a 20% off coupon that is emailed out after roughly 4 days. Otherwise, order cut pieces from 8020.net. 80/20 Parts Part No. 1010 - Eight (8) 47.3 inch pieces (Horizontal) Part No. 1010 - Eight (8) 26 inch pieces (Vertical) Part No. 2211 - One (1) 47.3 inch piece (Door Top) Part No. 2211 - Two (2) 22.1 inch pieces (Door Sides) Part No. 2221 - One (1) 47.3 inch piece (Door Bottom) Part No. 3280 - 44 Pieces (Double T-Nuts) (incl. 4 spares) It is cheaper to use single T-nuts, but they are a pain with this style of bracket to get aligned. I recommend spending the extra $20 to get doubles (Part No. 3280). I use McMaster-Carr Part 90602A210 for the screws and a 3/8" magnetic nut driver to install them. This was done because my original Torx black oxide screws rusted after a couple years in a garage and looked bad. *** Arena in the Pictures: This is my arena for Honolulu, HI. It uses 26" high polycarbonate which increased the cost by around $300. It also uses 80/20 door track for all 4 sides rather than only one like in the proposal. This will allow me to add another layer of polycarbonate to all non-door sides for beetleweight testing or if antweights get even scarier. The use of door track on all sides increased cost by around $200. Wood: The arena in the pictures has 2x3 bumpers and the roof and floor are 3/8" Russian Birch plywood which originally were 5 ft x 5 ft sheets. The left overs were used to make the roof supports. I have not bought a sacrificial 1/8" hardboard floor yet. I might also use a cheap laminated flooring for a classier look. Bots get stuck in softwood bumpers, but I just wanted to get the project complete. You need an unstick rule if you have softwood bumpers. I will probably glue 1/8" stainless steel or 3/16" aluminum to the inside of the bumpers once I feel like spending the money. Stand: It is sitting on Home Depot 72" x 30" folding tables. This is a similar cost and weight but is less strong than the sawhorse method. I just already had them. The park has concrete picnic tables that I will try to use. Locking: I used 3/16" x 1" Aluminum bars in my last 6x6x2 arena (Houston) to lock the arena. The bars are dropped into the lower door track slots to keep them from sliding open. The bars should be painted in a bright color.
With this file you will be able to print Antweight Robot Arena & 80/20 Bracketry with your 3D printer. Click on the button and save the file on your computer to work, edit or customize your design. You can also find more 3D designs for printers on Antweight Robot Arena & 80/20 Bracketry.