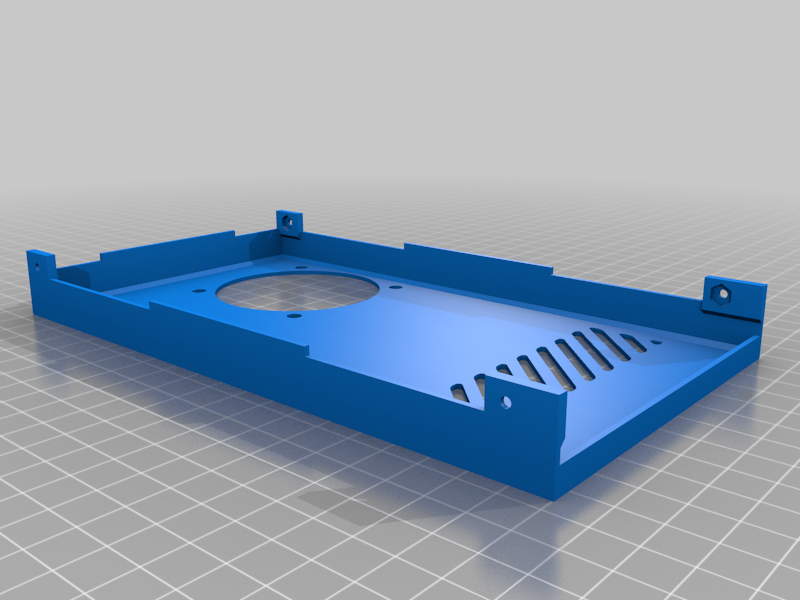
Anycubic 4Max Pro 2.0 - 25mm fan PSU cover
thingiverse
As the stock cooling fan for the is quite loud, I decided to install a Noctua NF-A6X25, however the PSU case doesn't have enough clearance for a bigger fan. This mod actually will work for any 6025 fan, but keep in mind that the original one is about 16 cfm, or 27 m3/h. Although the PSU doesn't run very hot and the fan is not switched on at all times, you still might consider this parameter when choosing a replacement. **Print notes** ----------- Turn off suports when printing, as the few overhangs are at 45 degrees and are very small. If you'd like, you might paint/enforce supports inside the screw holes, however it is not necessary. **Model Variants** ---------------- There are four variations of the model - a couple with a Fan guard/grill, and a couple without the guard/grill. Each couple has a variant with opening for a press fitted M3 nut and with plain 2.5mm hole. _!!! I haven't tested the model with openings for press fitted nuts !!!_ - If you decide to go for the models without nuts, I strongly advise you to redrill the mounting holes with a 2.5mm, or a 3/32 drill bit, which is slightly smaller than 2.5mm. You can go up to a 7/64 drill bit, however it's on the larger side and your screws might fit somewhat loosely, although it doesn't really matter. - If you go for press fitted nuts, you have to use your own M3 bolts, instead of the original self tapping screws. You'll need 10-15mm flat/countersunk bolts. I think anything up to 20mm (3/4 inches) should be fine, without touching any of the electronic components inside the PSU. *Grill or no grill* Although I printed my cover with a grill, I don't think it's necessary, as the printer's plastic cover has its own fan guard. Printing the model without the grill will give you faster print time, so it's a win if you ask me. If you change your mind on a later stage, you can always print your own grill and press fit it inside the opening of this one - its diameter is 59mm. **Getting to the PSU** ------------------ You'll need 2mm, 2.5mm and 3mm allen keys, and a no 2 phillips screwdriver. You have all three of them in the toolkit that came with your printer. - Disconnect the main power cable from your printer - Locate and unscrew four 2.5mm allen key screws on the inside of your printer - at the bottom you'll see where the PSU's case is. - Turn it on its side (the side with the USB port and SD card slot). **DO NOT** forget to disconnect the USB cable and remove the SD card, before doing this - Unscrew the eight bolts on the bottom of the printer - four of them are in the rubber feet - use the 3mm allen key for them, the other four need the 2.5mm allen key - Remove the bottom cover - Unscrew the four screws at the bottom of the printer's PSU panel - Unscrew the three screws at the back of the printer panel, that are closest to the printer's PSU side (although not necessary, this helps with getting the side off) - The PSU side of the printer's enclosure is now held only by 6 clips - 3 on each side (back and front). If you pull the back panel away from the printer case, you'll see how the side panel clips are being held - You should now be able to pull the side panel off the printer. It takes quite some force to unclip these clips, but please remember - this is not Excalibur - Behold - the PSU is in front of you - I did not remove any cables from the PSU while doing all of this. It can get a bit fiddly, but I'm sure you'll be able to do it without taking the PSU entirely out of the printer. - Pull the PSU out a bit, without straining the cables - Unscrew the four screws holding the PSU's cover - two on each of its long sides - **BEYOND THIS POINT, THE MAIN CAPACITORS ARE EXPOSED AND YOU SHOULD BE CAREFUL NOT TO TOUCH THEIR LEADS, AS THEY CAN HOLD ELECTRICITY FOR LONG PERIODS OF TIME** - Remove the cover, but be careful, as the fan is still attached to it, and its cables - to the PCB - Unplug the fan - Unscrew the two screws that hold the fan **Mounting the fan** ------------------ - Use a 5mm or 7/32 drill bit to redrill the fan mounting holes. If you don't, the fan screws might fit a bit tight, depending on your print - **I THINK** you should be able to use the rubber "screws" that come with the Noctua fans, however getting them through the 5mm mounting holes might be tough. However I don't think this is needed - I mounted my fan using only the two original screws - Please make sure the fan is oriented correctly and blows **towards** the PSU PCB. All fans have markings on their side, showing rotation and blowing direction, if the fan is connected properly - red to + and black to ground **Connecting the fan** ---------------- - Please take note of the orientation of the red and black wires of the original PSU, as reversing them will result in your fan not blowing the way it's supposed to - If your fan comes with three wires, instead of just two, you'll be using only the red and black ones, you won't need the yellow one, but I suggest that you don't snip it - Using a small screwdriver, you can remove the pins inside of the connectors. Please refer to this video for visual explanation: https://youtu.be/q1mzuaFN4sI?t=195 (3 min 15 sec into the video) - You'll need to take the white heat insulation tube from the original wires and install it around the new fan wires. You'll have to do that *before* taking care of the connectors, otherwise you'll have to disconnect the wires all over again Although I have my own connectors and brand new female pins that go inside them, that are the same as the one used in the PSU, I decided to not cut and re-crimp the Noctua's cables. Yes - I reused the original Noctua pins that go in their black 3-pin connector - just pressed them in the white PSU connector and plugged it on the PCB's male connector. The tension is good enough so that the connector won't come loose. **Reassembly** --------------- Read the **Getting to the PSU** part backwards, lol
With this file you will be able to print Anycubic 4Max Pro 2.0 - 25mm fan PSU cover with your 3D printer. Click on the button and save the file on your computer to work, edit or customize your design. You can also find more 3D designs for printers on Anycubic 4Max Pro 2.0 - 25mm fan PSU cover.