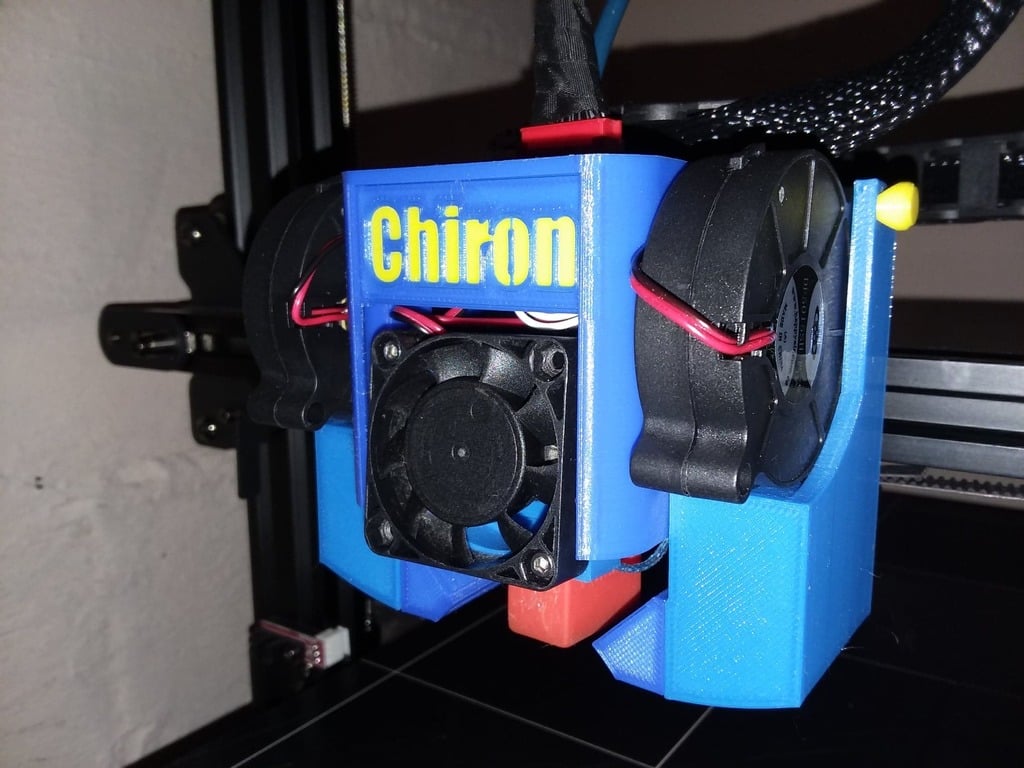
Anycubic Chiron V6 + Volcano (or stock) dual 5015 fan, With changeable blower attachments.
thingiverse
This is for dual 24V 5015 fans it doesn't support the bed probe and uses one of the probe screw holes to attach the mount. I have not tested this with the stock hotend but it should work, V5 heater block is slightly wider Vs the V6 but can easily design shallower connectors for the V5 if needed. Note: On 10/24/19 I've add a new Left and Right blower with a 15.5mm opening for the 5015 fan the older blower 1.0 and 2.0 opening is 14.68mm. In your slicer settings check the scale is 2540% for all parts. The screws that hold the probe are longer so if you choose to use them to hold the mount I'd advise to only use them for the top holes it's close but when going all the way through the bottom mount and plate they could scrape the extrusion. Currently using the stock 4010 fan for the heat sink. I designed the 40mm fan duct that can be found here: https://www.thingiverse.com/thing:3609827 You will need to cut the stock part cooler fan wire since the new 5015 connector doesn't fit the on the PCB board. You can solider the 5015 wires or make a connector as I did for easy removal. (see picture) I made two different mounts version 1.0 and 2.0, difference is the way you slide the attachment in personally like the cleaner look from the back (1.0) also depending on PLA or PETG you might need to use mini files to sand the edges so the connectors can slide effortlessly. Key points: 1. Use with the stock hotend or the E3d V6 + volcano (currently installed). 2. Able to interchange the blower and if they show any ware and tare you can just print a new one Vs printing a complete mount. Cover update: 5/11/19 The pins and logo are printed in 60% You will use two each of the dowel pins 1 and 2, the pin 2 pops in place and can be hot glued or melt them in using a solider gun so they don't come out. No screws are necessary to hold the PCB board it just slides in. Assembling the Cover: Step 1. Slide the logo and back into the cover. Step 2: Fully tighten the left blower. Step 3: On the right blower lightly screw in the top one just enough for it to move freely. Step 4: Assemble pins 2 into the cover, glue in if you wish and slide the pin into the left blower hole than place the other pin into the right blower and tighten up the right blower screws. Step 5: Make sure ALL wires are out of the way carefully bring up the cover and slide the PCB board into the slot. Step 6: Once the cover is in a vertical position and blower fans are seated in slide pins 1 into the mount and fans. Enjoy!
With this file you will be able to print Anycubic Chiron V6 + Volcano (or stock) dual 5015 fan, With changeable blower attachments. with your 3D printer. Click on the button and save the file on your computer to work, edit or customize your design. You can also find more 3D designs for printers on Anycubic Chiron V6 + Volcano (or stock) dual 5015 fan, With changeable blower attachments. .