Anycubic I3 Mega, Multicolor Upgrade, 3 colors
thingiverse
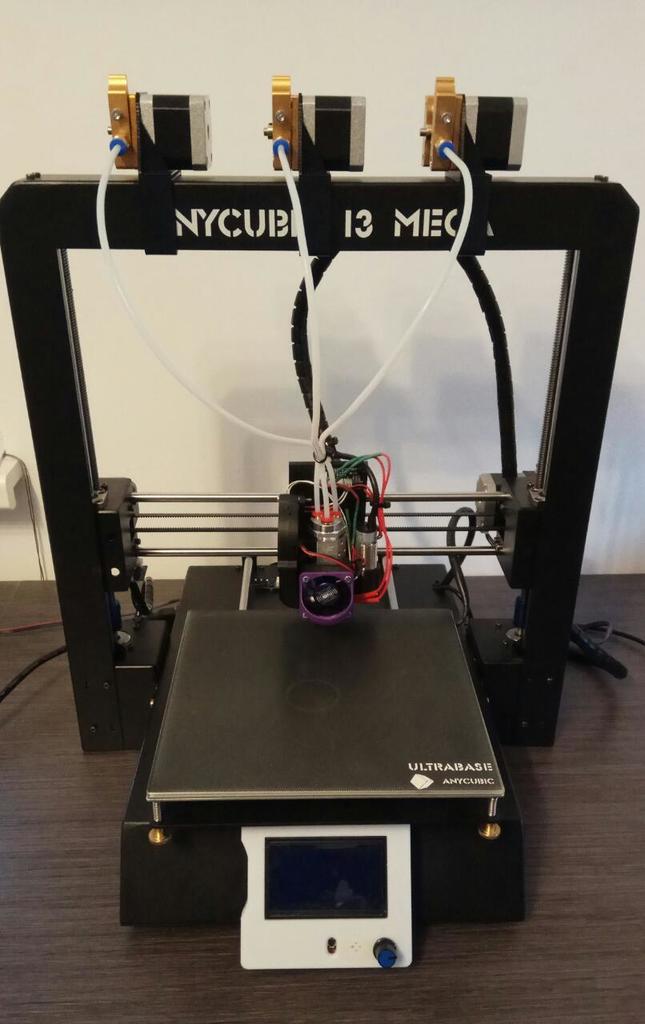
This is a comprehensive guide for modifying an AnyCubic I3 Mega 3D printer to allow multicolor printing, specifically a two-color and three-color setup. The modification involves installing a new hotend and mainboard, as well as flashing the firmware. Here are the key points from the guide: 1\. BOM (Bill of Materials): Take a look at the list of parts required for this modification, order them, print the necessary parts, build the new hotend on a table, and assemble everything. 2\. Installation: Install the new hotend into the printer, insert the mini PCB and connect the cables from the original extruder to the new mainboard. Flash the firmware onto the new motherboard using an Arduino DuPont cable. 3\. Calibration: Loosen the X-rod, move it apart, replace the hotend, insert the X-belt under tension into the "x-belt-holder", plug the connectors for the fan, heating element, and thermal sensor onto the mini PCB. Home the hotend by hand and adjust the Z-axis. 4\. Filament Management: The guide recommends using the external program Filaswitch to manage filament flow during multicolor printing. This involves setting different speeds and lengths used for cooling inside the hotend. To use Filaswitch, transfer two "s3d - * - section.txt" files into Simplify3D. 5\. Tips and Warnings: \* The modification requires a new mainboard and firmware flashing, so familiarity with these tasks is assumed. \* Use Arduino DuPont cables for connectivity. \* Plug the external display into the new motherboard after installation. \* Flashing the new firmware onto the motherboard is necessary. \* Loosen the X-rod, move it apart, replace the hotend, insert the X-belt under tension into the "x-belt-holder", and plug the connectors for the fan, heating element, and thermal sensor onto the mini PCB. \* Home the hotend by hand and adjust the Z-axis to avoid crashing into the Ultrabase. \* The 2-colored frog print was challenging due to filament flow issues. Installing Filaswitch can help manage this. \* If using Filaswitch, create gcode without a waste tower, as it will be handled by Filaswitch. \* Insert the first filament normally and the second filaments at the point marked with a ballpoint pen (Figure 4). \* Congrats! You're done. Have fun printing.
With this file you will be able to print Anycubic I3 Mega, Multicolor Upgrade, 3 colors with your 3D printer. Click on the button and save the file on your computer to work, edit or customize your design. You can also find more 3D designs for printers on Anycubic I3 Mega, Multicolor Upgrade, 3 colors.