Anycubic i3 Mega S X carriage belt tensioner (NO MODIFICATIONS)
thingiverse
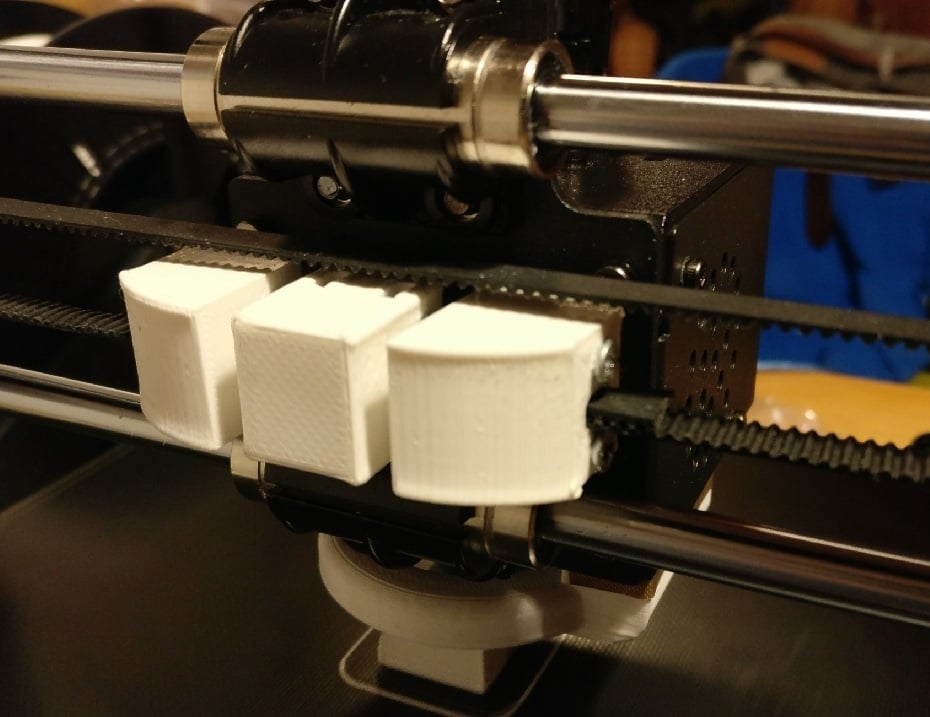
# Anycubic i3 Mega S X-Belt Tensioner ## *with **NO MODIFICATIONS** necessary! I designed this **X-axis belt tensioner** to fit onto an **Anycubic i3 Mega S** because there isn't one that I could find readily available on here. You can install this onto a stock Ai3MS with **no modifications necessary** to the current fixture. No need to remove hotend or modify/cut any parts. Just undo the belt and reinstall it with the tensioner assembly. You will need to buy some screws and nuts though. ***Bear in mind that if you use the original belts on the machine, the installation can be a bit of a struggle.*** Use your own judgement a far as print setting goes as only you can determine the right settings for your machine to print dimensionally-correct parts. I printed on **0.2mm/30% infill**/with hole expansion feature, coasting etc. At minimum at least do some calibration on the extruder etc, PID tune, bed level etc. You'll suffer print quality with loose belts so maybe MacGyver it until you can get these parts to get your belts tight! Printed on PLA but will be printing this in PETG and ASA later. I just finished the design a couple of days ago and have gone through a few iterations to adjust the fit. Originally this was designed with M2 bolts and fasteners due to the really limited space. However, due to COVID, the stores that I can get to only carries M3 sized nuts and bolts as their smallest. So for the moment, this is the COVID release model. I can release the 2mm models when requested but since I haven't tried printing them yet, I rather not have it as a general release. ### **INSTALLATION:** You will need: - 4 x M3 nuts - 4 x M3 x 25mm screws (**Allen head** is most **preferred**, in a pinch you can use ***Philips (+) screws*** but it will be a ***pain in the ass*** to install, trust me on this). > You **may have to bore out the holes** a bit before you start screwing it all together. The **screw** should **move freely** in and out on both left and right side **clamps**. Line up the nuts so when the screw goes into the mainblock it is straight. You will need to **press fit the nuts** into the **mainblock**. Some force is required here. The reason **it is tight** is so that the nuts don't spin when you try to install your tensioner later (trust me, I know, I've printed about 10-15 iterations of this part by now. . .). This is not simply an imaginary 3D model design. It is a fully tested, proven, installed, tweaked design. So to install, you start with the **left** or **right** side (**choose one**). 1. **Cut all the cable ties** that are securing the belts at the moment. Sometimes the belt will jump out of the pulley (actually, they will, maybe you'll just get lucky and they won't but it is easier to install the first clamp with the belts off the pulley). 2. **Mount the mainblock** by pushing it into the middle. There's a ***cut-out on the bottom*** to account for the bearing mounts. This should help you align it, but you don't have to be anal about it. 3. Take one end of the **belt, put it through the back of the left or right clamp** (**NOTE:** there is a **correct side up**, it is **slightly taller** on the top of the clamp than it is on the bottom -- designed this way due to clearance space). With the **belt off**, now is also a **good time to inspect the pulley** to make sure it is **not wobbling and is rolling smoothly**. 4. Now snake this **belt under the square hole** of the hotend assembly just like how it was installed before you took it apart. **Loop it over** and put it back into the clamp on the front side. 5. Try and adjust the belt so you have a small loop where the square hole of the assembly is so you can **insert the dowel inside the loop**. Once set correctly, it should sit just within the cavity of the square hole with the belt running around it (just like how a belt would run around a pulley). 6. **Adjust the belt** by pulling back on it so that you only have a **little bit of belt biting on the dowel** and the clamp (***you will need the extra slack to install the other side*** or you'll be pissing and moaning later). Push the clamp towards the mainblock but not all the way, insert the two screws and screw into the mainblock to secure the clamp into place. 7. **Go to the other side, do the same thing** as you did for the first clamp (after you loop the belts back onto the pulley and the motor gear a few times as it will probably want to keep falling off). Now, if you did this right, you ***should have enough slack where the belt sticks out enough*** out the back where you can **pull on it to pre-tension** the installation **before you screw the whole assembly together.** 8. You don't want it flopping around because you only have a very **small area for you to pull the belts inwards** toward the mainblock to tension up the X-axis drive. So try and ***get as much pre-tension as possible*** while you're installing the tensioner as mentioned in Step 6. 9. Just start **screwing in the screws towards the mainblock.** Be sure to do it where you screw a bit on the bottom, and a bit on the top and back and forth, left and right as well. The clamp will push on the belt and dowel as it moves toward the mainblock and tighten up your belts. ### Thanks for looking and using this! ### If you like my design, and are feeling generous, feel free to leave me a ***tip***! ### Check my page out for ***more designs*** as I continue to create stuffs! # Happy **3D-ing!**
With this file you will be able to print Anycubic i3 Mega S X carriage belt tensioner (NO MODIFICATIONS) with your 3D printer. Click on the button and save the file on your computer to work, edit or customize your design. You can also find more 3D designs for printers on Anycubic i3 Mega S X carriage belt tensioner (NO MODIFICATIONS).