Anycubic I3 Mega Z Brace - Arm
thingiverse
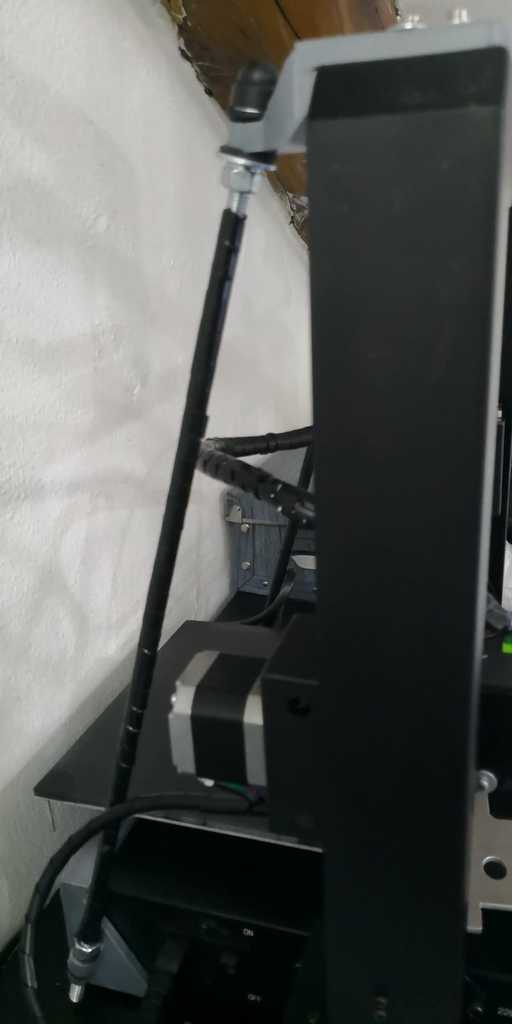
Ho creato questi z brace, perchè la i3 mega purtroppo ha un asse z molto ballerino, e le vibrazioni derivanti si riflettono sulla stampa. Per il corretto montaggio sono richiesti per ogni lato: 50 cm barra filettata M8 4 dadi autobloccanti M8 (possono essere usati anceh dadi normali ma autobloccanti non si sposteranno con le vibrazioni) 4 grosse rondelle 4 oring o guarnizioni di dimensione pari alle rondelle o similare (opzionale) viti m3 rondelle m3 Il montaggio è semplice ed intuitivo, e per lo più sfrutta viti già presenti anche se dovranno essere sostituite da viti più lunghe in alcuni casi. Per i pezzi inferiori, essendo poche le viti originali a disposizione, le soluzioni per renderli davvero solido sono due, la prima fare un foro al centro e mettere una vite passante con dado, la seconda (io ho adottato questa) è che prima di avvitare le viti, sulla parete grande e liscia venga applicato un po di silicone, in futuro facendo leva senzsa viti sarebbe comunque possibile rimuovere il pezzo, ma nel frattempo eviterebbe fori. A prescindere i pezzi inferiori in realtà reggerebbero abbastanza perchè la forza è sviluppata in diagonale e il pezzo se stampato correttamente ha un horte incastro verticale, ma con questi accorgimenti è meglio. Molto importante mettere sotto ogni vite m3 una rodella, in modo che la forza venfa ripartita sul pla su una superficie più grande rispetto alla vite o si spaccherà. Infine gli oring andrebbero inseriti tra le rondelle e i componenti in pla (petg o abs),questo per due motivi il primo è per preservare il materiale anche stringendo i dadi con forza, il secondo perchè fornisce uno "sfogo" per le vibrazioni della macchina. AGGIORNAMENTO: aggiunte due mount per spostare il blocco spingifilo, in quanto salendo l'asse x, il motore poteva toccare lo zbrace. La mount di tipo 1 sposta il blocco dritto, e necessita di 4 viti m4 e due dadi m4 la mount di tipo 2 sposta il blocco e permetti di metterlo in posizione inclinata creando anche meno tensione sul ptfe e creando una angolazione più naturale a mio parere. layer 0.2 infill 100% I'm sorry for English, but I do not have time to rewrite the text in Ingloese, so to speed up use of the translator, then when it will be possible I will rewrite it correctly. I created these z brace, because the i3 mega unfortunately has a very z-axis dancer, and the resulting vibrations are reflected in the print. For the correct assembly are required for each side: 50 cm threaded bar M8 4 M8 self-locking nuts (can be used as standard but self-locking nuts will not move with vibrations) 4 large washers 4 orings or gaskets of equal size to the washers or similar (optional) m3 screws washers m3 The assembly is simple and intuitive, and mostly uses screws already present even if they must be replaced by longer screws in some cases. For the lower parts, since there are few original screws available, the solutions to make them really solid are two, the first to make a hole in the center and put a through screw with nut, the second (I have adopted this) is that before screwing the screws, on the big and smooth wall a little bit of silicon is applied, in the future, leaning without the screws would still be possible to remove the piece, but in the meantime it would avoid holes. Regardless the lower pieces actually hold up enough because the force is developed diagonally and the piece if printed correctly has a vertical interlocking horte, but with these tricks it is better. It is very important to put a rodella under each m3 screw, so that the force is distributed on the pla on a larger surface than the screw or it will split. Finally the orings should be inserted between the washers and the components in pla (petg or abs), this for two reasons the first is to preserve the material also tightening the nuts with force, the second because it provides a "vent" to the vibrations of the machine. UPDATE: added two mounts to move the thrust block, as by going up the x axis, the motor could touch the zegace. The Type 1 mount moves the block straight, and requires 4 m4 screws and two m4 nuts the type 2 mount moves the block and allows you to put it in an inclined position, creating even less tension on the ptfe and creating a more natural angle in my opinion. layer 0.2 infill 100%
With this file you will be able to print Anycubic I3 Mega Z Brace - Arm with your 3D printer. Click on the button and save the file on your computer to work, edit or customize your design. You can also find more 3D designs for printers on Anycubic I3 Mega Z Brace - Arm.