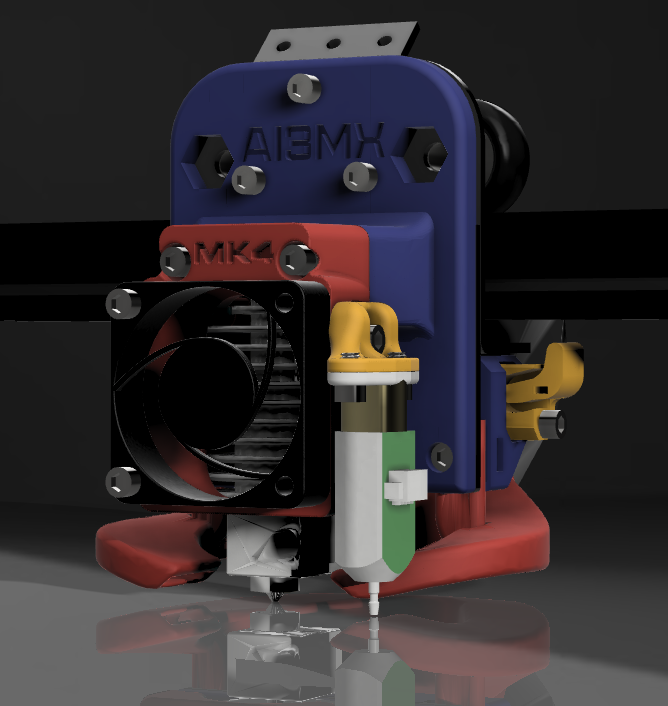
Anycubic Mega-X MK4 X-Carriage
thingiverse
X-Carriage to support mounting the MK4 X-Carriage System on the Anycubic Mega-X with 2020 V-Slot rail. 13 May 2021: Update * Added Blank Carrier Plate STEP file that can be used to design your own mount for whatever you want to mount on your Mega X. 29 Mar 2021: Update * Added a 7mm BLTouch spacer. When using the E3D V6 Volcano hotend, the BLTouch mount is raised out of reach of the bed. This spacer compensates for this. You may need longer screws to secure the BLTouch. If required, you can adjust the height in your slicer. 20 Jan 2021: Update * Updated Dual Tensioner Rear Mount added - This has a flattened rear that allows the screws to be inserted from the rear for anyone wishing to use the rear mount/fan duct with the original stock carriage. Retains the PCB mount for a future upgrade path to the full MK4 X-Carriage * Added Dual Tensioner Rear Mount without PCB mount. For those who either do not intend on changing to the full MK4 X-Carriage, or those bypassing the hotend PCB. BL Touch Z-Offset configuration process: I have taken the process from Knutwursts Github Wiki and amended to reflect the correct MK4 probe offsets. For the next steps we need the printer, a PC and Pronterface Configure the BLTouch X and Y Offsets (Differs from firmware defaults). 1. M851 X+29 Y-15 ; Configure the BLTouch X/Y Offsets for the MK4 X-Carriage 2. M500 ; Save the settings to EEPROM Configure the BLTouch Z-Offset 1. Heat up the bed 2. G28 ; Home the XYZ axes 3. G90 ; Set Absolute Positioning 4. G1 Z10 ; Raise the Z 10mm 5. G1 X40 Y40 F4000 ; Move to X40, Y20 6. M280 P0 S10 ; Deploy the probe 7. G91 ; Set Relative Positioning 8. Slowly lower the nozzle with G1 Z-1 or G1 Z-0.1 or G1 Z-0.02 until the sensor is triggered. NOT FURTHER! 9. If the sensor has triggered and flashes: M280 P0 S160 10. M114 ;= Current position of the nozzle -> note! (e.g. Recv: X:40.00 Y:40.00 Z:1.30 E:0.00 Count X:3200 Y:3200 Z:520) M211 S1 ; Enable Software Endstops M211 S0 ; Disable Software Endstops 11. G90 ; Set Absolute Positioning 12. G1 X69 Y25 F4000 (values from point 10 + offset of the sensor, i.e. X=40+29 and Y=40-15) 13. G91 ; Set Relative Positioning 14. Place a sheet of paper under the nozzle 15. Slowly lower the nozzle with G1 Z-1 or G1 Z-0.1 or G1 Z-0.02 until the paper is difficult to move. 16. M114 = Current position of the nozzle -> note! (e.g. Recv: X:42.00 Y:65.00 Z:0.70 E:0.00 Count X:3200 Y:3200 Z:520) 17. Subtract the Z value from point 16 from that from point 10 -> 1.30 - 0.7 = 0.6 mm -> This is our Z offset. 18. M851 Z-1.62 19. M500 20. Carry out BL Touch leveling again via the display. Finished. From now on you never have to change anything again. Auto-leveling can be carried out at any time. After the successful run, the created mesh is automatically saved. 26 Sep 2020: Update * Improved the Rear mount design for better tensioner nut retention. - Thanks to Geir-Ove * Added additional Rear Mount option, now with Dual Belt tensioners, and additional Left Belt tensioner to match. - Thanks to DaGlo (https://www.thingiverse.com/DaGlo) * Added Pen Holder for 3DX System - Thanks to Wayne 21 Sep 2020: Update * X-Axis endstop is ready and added for download. BOM and Print Settings Documents updated 20 Sep 2020: Update / Coming Soon.. * I'm in the final stages of testing a new printable X-Axis endstop mount so there is no need to cut the original one. This should be up in the next 24 hrs. 18 Sep 2020: Update * BOM and Print Settings PDFs added. * Renamed all files to match BOM & Print Settings PDFS * Removed older versions of models * Check out my YouTube Channel, i'll be creating and upload more video's * Removed remix references where there is no longer any borrowed parts 15 Sep 2020: Update * Check out the Instruction Video on youtube! https://youtu.be/q2AmNEVsrQg 04 Sep 2020: Update * Added brackets to support 20x10 cable chain for X-axis 30 August 2020: Update * Removed Work In Progress Status * Added version 2 carrier plates for V5, V6 and V6 Volcano. I have created a larger hole for the bottom two screws that secure the 'Tensioner & PCB' rear mount. I have found the carrier plate to be sturdy enough using the top three screws, and this now allows for the rear mount to remain securely mounted when changing the carrier plate. 25 AUGUST 2020: Update * Added the updated Fan Duct. Includes custom support. I used Cura to print. Use mesh tools to split the model into parts and configure per object settings to set the 4 support pieces to print as support material. 24 AUGUST 2020: Update * Removed original version STLs as they will not be progressed any further. * Added my preferred method to wire the BLTouch signal and ground (Black and White) to the hotend PCB. You will need to change the dupont connector from 2 pin to two single pin connectors. * While not really a remix, have added https://www.thingiverse.com/thing:4431052 as my recommended Marlin firmware version. After loading you will need to change the z-probe offsets: M851 X29.0 Y-15 M500 M501 17 AUGUST 2020: Update * temporarily removed the fanduct, more work is needed to test and update 15 AUGUST 2020: Update * Remixed the original MK4 Fanduct to fit. The other one did not have enough clearance for the extruder motor. 13 AUGUST 2020: Update * Added V6 Volcano Carrier Plate * Added mounting bracket for IR Probe to mount onto the front of the fan on a V6 Cover Plate * Remixed original Belt Tensioner, this includes an arm that raises the belt to the same height as the standard belt. 11 AUGUST 2020: Update. * Added V5 and V6 "Unarmed" cover plate remixes. * Added V6 Carrier Plate 10 AUGUST 2020: Update. I've created a 'Light' version of the X-Carriage. Due to a number of issues with my original design, such as collisions with the X-Axis limit switch mounting bracket and difficulty fitting the tensioners in place while still using the original MK4 fan duct, I've decided to come at this from a slightly different angle. The light version * Uses the existing X-Carriage Gantry, simplifying the design significantly * Uses a tension adjuster on only the right hand side. I found that the angle of the belt on the left was stopping the carriage from being able to home and I didn't want to lose any of my print surface. The left hand side uses the original attachment point, and the tensioner still works nicely. * Allows the use of a number of fans available on Thingiverse. I have used this one from kdyrja (https://www.thingiverse.com/thing:3340414). There are many remixes of this style which may also work, such as https://www.thingiverse.com/thing:3549764. * the fan duct mount will collide with the x-axis endstop mount. This will need to be trimmed back as shown in the photo * still uses the original MK4 Cover plate, however this does require my remixed carrier plate. I've created the V5 carrier plate initially, however I will be remixing the V6 carrier plate also... let me know if there are any more out there that need doing. * You will need to modify the original V5 cover plate, the x-axis limit switch arm is not required. You can either remix it or just cut the end off. (I'll probably remix this at some point.) * You also need one belt tensioner from the original MK4 design. all screws are M3, I'll have to add the lengths needed a bit later, I have only 15 and 25mm at the moment, so I did have to cut a couple down. If anyone out there really want's to try and progress the original design, get in touch, I'd be happy to share the Fusion 360 file. 31 JULY 2020: V3 Update. * Removed some material from the back near the fan mount, this would have collided with the x-axis rail bracket and be unable to home the x-axis * Added remixed version of the e3d v5 Coverplate w/BL Touch. I have extended the arm that activates the end stop... 30 JULY 2020: V2 Update. * Adjusted Hex Nut holes as they were a bit of a tight fit * Adjusted to take into consideration 8mm spacer & eccentric nut * Adjusted Fan mount arms to give more space to the V-Slot & to give more strength * Moved both top wheels in by 5mm so the walls around the sunken nut holes weren't too thin * filled the channel that was made for the v-slot as it is not needed with the spacers installed. Remixed from ML3DPrinting : https://www.thingiverse.com/thing:3537449 Should also work with the MK4 direct drive system https://www.thingiverse.com/thing:4469339 This will probably also work for Chiron or other printers that use 2020 V-Slot system, let me know if you try it out. NOTE: I'm putting this up early so others can provide feedback, I'm still printing it myself so haven't had a chance to test it. I forgot to factor in the X-Axis end stop switch, so it might need a slight adjustment there. It is designed to be used with all components of the MK4 system. You will need: - Fan Duct - Carrier Plate to suit your hotend - Belt Tensioners - Cover Plate to suit your hotend - PCB Holder - Belt Clip (Optional) - Bowden Collet (Optional) You do not need: - rear bracket as the fan mounts are built into the X-Carriage - Distance Sleeves The Belt tensioners need to be swapped sides so the screw holes are at the bottom instead to keep them closer to the rail. I haven't worked out the screw lengths yet, let me know if you get that far before I do and I'll update it here. Also, thanks to Tximy. Hole sizing and spacing from this design for the wheels/Eccentric nut saved me from having to fully dismantle mine. https://www.thingiverse.com/thing:3343882
With this file you will be able to print Anycubic Mega-X MK4 X-Carriage with your 3D printer. Click on the button and save the file on your computer to work, edit or customize your design. You can also find more 3D designs for printers on Anycubic Mega-X MK4 X-Carriage.