Anycubic Mega X Part Cooling Fan Holder for Sunon Maglev Radial Fan
thingiverse
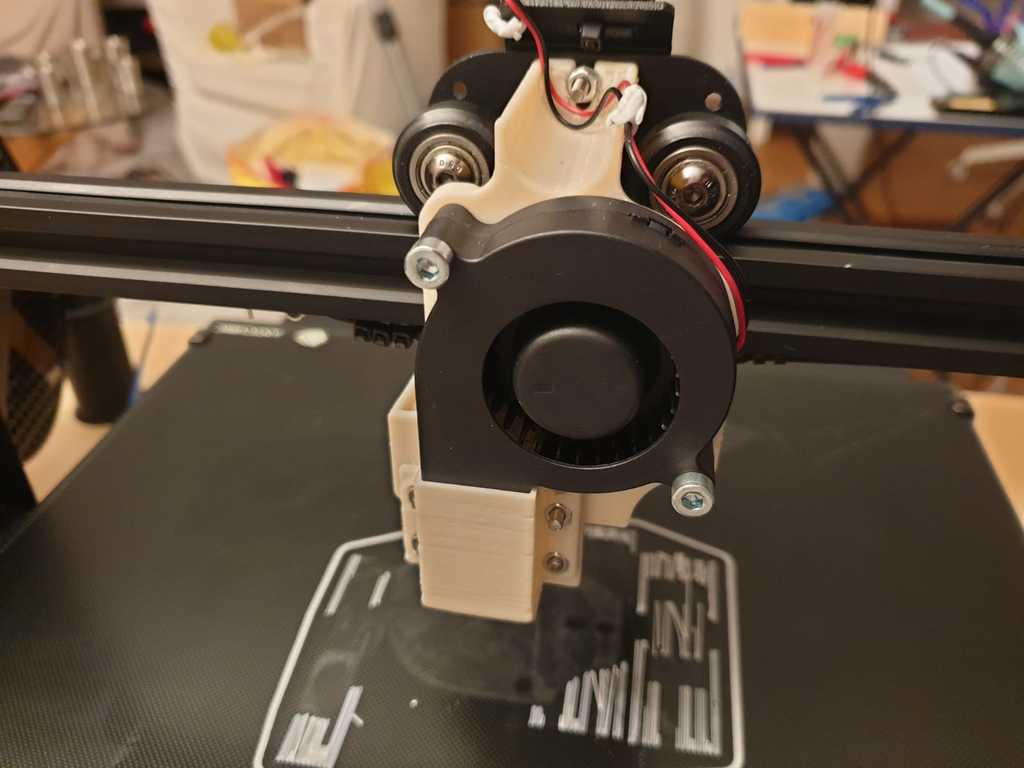
<H2> Description </H2> This is my approach on a Sunon radial fan holder for the Anycubic Mega X. It was my goal to put it on the back of the hotend carriage to leave more room for potential futher modifications on the front, e.g.a direct extruder or a levelling probe. <H2>Bill of Material</H2> <ul> <li>1 Sunon Radial Fan MF50151VX 2 wires</li> <li>1 JST 2 pin plug plus crimp pins that fits into the fan 2 socket on the litlle pcb board of the hotend carriage (optional, see below) </li> <li>7 M3 8mm hexagon socket screws </li> <li>1 M3 15mm (or longer) hexagon socket screw</li> <li>8 M3 nuts and washers</li> <li>2 M4 20mm hexagon socket screws </li> <li>2 M4 nuts and washers</li> </ul> <H2> Print Instructions </H2> <ul> <li>you'll need to print fan_holder_megax_sunon.stl, fan_duct_megax_sunon.stl (best printed standing upright on the closed end) and part_cooling_nozzle_megax_sunon.stl (printed upright standing on the adapter plate)</li> <li>use heat resistant material, I used Prusament ASA, PLA will probably not suffice, PETG might</li> <li>the parts have to be printed using support material, the .stl files named "support..." are designed support features that can be added using the slicer (in prusaslicer: 1. On print settings tab -> Support Material check "Generate Support Material" but uncheck "Auto generated support" 2. Select model on plate -> right click on it -> Add support enforcer -> Load..) </li> </ul> <H2>Assembly</H2> Mounting the whole thing onto the printer is a bit fiddly. Here's how I went at it: <ol> <li>Remove the case from the hotend carriage and remove the old radial fan from it</li> <li>Remove the top most hexagon socket screw that attaches the hotend holding plate to the plate of the carriage roller; then replace it by the long M3 screw from the list (you can see the longish end of the screw I used in top middle of the picture showing the whole thing from the back) </li> <li>Put M3 and M4 nuts into all the hexagonal wholes on the printed parts, use pliers if needed <li>Attach the fan nozzle to the fan duct using 2 of the M3 screws and washers, make sure to attach it on the closed end of the duct, also ensure the nozzle slits face downward to the closed end of the duct (the tool path is blocked I know, I might fix it in a later iteration, you can use one of the small allan keys with a rounded pin in in one end that came with the printer) </li> <li>Attach the fan duct with the nozzle to the holder plate using again the M3 screws and washers </li> <li>Stick the radial fan opening into the fan duct and then screw the fan onto the holder plate using the M4 screws</li> <li>Attach the whole assembly to the hotend carriage: <ol><li> Put the assembly onto the back of the hotend carriage, use the longish screw on top and slide the top slit of the holder plate on it, fasten it just so it won't fall of using a washer and an M3 nut </li> <li>figure out a good length and a good path for the wires and then crimp on the JST plug, keep in mind plus and minus, you can look at the old fan for direction. I didn't have a new plug and crimping equipment so in a pro move I snipped of the old plug and soldered it onto the new wires. Also my wiring clearly needs improvement, so please figure out a better way yourself :-)</li> <li>Plug in the fan in </li> <li>Screw the fan holder plate through the hotend holding plate into the backward facing threaded wholes of the carriage case using the remaining M3 screws and washers (fiddly and ablocked tool path again, I know). Thereby attaching the fan holderassembly and the hotend case in one go.</li> <li>tighten the nut on the top screw</li> <li>add the twomissing little screws on top of the carriage to attach the case completely</li> </li> </ol> <p>Here you can find the original CAD design: <a href="https://cad.onshape.com/documents/13f51b6cc4843a5bc5a52480/w/32c38adfff10cb27e3c6a66d/e/ee2bdb2412d03d7c7f2a0de" title="Onshape"> MegaX_Sunon_Part_Cooling_Fan_Holder in Onshape</a>.</p>
With this file you will be able to print Anycubic Mega X Part Cooling Fan Holder for Sunon Maglev Radial Fan with your 3D printer. Click on the button and save the file on your computer to work, edit or customize your design. You can also find more 3D designs for printers on Anycubic Mega X Part Cooling Fan Holder for Sunon Maglev Radial Fan.