Anycubic Mega X Titan Aero
thingiverse
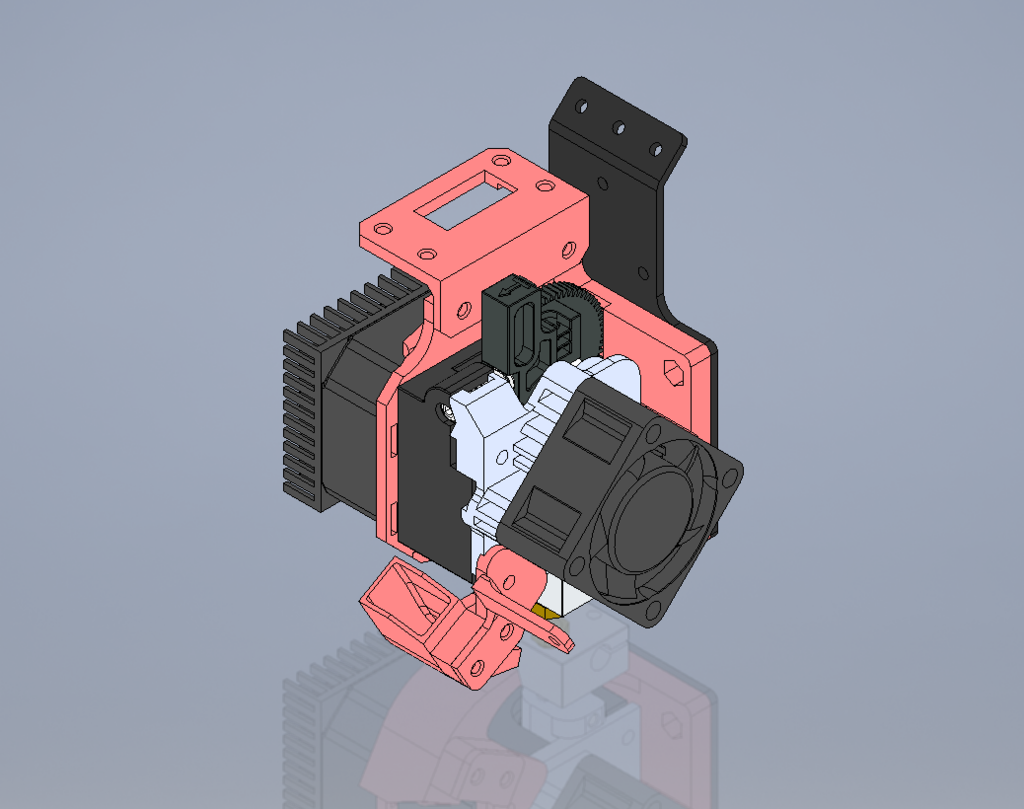
Upd. 14.12.21 Minor ergonomics adjustments have been made to the 7.5.1 and the diameter of the center screw bore has been slightly increased. I also added the previously deleted 7.5.2 model, since it finally turned out to test it fully and I did not notice the difference in relation to other models. I was also able to test for vibration using the accelerometer, models 7.5.1 and 7.5.2, and as you can see, the result in terms of frequencies and recommended shapers is almost the same. It's important to note that I tested the 5015 without a fan. Upd. 23.10.21 Slightly improved hole seating accuracy. Structurally, nothing has changed in relation to the previously published version - in general, this is the result of the refinement of my model. Technically, the differences from the earlier version are insignificant. I also came up with an idea to simplify the design and use a three-point mount with a center eccentric screw. For this, a countersunk screw m5x35-40 (preference 40) is used. Feels like it works the same as main model. ### Important I used PETG plastic, but I strongly advise you to print from something heat-resistant, as parts close enough to the heater block are subject to noticeable heating. Also pay attention to the thread feeder when assembling - it must move freely. If you feel such tension in its movement - try to move the extruder away from the base plate - there is a slight backlash for this. ##### Intro The motivation is simple enough - I would like to speed up printing at least a little and be able to use the LA from the relatively fresh marlin firmware. Simply put, get everything that direct execution gives. If you are reading this, you obviously understand what the benefits are. One of the main requirements, I set for myself, was to make the construction as simple as possible in print - without supports and overhangs. And lastly, keep approximately the same dimensions of the print head and not get out of print too much. ##### Assembly For assembly, you need all those the fasteners that come with the printer, that is, m3 screws. Also, to secure the carriage itself, you need m3 nuts. To secure the breakout board, I used the regular m3 spare screws that come with the pc motherboard. I must warn you that the baffle between the extruder and the motor is wide enough that you will need to compensate for this somehow. My titanium kit had two sets of screws. I took the long ones and compensated for the lengths by simply screwing on an additional m3 nut. It should also be mentioned that the dimensions of the motor or motor + radiator should not exceed 31-32 mm (I use a 20mm motor and an 11mm aluminum radiator). Otherwise, you will have to design your own stopper or you can stick on some kind of stopper for the X-axis limit switch. In the attached you can find my version of the stopper. It mounts as part of the carriage mount itself, but you will need a longer screw to do this, rather than the included one. You will need to turn the screw that holds the tension eccentric, that is, the nut will be on the side of the wheel. In general, you can try to leave everything as it is, but you will have to suffer a lot to pull things up as needed. You can also find a cooling system here, but I suppose it is worth looking for more reasonable options for the Titan - luckily there are plenty of them here. I can't say it's bad - I can print bridges up to 100mm, which is more than enough for me. Nevertheless, I modeled for my fan and for some reason, despite the fact that it is a 5015, its dimensions are somewhat different from the standard drawings. Maybe I'll post later for the standard version. ##### Conclusion I hope I was able to help you with something and that you can also achieve your goals. ##### Afterword Many thanks to the guys who support Marlin firmware for this printer. https://github.com/knutwurst/Marlin-2-0-x-Anycubic-i3-MEGA-S/releases Now, as a firmware, I use Klipper and I strongly recommend that you try using this firmware if you have such an opportunity, or change the control board itself. Unfortunately, the printer board is too weak and in my experience does not work well with the latest versions of Marlin.
With this file you will be able to print Anycubic Mega X Titan Aero with your 3D printer. Click on the button and save the file on your computer to work, edit or customize your design. You can also find more 3D designs for printers on Anycubic Mega X Titan Aero.