Anycubic Photon Fume Extractor / Exhaust
thingiverse
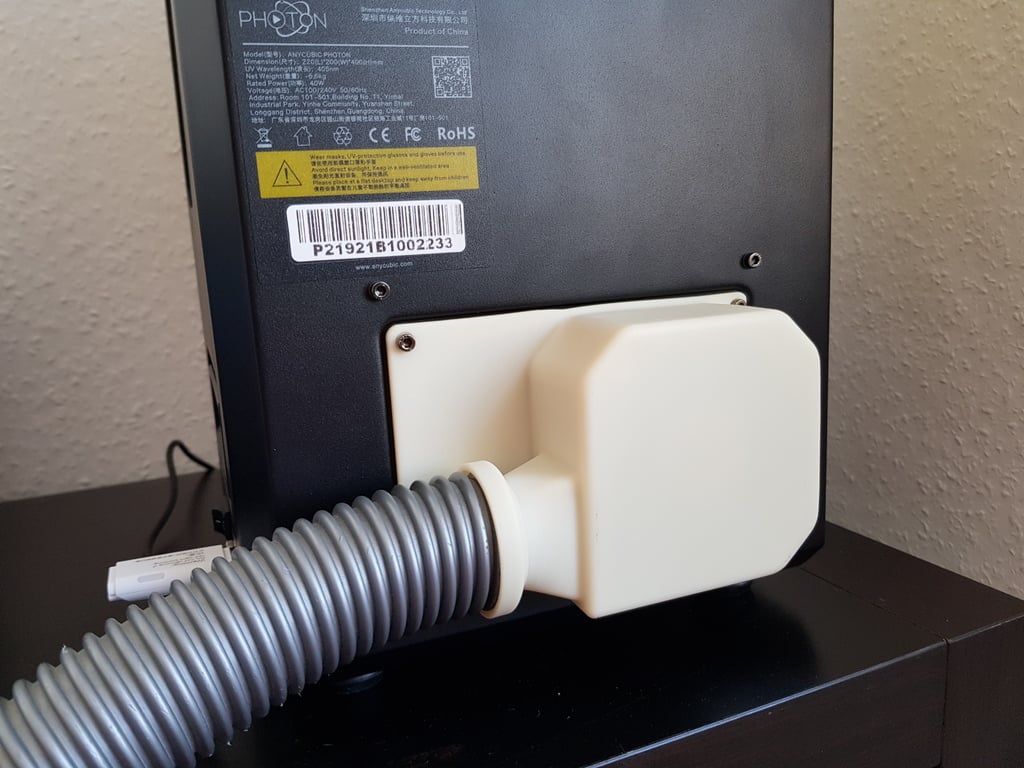
Hi! This is one of the first things I printed on my Photon and also my first thing on thingiverse. There are already some similar solutions here, my goal was to create a more compact design using an integrated blower fan and a vacuum cleaner hose. The blower fan achieves higher static pressure than a axial fan so you can use long hoses (I tested up to 5m but more is certainly possible). The vacuum cleaner hose is very durable and fits though a tilted window easily. It consists of two parts, both of which can be printed on the Photon itself. The internal duct part is somewhat optional, but recommended. The external part with the blower fan can be mounted with the outlet facing left or right. The version I uploaded here has no mounting bolts for the fan since there seems to be no standard for the location of those. Even the fan I bought had different dimensions than specified on the manufacturers website... Additional parts needed: - 12V 75x30mm blower fan. I used Titan BFD-B7530M12C (~9€ on ebay) which is actually only 28mm in thickness. As for power, the one I use is rated 170mA / 2600prm and is still somewhat oversized. So to reduce noise you could use a slower fan. On the other side, if you plan on using a very long hose you may need a stronger fan. - vacuum cleaner hose (ID 32mm, OD 40mm) of desired length. You can buy this on ebay for few €/m or even better recycle it from a defective vacuum cleaner. Not sure if 40mm is the standard size in all countries, if not let me know and I will post a modified version. - double sided adhesive tape to install fan (or use hot glue, chewing gum...) Installation: Short version: install internal printed part instead of filter, install fan in external printed part, connect fan, install external part instead of vent cover. More detailed version: 1. Remove vat and build plate 2. Remove back vent cover and bottom of photon, disconnect display and LED fan. 3. Remove two screws at front left and right corner inside build chamber (somewhat hidden), and two screws on back of Photon above the vent cover. You should now be able to slide the internal part of printer out of the housing to some extent. 4. Open filter (2 screws) to access screws, remove filter (2 screws). 5. Remove fan (2 screws). 6. Install internal part instead of filter. 7. Install blower fan in external part using double sided adhesive tape or similar. 8. Connect blower fan(*) 9. Slide internal part of printer back into housing, reassemble all screws, install external part with blower fan in desired direction of outlet. ! Be *very* gentle when fastening the screws, especially when printed on the Photon with standard resin! (*) You can connect the fan to the connector of the print chamber fan so the fan only turns on while printing. However, I connected it directly to 12V so it is always on when the printer is turned on. (--> No fumes when opening the printer after print finished) To do that, you can use the scew terminal of the 12V connector on the mainboard, or if you have a matching plug you can use the unused 12V input socket for easier disassembly.
With this file you will be able to print Anycubic Photon Fume Extractor / Exhaust with your 3D printer. Click on the button and save the file on your computer to work, edit or customize your design. You can also find more 3D designs for printers on Anycubic Photon Fume Extractor / Exhaust.