AnyCubic Photon Panel Mount Heater
thingiverse
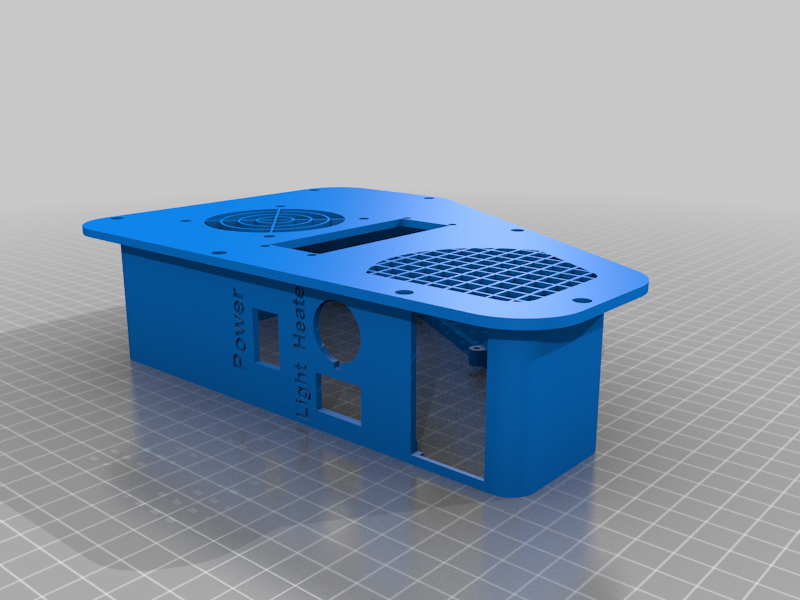
AnyCubic Photon Heater with Optional Light Models for for the Left or Right panel For the fan I turned it around after I found it not blowing outward. Double Check You use the right top and back that go together. Don't do Like I did in the pictures! I get nothing from these parts links. All parts here or what I used or just to show what can be used, search you may get better prices. Mount your heater and (Optional Light) while box is off printer, then install your side components (Switches, Controller) after you install the box on printer, or you won't be able to install the case Hole for power mount was not made due to whatever power options you want. the power mount adapter listed takes a 11 mm (7/16) drill. Printed with PLA , PETG is better if you have good luck with it sticking. File in case you cannot download from Thingiverse https://drive.google.com/file/d/1WLp7AtCZGsLDsoyeKDpfMY75koo1_Cu2/view?usp=sharing NOTE: controller is factory set for Cooling, it needs setting to Heat also remember you have to press both buttons to enter program changing mode, after setting, just wait until it goes out of programming mode. then you can make other changes as you want. Parts listed may be cheaper so search. 4 M3 x 8mm bolts + 4 nuts for mounting the light https://www.ebay.com/itm/M3-Socket-Head-Cap-Screws-12-9-Alloy-Steel-w-Black-Oxide-DIN-912-0-50-Coarse/112842465163 6 M3 screws 10 mm long to screw cover on. https://www.ebay.com/itm/100pcs-M2M2-6M3M3-5-Black-Mini-Micro-Cross-Phillips-Head-Self-Tapping-Wood-Screw/163748735513 Super Bright 5/12V 12/24/42/48 LED Piranha LED Panel Board Lamp lighting https://www.ebay.com/itm/Super-Bright-5-12V-12-24-42-48-LED-Piranha-LED-Panel-Board-Lamp-lighting-US/253816257643 ROCKER SWITCH Toggle 12V Led Light Car Auto Boat Round ON/OFF SPST 20 AMP https://www.ebay.com/itm/8PCS-ROCKER-SWITCH-Toggle-12V-Led-Light-Car-Auto-Boat-Round-ON-OFF-SPST-20-AMP/223566611963 Square Rocker switch used is like this one https://www.ebay.com/itm/4-Pin-DPST-On-Off-Rocker-Switch-Alto-PA-Speaker-Power-Button-HI00019-HI00475/223963879199 Power Supply I used 12V 10 amp https://www.aliexpress.com/item/4000433119623.html?spm=a2g0s.9042311.0.0.2c964c4d3Tl5G5 Heater 100W 12V PTC Car Fan Air Heater https://www.ebay.com/itm/100W-12V-PTC-Car-Fan-Air-Heater-Constant-Temperature-Heating-Element-Heaters-US/264547374094 Controller https://www.ebay.com/itm/1x-Digital-LED-Microcomputer-Thermostat-Controller-Switch-Temperature-Sensor-12V-/202575748363 X3msnake has a great video to program the Controller https://youtu.be/o7XkPHlw0_M Instructions Copied from internet The Description of Parameters Function: Please press the button SET five seconds and then it can enter to the main menu of setting, pressing STC(+)and C/F (-) can switch to P0-P8. About the adjustment of parameters P0-P8, when you need to adjust P0, firstly please press STC (+) and C / F (-) at the same time, and the P0 figurewill flash, secondly please press STC (+)and C / F (-) to adjust, if done, finally please press STC (+) and C / F (-) to confirm at the same time,P1-P8 which can be set the parameters of each code like P0 according to the needs of their own. The key C/F is a key for switching Fahrenheit or Celsius Press the key C/F once, and it will manifest F(Fahrenheit mode),and then press the key C/F once, it will show C(Celsius mode), the default mode is C(Celsius mode),if there is a big temperature error when you use it, maybe it is F mode. An example for setting: If you need to Control the refrigeration equipment 1: Please set into C mode in the code P0: 2:In the case of manifesting the actual temperature you should press the key SET, and the following digital of setting text will flash, then press C/F (+) and SET (-) to set the stop cooling temperature, after setting please wait for 3 seconds, it will automatically confirm to return. 3:Return difference setting: Firstly please press the key SET for five seconds all the time, and it will enter the setting main menu, secondly press STC (+)and C / F (-) to switch into P1, when switching into P1,please press STC (+) and C / f (-)once at the time, the P0 figure will flash, then please press STC(+)and C / f (-)to set to difference value(return difference means that you should add several degrees to start, for instance, if the it stops when the stop setting temperature is 25 degrees, you should need to set the cooling temperature to 28 degrees, the value in the code P1 should be set 3 degrees, so the return difference value is 3 degrees),after finishing that, finally please press STC(+) C/F (-) at the same time to confirm. 4:The above steps are set up, the data is automatically saved, and the final result is, in the control of refrigeration equipment, higher than 28 degrees to start the refrigeration, refrigeration to 25 degrees to stop. If you need to control the heating equipment: 1: Please set into H mode in the code P0. 2:In the case of manifesting the actual temperature you should press the key SET, and the following digital of setting text will flash, then press C/F (+) and SET (-) to set the stop heating temperature, after setting please wait for 3 seconds, it will automatically confirm to return. 3:Return difference setting: Firstly please press the key SET for five seconds all the time, and it will enter the setting main menu, secondly press STC (+) and C / F (-) to switch into P1,when switching into P1, press STC (+) and C / f (-) once at the time, the P1 figure will flash, then please press STC (+) and C / f (-) to set to difference value(return difference means that you should add several degrees to start, for instance, if the it stops when the stop setting temperature is 25 degrees, you should need to set the heating temperature to 22 degrees, the value in the code P1 should be set 3 degrees, so the return difference value is 3 degrees),after finishing that, finally please press STC (+) C/F (-) at the same time to confirm. 4:When the above steps all are set up,the data are automatically saved ,so as controlling the heating equipment, it will start heating system less than 22 degrees, and it will stop heating when the temperature is 25 degrees. Code Explain Setting range Factory setting P0 Heating/cooling H/C C P1 Return difference 0.1-30 2.0 P2 Set limit maximum + 110 110 P3 Set limits to the minimum -50 -50 P4 Temperature correction -15-15 0 P5 Delay start 0-10 0 P6 High temperature alarm -50~110 OFF P7 CS/FH cs F8 Factory Reset ON-OFF OFF
With this file you will be able to print AnyCubic Photon Panel Mount Heater with your 3D printer. Click on the button and save the file on your computer to work, edit or customize your design. You can also find more 3D designs for printers on AnyCubic Photon Panel Mount Heater.