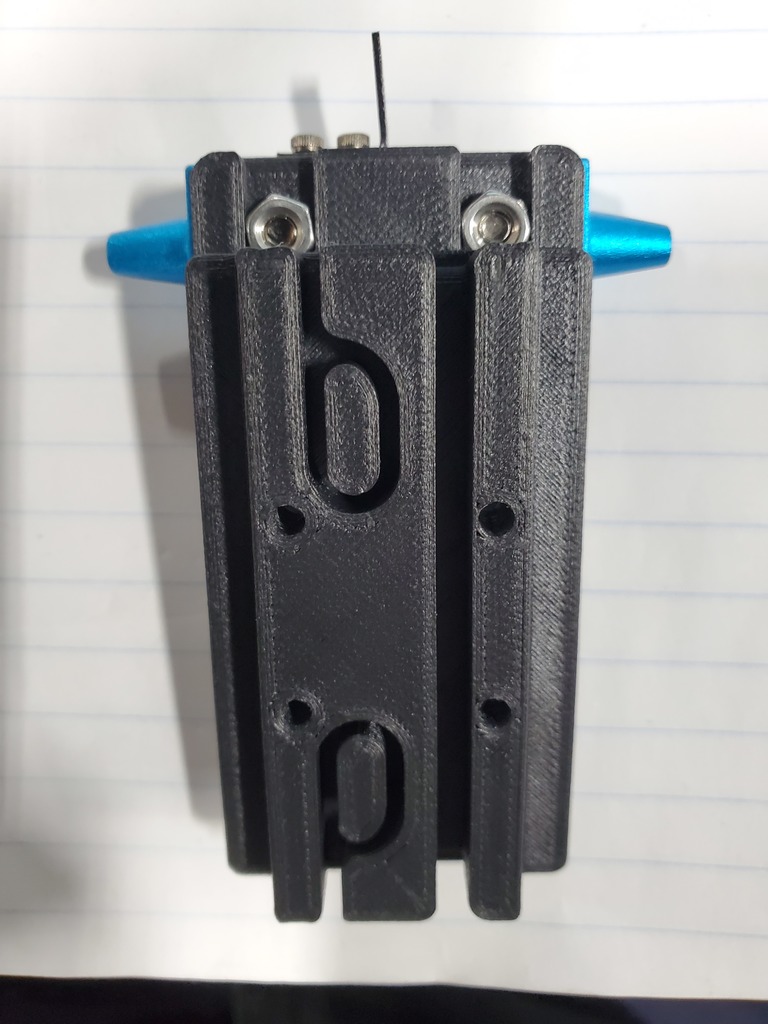
Anycubic Predator carriage with adapter plate one assembly and motor spacer to complete upgrade after installing linear rails.
thingiverse
Finally completed this awesome upgrade which couldn't have been finished without Nadeon's and Shaunppl's brilliant ideas and innovative designs - a huge thank you to them!! I just successfully completed delta calibration, and the 40mm cube came out perfectly. I took a different approach for this upgrade. I've included Nadeons motor mount, scaled up to 10mm, between the motor bracket and extrusion. I also decided not to use vibration dampeners after seeing how much they flex when applying pressure to the belts. Honestly, they didn't make a significant difference in sound, but I'm running an SKR with a 2209. After installing linear rails, these are the parts you'll need to complete the modification using my method: - (12) M5x25 used to mount 10mm blocks between motor plates and extrusions. - (12) M3x7 used to mount motors without dampeners to plates. - (12) M3x13 used to mount carriage adapters to linear blocks - (6) M4 nuts to attach metal rod blocks to carriages. You'll need to print three of my custom-made carriage blocks and three 10mm spacers. Don't use the blue carriage plate, as my new carriage block is integrated into it. Follow Shaunppl's instructions for installing linear rails on extrusions. His guide is perfect, and you'll need to use his guide blocks sized to your machine using your slicer. I drilled and tapped 7 holes; feel free to do as you see fit. I didn't like the motor drive gear being so close to the linear rail - it's a personal preference. I also didn't like how the carriage plate was mounted to the plastic carriage, which is why I made these modifications. One thing to note: I decided to add a 1mm washer between the optic stop on top of the machine. Stock has a plastic spacer that just needs a bit more consistency. The metal ones might be slightly bent in your machine; since my mag ball upgrade uses plastic, there's no chance of bending them. But your machine might be okay - I just wanted to mention it in case. The top of the drive gear to the plate is 20mm, as shown in the picture. When installing the belt into the carriage, keep it flush with the top of the carriage. I also replaced the drive belts to Gates belts, recommended by Nadeon, and purchased new pulleys on Amazon because mine were wobbly. But your machine might be okay - I just wanted to mention it in case. EXPLANATION OF MODIFIED CARRIAGES Using Nadeon's and Shaunppl's designs for carriages, I designed this carriage to include the mounting plate in one simple design. I didn't like how the stock plate had big holes where screws could dance around them, plus it was a personal preference. I don't like plastic threads, but they would have held up, I'm sure. Dimensions are just like stock. If you have any questions, don't hesitate to ask - it took me a week to complete this upgrade due to family and work commitments, as well as design time. Have fun and enjoy!!
With this file you will be able to print Anycubic Predator carriage with adapter plate one assembly and motor spacer to complete upgrade after installing linear rails. with your 3D printer. Click on the button and save the file on your computer to work, edit or customize your design. You can also find more 3D designs for printers on Anycubic Predator carriage with adapter plate one assembly and motor spacer to complete upgrade after installing linear rails. .