Anycubic Predator Linear Rail Remix
thingiverse
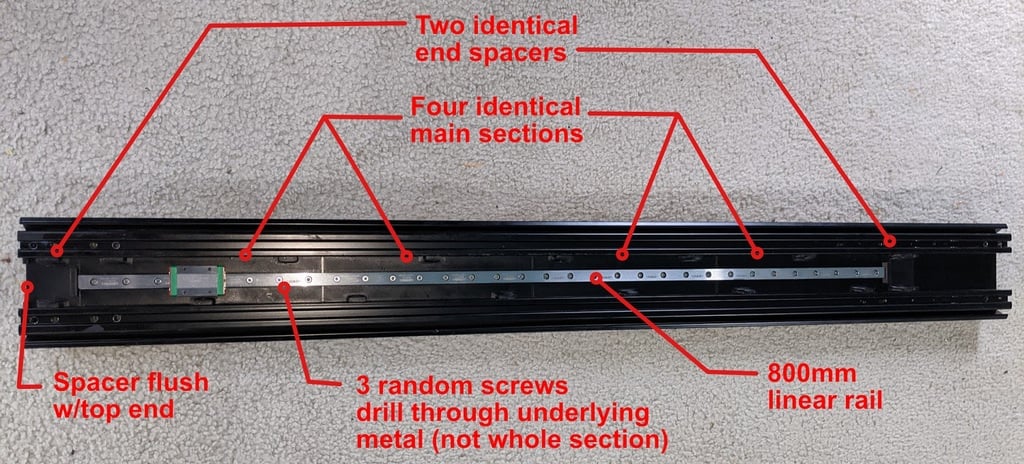
This is a remix of Nadeon's design (https://www.thingiverse.com/thing:4116804) I had a few objectives: 1.)Make it a little simpler to print and install (only two main types of pieces, plus spacers for the surface pieces). 2.)Make it for only 800mm linear rails (cheaper) 3.)Take a lot of the guesswork out of the install. 4.)When finished still allow access to the motor gear & pulley through the top of the Predator (blue alloy sections) without disassembly 5.)Create end stops that will prevent the linear rail carriage from accidentally coming off the rail (this sucks when it happens). 6.)Improve the process of counter-sinking screws into these printed sections Use T-nuts to secure and alternate the side sections, exactly like in Nadeon's design. With extrusions disassembled, print 4 'main sections' and two 'end spacers' per linear rail (x3 for total). Glue in place 3mm hex nuts into the base middle section holes, consider this glue (https://www.amazon.com/gp/product/B008GUV708/ref=ppx_yo_dt_b_search_asin_title?ie=UTF8&psc=1) . Once this is done do a temporary alignment of the whole assembly. Align the 'end spacers' so that the flat inner sections face toward the rail ends. Align the top 'end spacer' exactly with the top of the extrusion so there is no Z location guesswork. Mark and drill 3 (or more) of the screw holes through the 1st flat metal part of the extrusion underneath. The idea is that to avoid any Z movement, you won't have to rely on the T-nuts. Most of the linear rails holes will have M3 6mm screws which screw flush into the main printed sections. But a small number (in my case 3 but you could probably do 1), can penetrate through that lower metal to stop any Z slippage of the rails and T-nuts. Note that any drill holes don't pass through the whole extrusion, only the flat part immediately under these printed pieces. The rest of the assembly should be straightforward. Print 'pulley_motor spacers' to install the motor and pulley elements on the surface of the extrusion. As far as the belts are concerned, when finished they should be just under from flush (~1mm) with the front surface of the extrusion.
With this file you will be able to print Anycubic Predator Linear Rail Remix with your 3D printer. Click on the button and save the file on your computer to work, edit or customize your design. You can also find more 3D designs for printers on Anycubic Predator Linear Rail Remix.