Anycubic Vyper 92x14mm fan and OctoPi upgrade
prusaprinters
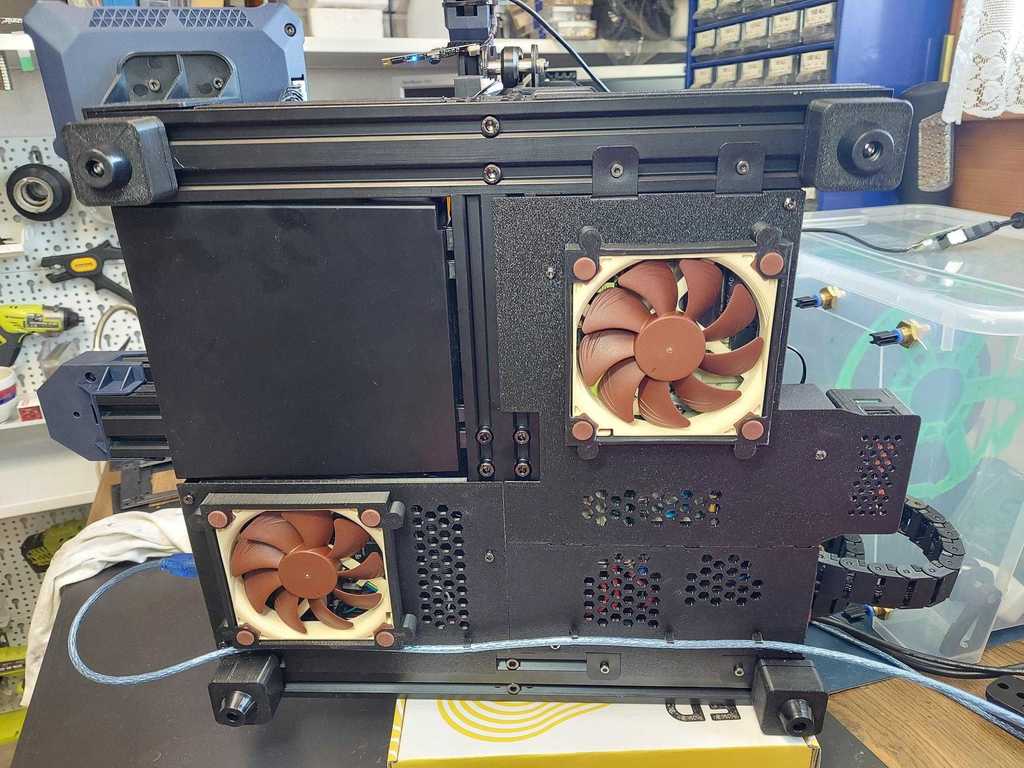
<p>Disclaimer: This mod requiring you to remove the cover of your AC power supply and you will need to deal with AC power wiring. If you don't know what you're doing I strongly advise to get help from experienced electrician. Risk of fire and electric shock!</p><p>I am not responsible for any damage on the device or injuries happening due to improper handling. Always disconnect AC mains cable when dealing with power supplies or any exposed AC components. If in doubt refer to <a href="https://www.youtube.com/c/Electroboom">Mehdi</a> for more demonstration material.</p><p>I was basically trying to address two "issues" of my Anycubic Vyper:</p><ul><li>The PSU and Mainboard 24V fans are very loud</li><li>I want to upgrade my Vyper with an OctoPrint/OctoPi setup</li></ul><p>So here is my result:</p><ul><li>An upgraded PSU cover featuring a 92mm fan mount</li><li>Including mounting plates for a 5V power supply (powering the Raspberry)</li><li>Included Raspberry Pi Zero 2 case</li><li>Including Mainboard cover featuring 92mm fan mount</li><li>Mounting points for a 24 to 12V step-down converter to power the fans</li><li>Mounting points for a relay module used to control the printer power using PSU control OctoPrint plugin</li><li>Including wiring diagram</li><li>No additional/changed screws needed (though you might want to user slightly longer M3 screws to mount the bottom plates)</li><li>Featuring V-Slot rail mounts to center the plates and add rigidity</li><li>Built-in cable management</li></ul><h3>What you need to buy</h3><ul><li>Anycubic Vyper</li><li>Raspberry Pi Zero 2 W (don't get the first model, it's not recommended for OctoPi but Zero 2 W is just fine)</li><li>Raspberry Pi Ethernet hat like <a href="https://www.aliexpress.com/item/1005003092123334.html">this</a></li><li>5V power supply like <a href="https://www.aliexpress.com/item/4001068579272.html">this</a></li><li>12V step-down converrter like <a href="https://www.aliexpress.com/item/1005003116820234.html">this</a></li><li>230V relay module for Raspberry Pi like <a href="https://www.aliexpress.com/item/33005089829.html">this</a></li><li>2x Noctua NF-A9x14 PWM or similar fan (you won't use PWM but the fans are strong, silent and only 14mm wide)</li><li>Some cables and preferably some crimp contacts</li></ul><h3>What you need to print</h3><ul><li>1x PSU-cover-top (Top/large part of the PSU cover, there is a variant with and without the Raspberry Pi case)</li><li>1x PSU-coerr-bottom (Bottom/small part of the PSU cover)</li><li>1x mainboard-cover (Cover for mainboard bay)</li><li>1x Raspberry-pi-zero-lid (Pi mount top lid) if you printed the PSU cover including Pi case</li><li>2x fan-shroud (Fan insert frame)</li><li>5+ cable-rail-clip (depending how many you want to use and how you route the calbes</li><li>Optional: 6x cable-guide (Clips allowing to route the USB cable along the bottom of the printer)</li><li>Feet extension or some spacers to lift your Vyper. You can use any printed feet or use my <a href="https://www.thingiverse.com/thing:5275042">hyperfeet</a></li></ul><h3>Assembly instructions</h3><ul><li>Print all the parts</li><li>Insert fans into printed fan shrouds</li><li>Clip in the fan shrouds to the top/large PSU cover and the mainboard cover</li><li>Optionally insert cable clips into square-slots</li><li>Mount the 5V PSU to the back side of the top/large PSU cover (I have attached some pictures)</li><li>Mount the Ralay module to the back side of the top/large PSU cover</li><li>Insert Raspberry Pi with Ethernet hat to the attached case on the top/large PSU cover</li><li>Route cables from Raspberry Pi to 5V PSU and Relay module (cabling diagram included). You might just push in cables from GPIO to the printed slot alongside the Raspberry case and use tweezers to pull them from the bottom.</li><li>Mount the 12V step-down converter to the bottom/small part of the PSU cover</li><li>Route cables from the step-down converter to the 24V PSU connectors. On my Vyper the PSU has 2 unused terminals for 24V+GND where the step-down Module can be connected</li><li>Route all cables into the printed cable guides and clip on some cable rail clips to affix them</li><li>Remove the main PSU top cover (Again: Caution; dangerous voltages!). For this you need to unscrew the PSU from your Vyper. Remove the PSU cover on the bottom and lose up the screws holding in the PSU from the top side (underneath the print bed). Then drop the PSU and remove the screws from the side to remove the top lid including the fan (make sure not to rip out the fan cable by properly disconnecting it from the PSU).</li><li>Connect AC to relay module and 5V PSU; basically you can connect neutral (blue) directly to the AC terminal of the power supply towards the 5V PSU. The live (brown) wire should be routed to the COM input of the relay module and from there directly to the 5V PSU too. The NO (normally open) connector of the relay module should be connected to the Vyper PSU live terminal. Make sure 5V PSU is always on when power is applied but the main PSU only is powered when the Raspberry Pi is turning it on via PSU control plug-in.</li><li>Mount the top/large PSU cover by clipping it in to the cable rails and screwing it on</li><li>Clip in the mainboard cover and securely screw it down</li><li>Clip in the bottom/small PSU cover making sure the teeth properly fit into the large/top PSU cover to securely lock down</li></ul><p>A wiring diagram is included as well as some pictures of my setup.</p><p>Note that of course the mounting points might differ depending on the modules you actually buy. The relay modules might be quite common and also available on <a href="https://www.amazon.com?linkCode=ll2&tag=thingiverse09-20&linkId=e4759bff1fa9a55a0f897d801ce2d765&language=en_US&ref_=as_li_ss_tl">Amazon</a>. The 5V PSU however is available in literally thousands of variants and the mount points might not fit. Moreover I have chosen a PSU which kind of perfectly fits into the empty space inside my Vyper OEM power supply. So it perfectly fills up an empty space there. Also the Relay module perfectly sits into an empty space between the main power supply and the outer Vyper wall.</p><p>I do not describe the setup of OctoPrint here as there is plenty of documentation out there. Just the note that you can use the PSU control plug-in to allow your OctoPi to power on/off your printer either manually or when uploading files from Cura. So I can keep my printer off all the time while my Pi Zero 2 is always on (consuming minimum amount of power) keeping the printer ready for action at any time. The fans are off while the main PSU is off (relay in off position). The 5V PSU does not need active cooling.</p><p>Note: you might easily scale the fan shroud also to mount wider 92mm fans if you can't get hold of any 14mm ones. Just make sure to get sufficiently large feet spacers too.</p><h3>Print Settings</h3><p><strong>Printer Brand:</strong></p><p>Anycubic</p><p><strong>Printer:</strong></p><p>Large Size Chiron</p><p><strong>Rafts:</strong></p><p>Doesn't Matter</p><p><strong>Supports:</strong></p><p>No</p><p><strong>Resolution:</strong></p><p>0.2</p><p><strong>Infill:</strong></p><p>10% Gyroid</p><p><strong>Filament:</strong> Purefil PLA</p><p>black</p><p><strong>Notes:</strong></p><p>Actually used my Vyper to print - just can't select it here.</p><p>Printing does not require any sort of supports and should be easily printable.</p><p>The cable rail clips might be advised to print with a raft for better bed adhesion due to small size but I have also sucessfully printed some on the default bed.</p><p>Orientation in STL is the recommended print orientation.</p><p>Category: 3D Printer Accessories</p>
With this file you will be able to print Anycubic Vyper 92x14mm fan and OctoPi upgrade with your 3D printer. Click on the button and save the file on your computer to work, edit or customize your design. You can also find more 3D designs for printers on Anycubic Vyper 92x14mm fan and OctoPi upgrade.