Apple Airtag Car Tracker
thingiverse
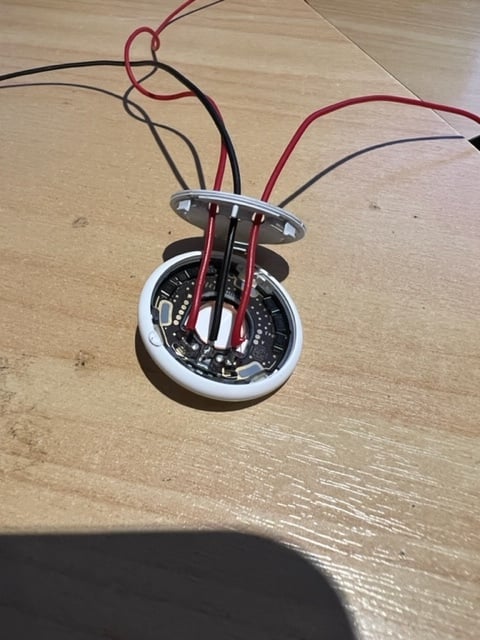
Apple Airtag Vehicle Tracker (no battery needed) Apple Airtag is a tracking device that can advertise its GPS coordinates on the Apple "Find My" app. It does this by pinging off other nearby Apple devices using BLE (bluetooth low energy) which in turn advertise its location over the telecommunications network. The problem is the tag has a battery life of approx 1 year. This is all well and good for tracking the likes of keys, handbags and similar, as the battery is easily replaced. However I wanted a solution where I can hide this far under the dashboard and not bother having to replace the batteries annually. This solution simply uses a small buck converter to dial down voltage from your cars 12V to the Airtags 3V. Fairly simple, but it does require some hacking of the Airtag and soldering. Note: you have to be SUPER careful soldering! There is a very fine wire around the positive terminal that feeds the BLE aerial. Take extra care when soldering!!! If you're happy leaving the speaker in place, then you can solder to the terminals with plastic cover left on. This 3D print is a nice clean case you can use to hold the required components altogether and position somewhere in your car, where there is 12V power. REQUIRED: - Apple Airtag (https://www.apple.com/airtag/) - Buck converter (3D case fits this very common one https://www.aliexpress.com/item/1732504666.html) - Wire, Soldering Iron, solder - 12VDC power supply (for testing, or test off your car battery) - Multimeter PRINT 3D CASE: - Download and start printing case and lid, you can start the other steps while it's printing SETUP APPLE AIRTAG: - First associate the air tag with your phone, this will let you test at various steps to ensure the tag still has power - Open the airtag and remove the speaker (this explains it well https://www.youtube.com/watch?v=8vAQNedIa0o) - There are 3 x holes in the plastic piece you remove from the above video, the left and right holes have contacts to the positive (+) voltage (top of battery). The centre hole has a contact that goes to the negative (-) voltage (bottom of battery) - Drill the 3 x holes larger with a 2.5mm drill bit to give yourself more room to work with - Carefully solder 3 x wires to the contact points on the Airtag (see photos) - Run the wires through the holes, replace the cap, twist the 2 x red wires together - Add a heap of hot glue to the Airtag to hole the 3 wires in place (throw away silver lid) SETUP BUCK CONVERTER: - Connect the buck converter IN + and - to a 12VDC power supply - Hook up your multimeter to measure the voltage on the OUT + and - - Using a flat head screwdriver, adjust the potentiometer on top of the buck converter (small screw on blue box) until the multimeter displays approx 3.2V (yes the battery is 3V, but they are actually > 3V when new/fully charged) - After adjusting the voltage out, I used a hot glue gun to dab a blob of glue on top of the screw to stop it accidentally moving ASSEMBLE PARTS (pay attention to polarity!) - Run 2 x wires (one for positive, one for negative) through holes of the 3D printed case (keep plenty of wire length so you can position the case better later) - Solder these wires to BOTTOM of the IN + and - terminals on the buck converter - Trim the + and - wires from the Airtag to about 1" long, solder to the TOP of the OUT + and - terminals on the buck converter - Carefully slide the buck converter into the case, then tuck the air tag wires in and sit the airtag in the top of the holder - Press fit the lid onto the case (the lid will also hold the Airtag in place) - Open the "Find My" app, then connect wires to 12VDC feed and ensure its location updates on the app INSTALL IN YOUR CAR: You should now be able to wire in the 12VDC side to your car battery. Find your fuse box and use multimeter to find a 12VDC feed. Make sure the voltage is live even when the key is turned off, the wattage draw on the Airtag is incredibly low (< 1.8mWh a day) so will not affect your car battery, plus you want to increase chances of the Airtag pinging it's location - especially if your car is stolen! Wire the + and - in (preferably use a small 5A fuse) and then hide your 3D printed Airtag box somewhere under the dash. Note: For optimal tracking, you are better off with a purpose built GPS Tracker. This is due to GPS using the GNSS network directly and some able to triangulate their position using the LTE/3G/4G networks vs the way an Apple Airtag works - where it requires another Apple device (such as an iPhone) nearby to ping its signal off using BLE (Bluetooth low energy). For most highly populated cities worldwide however, they work fairly well. But as they say, something better than nothing.
With this file you will be able to print Apple Airtag Car Tracker with your 3D printer. Click on the button and save the file on your computer to work, edit or customize your design. You can also find more 3D designs for printers on Apple Airtag Car Tracker.