v1.0 Universal Piezo Bearing Block Mount incl. PCB v2.75 and Marlin Firmware
thingiverse
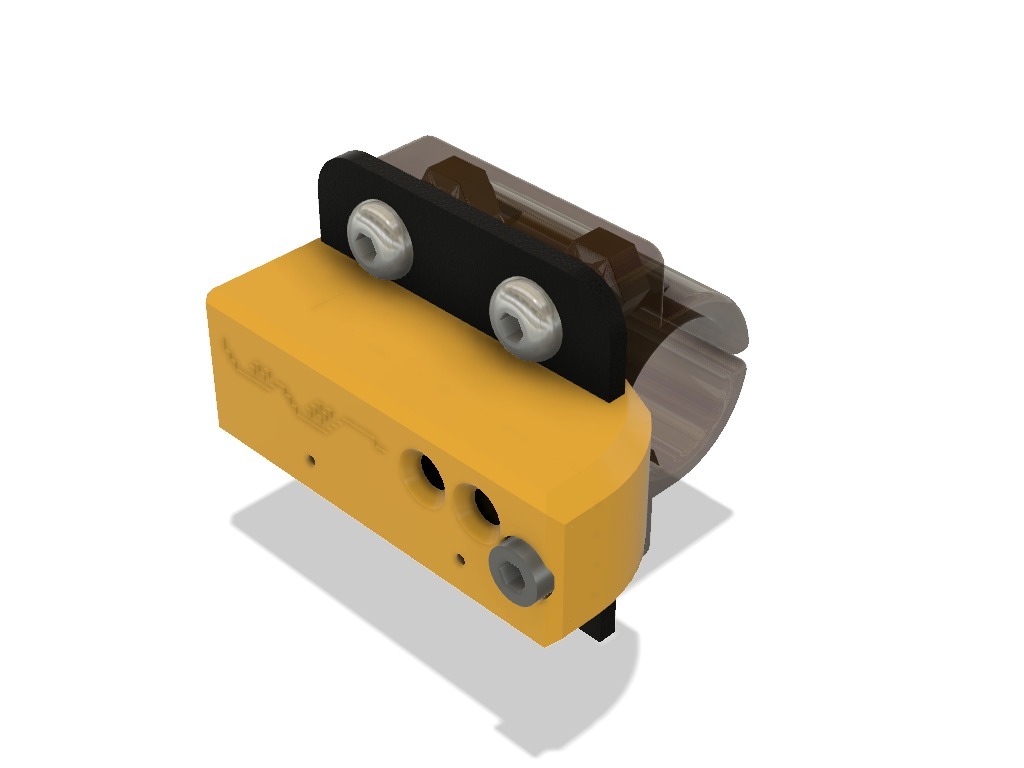
A great amount of effort and time went into the design, testing and troubleshooting of this thing! Please be so kind and consider leaving a tip if you decide to print and install this and share a make of your results. Advantages of this design: - universal - suitable for hotend and under bed installation - no loss of build volume in any direction - easy installation - no drilling necessary This universal piezo hotend mount replaces the top bearing block of your hotend carriage. To the best of my knowledge this design can be applied to any printer, as long as the bearings aren't directly embedded in the design of your hotend carriage. I designed this system for and on the Anycubic i3 Mega, but I see no reason why it shouldn't work equally well on any other FDM machine. In the case of my i3 Mega the X-carriage rides along two shafts, one above the other. When pressure is applied to the nozzle from below, this force is transmitted onto the bearings, pushing on the upper one and pulling on the lower one. A small gap of about 0.2 mm between the bearing block and the x-carriage supplies enough space for the piezo disc embedded in the bearing block to be compressed. Four springs placed around the bolts of the bearing block assist in giving sideways stability. The piezo disc is sensitive enough to pick up the vibrations caused by someone walking into the room. Pay close attention to the proper tuning of your PCB and lower the sensitivity to a reasonable level. Required parts: - 20 mm Piezo disc - <a rel="nofollow" href="https://www.precisionpiezo.co.uk/product-page/universal-piezo-z-probe-pcb-v2-x-for-1-2-3-or-more-piezos">Precision Piezo PCB v2.75</a> (can use other but won't fit this PCB mount) - 4 Springs like <a rel="nofollow" href="https://www.ebay.de/itm/10Stk-0-4mmx6mmx10mm-Silber-Ton-aus-304-Edelstahl-Druckfedern/132869928838?ssPageName=STRK%3AMEBIDX%3AIT&_trksid=p2057872.m2749.l2649">these</a> or similar - 4 M4 lock nuts - 4 M4x12 bolts (or longer) Installation (X-carriage): - Remove the upper bearing block of your X-carriage - (only Anycubic i3 Mega) Slide PCB Base onto the back plate of the X-carriage, if the PCB Base has too much play, tighten with a M5x5 or M4x5 grub screw - Replace the M4 bearing block bolts with ones long enough to work with the new bearing block (In my case M4x12 was enough) - Insert the bolts through the holes in your X-carriage's back plate and put the springs over the bolts (Springs like these https://www.ebay.de/itm/10Stk-0-4mmx6mmx10mm-Silber-Ton-aus-304-Edelstahl-Druckfedern/132869928838?ssPageName=STRK%3AMEBIDX%3AIT&_trksid=p2057872.m2749.l2649) - Press 4 M4 lock nuts into the piezo bearing block - Using a very small amount (!) of very weak glue, temporarily fix the pressure ring onto the brass side of the piezo disc (only to make installation easier, the glue should be kept to a minimum not to interfere with the piezos function at a later point) - Insert the 20 mm piezo disc and the attached cables into the bearing block - Install the bearing block and tighten the screws all the way (no gap between X-carriage and bearing block!) - Loosen all 4 bolts 1/3 of a turn - (only universal) Install PCB Base at the desired place using a M4 or M3 bolt - Insert the Precision Piezo PCB v2.75 into the PCB Cover - Slide the PCB Cover into the PCB Base and fix it in place with a M3x5 bolt Wiring (only Anycubic i3 Mega 8bit dual Z-Endstops): - Locate the wires marked in the pictures on your red and green plug - switch the Ground and Signal wires from the red plug to the green one and vice versa - Unplug the X-Endstop wire on your Trigorilla 8bit board located on Pin 42 - Route the supplied Endstop cable from the PCB through the gap above the red plug into the housing - Plug the endstop cable supplied with the PCB into Pin 42 (Make sure V, G and S are all connected correctly otherwise you can fry your board!) Your piezo sensor is now connected to Pin 42, while your X-Endstop switched places and is now connected to Pin 2. If you are using your own version of Marlin and want to continue using it, make the appropriate changes in pins_TRIGORILLA_14.h. Note that Marlin confuses Pin 43 and Pin 42. Change the assigned pins as is visible in the picture above. Firmware (only Anycubic i3 Mega 8 bit dual Z-Endstops): - Find my custom fork of David Ramiro's Marlin firmware for the i3 Mega <a rel="nofollow" href="https://github.com/kulfuerst/Marlin-Ai3M-Piezo">here on GitHub</a>. - Make adjustments to lines 856 to 868 to make it suit your stepper drivers, compile and flash. - If you have installed the piezo sensor according to the above instructions you are good to go! Wiring universal and Firmware changes: - Please follow the steps described in the official Precision Piezo manual and the RepRap Wiki https://docs.wixstatic.com/ugd/e08222_11eeb2b6951b44acaacbde4eb72ad72e.pdf https://reprap.org/wiki/Piezo-electric_sensors#Marlin: NOTES: The functionality of this part as an under bed mount is theoretical and has not been tested by me. If you decide to use this bearing block in such a manner, I suggest replacing the thumb screw springs with lock nuts (eg. https://www.thingiverse.com/thing:2941524) for direct transmission of the forces from the nozzle to the piezos. The springs recommended by me above would likely also be too weak and stronger ones better suited in this case and I highly recommend that you carefully check the configuration of the firmware for incompatibilities. M48 Repeatability Test for this hotend mount: Mean: 0.026750 Min: 0.022 Max: 0.030 Range: 0.008 Standard Deviation: 0.001953 One giant "Thank you" to <a rel="nofollow" href="/davidramiro/about">David Ramiro</a> who assisted me numerous times concerning the software implementation of the Z-probe on the i3 Mega. https://youtu.be/W1ma2InWEC4
With this file you will be able to print v1.0 Universal Piezo Bearing Block Mount incl. PCB v2.75 and Marlin Firmware with your 3D printer. Click on the button and save the file on your computer to work, edit or customize your design. You can also find more 3D designs for printers on v1.0 Universal Piezo Bearing Block Mount incl. PCB v2.75 and Marlin Firmware.