Aquarium Lid, Clear mesh
thingiverse
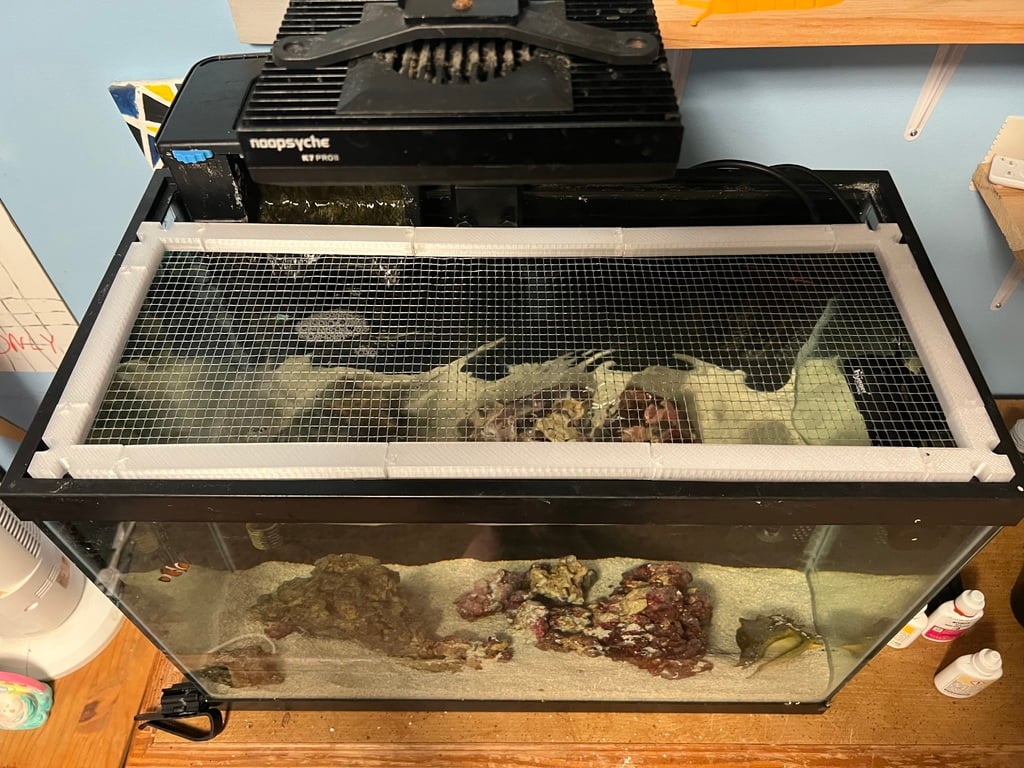
3D Printed Aquarium Lid. Note- This is a "Beta" Version. I have only printed and tested the 5.5 gal, 10 gal, and 20H versions. the system is modular, and designed so the parts are small enough to be printed on a "home" printer. They all snap together. It's a pretty tight fit as is, but it's best to use some glue as well. CA (superglue) is my favorite. Mesh screens are held in with standard window screen spline- Which you can get at any home improvement, hardware store, or even Wal-Mart. It's about $6 or so for enough to last you a lifetime. The screen itself is 1/4" clear plastic mesh. It's available multiple places online. For smaller pieces, check out E-Bay. Otherwise you'd have to buy a BIG sheet- It's more economical if you've got a All measurements are based on Aqueon aquariums, which seem to be the most common out there. They SHOULD fit most brands, just measure first. I'll be putting a better guide together soon, as I finish up the project, but here are the basics- 1) Choose a corner. One has holes in it to allow wires/tubes to pass through, the other is solid. You can, of course, mix and match as you please, as they are all interchangeable. Note that the corners are all a standard 2" long- So each side will have 4" of "corner". I'll post a drawing soon so this makes more sense :) 2) Determine the size and number of front & back as well as side pieces you'll need. I have put together some of the more common sizes and listed them. Also- Decide if you want it to cover the WHOLE top, or if you need an opening in the back for accessories like a HOB filter, etc. If you do, just choose side pieces that are shorter to allow for the opening. 3) Print the parts. You can probably get away with printing them in pretty much any material, but I'd suggest PET-G or ABS for extra strength. I used 25% infill and it was fine. 3) Assemble. Do a dry fit first, make sure it is all right. Then reassemble with glue. It's best if you can do this on a nice flat surface- Workbench, desktop, etc. Put some protective paper (parchment or freezer paper is perfect for this!) under it so you don't accidentally glue it to your work surface. 4) Install the screen. I'll put better instructions for this on here soon- But all you need to do is cut the screen so it's about an inch or so BIGGER than the frame. Cut a piece of spline that's about an inch or so longer than the entire length of the groove all the way around. It's easier to handle this way than if you try to do it right off the full roll. Start with one edge- I like to use the long side first- and press the screen into the groove using the screen spline. There is a tool sold for this- And it does work well- But I have also found that an "L" shaped hex key of the proper size works nicely as well. Use the tip to push it in place to start- and once it's in the groove, you can slide the bend of the key down it to keep pushing it in place. Start about an inch AWAY from the corner, and work towards the opposite corner. This will help keep things nice and tight. You don't have to worry about tension at this stage- just make sure it's straight. That's pretty easy to do if you just follow the lines of the mesh, and keep them even and square to the frame. Work all the way down the first side until you reach the corner. The corner is a BIT tricky until you get the hang of it, but it's not too hard. Pull the side tight from the back of the frame, keeping it square with the frame both vertically and horizontally. Then work your way up the side. When you get to the back edge, you'll have to pull the screen tight before you insert the spline. Pull it nice and tight, then push the spline in place. It'll tighten even more once the spline pulls it in. Keep doing this, while always remembering to make sure the screen is still square to the frame, the rest of the way around the frame. 5) Trim off the excess screen all the way around, using a pair of scissors. 6) Put it on your tank, and enjoy not worrying about your jumpers any more! Some common aquarium sizes and what they need- (I'll be adding more) 5.5 Gal- 15.5" x 7.625" Sides- 2x 3.625" Front/back- 4x 5.25" - 10 Gal- 19.5" x 9.75" Sides- 2x 5.75" Front/back- 4x 7.25" - 20L- 29" x 11.5" Sides- 2x 7.5" Front/back- 6x 8.33" - 20H- 23" x 11.5" Sides- 2x 7.5" Front/back- 6x 6.33" -More to be added
With this file you will be able to print Aquarium Lid, Clear mesh with your 3D printer. Click on the button and save the file on your computer to work, edit or customize your design. You can also find more 3D designs for printers on Aquarium Lid, Clear mesh .