AR-15 trailer hitch cover.
prusaprinters
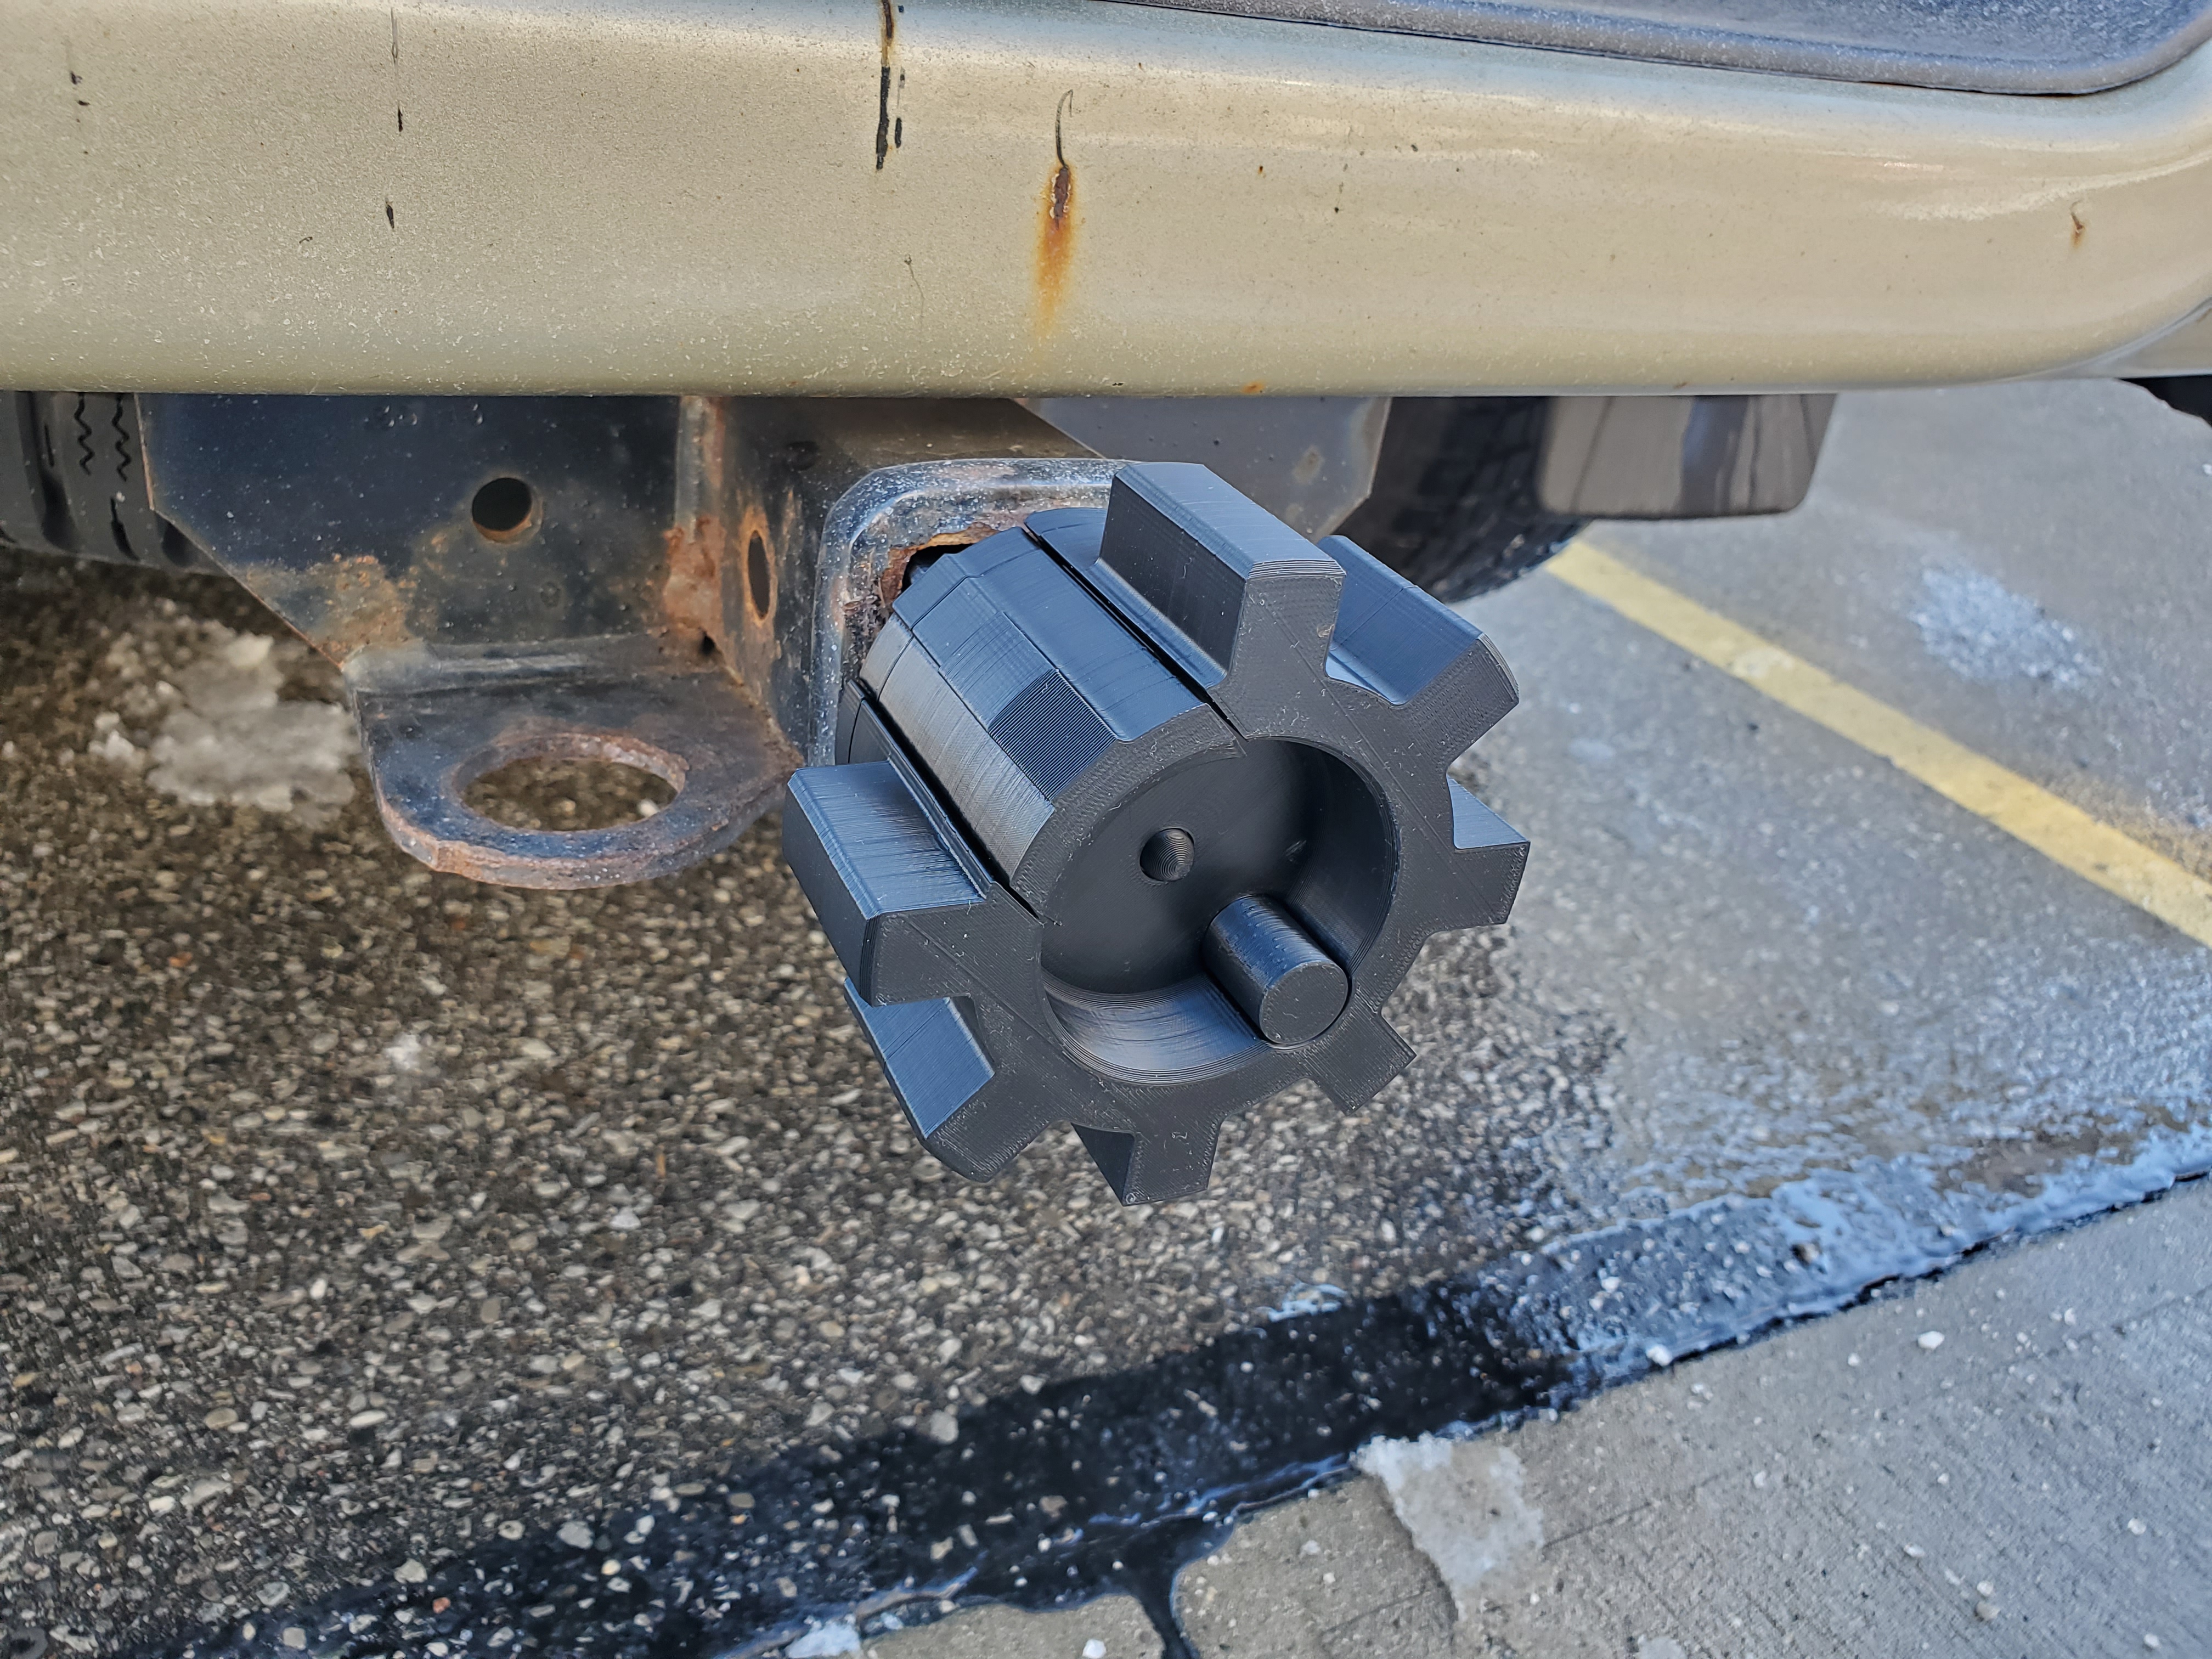
<p><i><strong>See </strong></i><a href="https://www.prusaprinters.org/prints/67141-ar-15-trailer-hitch-cover-mk-2"><i><strong>https://www.prusaprinters.org/prints/67141-ar-15-trailer-hitch-cover-mk-2</strong></i></a><i><strong> for a newer, simpler version of this design. I don't recommend this one. The technological gimmickry was fun, but it has too many problems, and is too fragile. The new version is simpler and stronger.</strong></i></p><p>An over-engineered AR-15 "bolt head" style trailer-hitch cover.</p><p>Share your passion for shooting sports, without attracting unwanted attention from haters. Those who know what it is, know what it is. To everyone else, it's just some kind of gear or something.</p><p>Features:</p><ul><li>Dimensionally-accurate (but scaled up) AR-15 bolt head.</li><li>Integrated cross-bolts to lock into trailer hitch receiver.</li><li>Bolt head rotates to extend or retract the cross-bolts, and lock/unlock from the hitch receiver.</li><li>Detents hold the bolt-head in the locked or unlocked positions.</li><li>A disassembly groove allows the device to be disassembled, but only from the unlocked position.</li></ul><p>Additional parts/materials required:</p><ul><li>Homemade <a href="https://www.matterhackers.com/news/how-to-make-abs-juice-glue-and-slurry">ABS glue</a> for solvent-welding</li><li>Acetone (for vapour smoothing)</li><li>Two approx. 8mm diameter ball bearings. (I got mine from a worn out bicycle crank bearing.)</li><li>Approx. 20mm x 8mm coil spring.</li><li>Dry graphite lubricant. (Beware of spray graphite; it may have solvents that will attack ABS.)</li></ul><h3>Print instructions</h3><p>I printed in ABS, for the strength, weather-resistance, solvent smoothing, and solvent welding. But ABS's tendency to warp did force me to split some components that could otherwise have been done in one piece.</p><p>I gave the shaft a bit of acetone vapour smoothing, to bond the layers together better. If it ever cracked when the device was fully assembled and locked, you'd have to destroy the entire thing to get it apart again.</p><p>Assembly:</p><p>Assembly video <a href="https://youtu.be/1MV4XDF4lOI">here</a>.</p><ul><li>Vapour-smooth the bolt shaft. I hung the shaft in the vapour chamber with a bit of coat-hanger wire through the detent cross hole.</li><li>After removal from the vapour chamber, leave it hanging from the wire and allow time for it to harden up again before touching it.</li><li>The cross hole for the detent balls may be a bit distorted after this. Clean it up with a close-fitting drill bit. Make sure the balls, plungers and spring move easily through the hole without binding on anything.</li><li>Solvent-weld the two halves of the bolt head.</li><li>Solvent-weld the shaft into the back of the bolt head.</li><li>Solvent-weld the two halves of the hitch bar.</li><li>Using a long wooden Q-tip or something similar, apply a bit of dry graphite lube to these areas:<ul><li>Detent grooves of the hitch bar.</li><li>Cross-bolt holes on the hitch bar.</li><li>Inside the detent hole on the shaft.</li><li>Spiral cam grooves on the back of shaft.</li><li>Larger flat ends of both detent plungers.</li></ul></li><li>Install detents in the shaft:<ul><li>Insert the small end of a plunger in each end of the coil spring.</li><li>With finger blocking one of the detent tunnel, drop a ball bearing in the other end.</li><li>Drop in the spring and plungers.</li><li>Push the remaining ball bearing into the detent tunnel, and hold it there against the spring pressure.</li></ul></li><li>Being careful to keep the detent balls compressed, insert the shaft into the hitch bar. Push it all the way down until the detent balls snap into their grooves inside the hitch bar.</li><li>Test the detents by rotating the bolt head each way.<ul><li>After 120° of rotation, it should fall into a detent.</li><li>In the fully-counterclockwise, unlocked position, it should be fairly easy to pull the shaft back out of the hitch bar. (Do not lose the ball bearings!)</li><li>In the fully-clockwise, locked position, it should be impossible to pull the shaft out.</li></ul></li><li>Install the cross bolts:<ul><li>Rotate to the unlocked position.</li><li>Partially insert a cross-bolt in its hole, with the cam pin pointing toward the bolt head.</li><li>Pull the shaft slightly out of the hitch bar, until the cross-bolt is able to go in and its cam pin is able to enter the cam groove.</li><li>Repeat for the other cross-bolt.</li></ul></li><li>Rotate the bolt-head to test the extension and retraction of the cross-bolts.</li><li>Install it on your truck!</li></ul>
With this file you will be able to print AR-15 trailer hitch cover. with your 3D printer. Click on the button and save the file on your computer to work, edit or customize your design. You can also find more 3D designs for printers on AR-15 trailer hitch cover..