AR-9
thingiverse
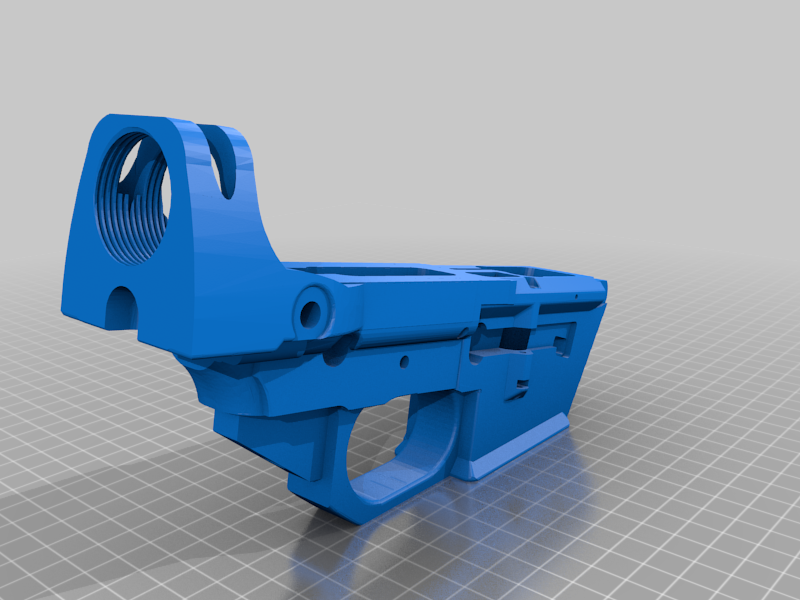
This is a mashup of the AR9 and the U-Bolt Vanguard-V1.1 I am printing the first one right now, so everything is on you! ;) Get the mag release & Ejector from the original. Here is the test file from the Vanguard This the the U-Bolt Reinforced Vanguard-style lower. Do note that this lower is only meant to work with carbine and pistol buffer tubes. I ensured the critical dimensions of this lower match that of the Colt M4 TDP, which helps assembly go a little smoother. Do note that the buffer tube threads modeled here are NOT to spec, but are instead modeled so that they can be printed and used without tapping. While this lower is quite bulky, it is also the strongest design for printed AR15 lowers that I am aware of. I was able to do multiple rifle pushups on this lower without anything breaking (lower was printed in eSun PLA+). While PLA isn't usually reccomended for AR lowers, this model works fine with PLA - the U-bolt adds enough stiffness that the PLA buffer tower doesn't suffer the fatigue that it would without the U-bolt. If you print in PLA, I recommend 230C/60C print temperatures. 100% infill is recommended. 0.15mm layer height will ensure an easier assembly experience. The exact U-Bolts I use are found here: https://www.mcmaster.com/3201T49 WATCH THE VIDEO TUTORIAL HERE: https://lbry.tv/@Ivan's_CAD_Streams:c/Assembly-Video:5 1.) Remove supports. 2.) Clearance the buffer tube or U-bolt so that the U-bolt can slide freely over the spot on the tube it will clamp on (watch video for reference). 3.) Install buffer tube and retainer as usual. 4.) Install the U-bolt (just place it down over the tube). 5.) Install buffer retainer spring from the bottom of the lower. 6.) Place and hold the clamping plate on the bottom of the lower. Hold against spring pressure from the buffer retainer spring. 7.) Install the two nuts on the U-bolt, ensuring you don't overtighten one (tighten one a little, then the other, then the 1st again, then the 2nd again, etc). 8.) Mark the part of the U-bolt that sticks up above the buffer tower. 9.) Grind or file that section flat. Reinstall the U-bolt if you removed it to grind the top off. **Important** When assembling the upper assembly to the lower, first ensure ALL the support material is removed from the front takedown pin recess - even a tiny amount of support material left behind will cause issues here! If you intent to take your lower to high round counts, consider remelting the area around the front takedown pin with a soldering iron - details on that process can be read here: https://ivanthetroll.keybase.pub/Fiberglass%20Heat-Welding%20Tutorial.pdf Refer to the renders folder for a basic look at what the rear takedown pin can look like - any .250 bolt will work, if you would like to have it be self-retaining, you can use a threaded one and put a nut on it. The mag catch slot and hole may need a little sanding/filing - this mostly depends on your support settings. Your front and rear takedown pins may be stiff for their first several uses - you can use a hammer and a punch to get them in place and removed until they loosen up. Like with any AR lower, you MUST drill out the pin holes to size - 0.250 for the takedown pins, 0.156 for the hammer/trigger pins, and 0.375 for the safety selector hole. The grip screw hole MUST be tapped with a 1/4x28 tap - I reccomend you use cutting fluid or oil, as the friction tends to overheat the plastic of the lower. Using a tap ensures the pisol grip screw hole will hold strong for a long time.
With this file you will be able to print AR-9 with your 3D printer. Click on the button and save the file on your computer to work, edit or customize your design. You can also find more 3D designs for printers on AR-9.