Arc Flipper: Fidget Toy, Clicker, and Rhythm, Timing & Dexterity Game
prusaprinters
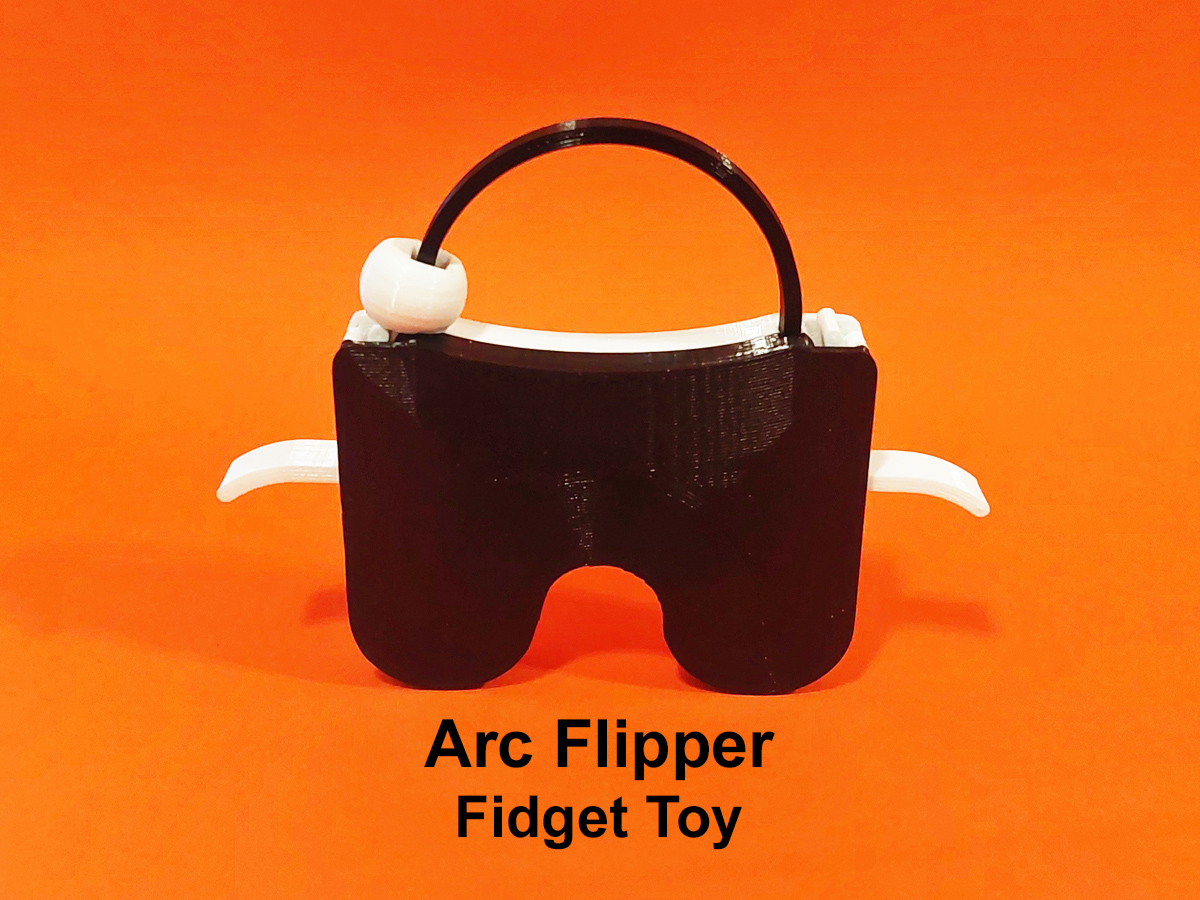
<p>This <strong>Arc Flipper Fidget Toy</strong> is a fun handheld game where an object (or objects) is flipped and travels back and forth in a mesmerizing pattern, across an arc rail, from one spring action flipper to the other. Besides being a ‘cat toy’ for humans (particularly those who like to watch tennis matches from mid-court), you can also play the following timing, rhythm and dexterity games with it:</p><ul><li><strong>Speed Flip</strong>: Try to flip the object back and forth as many times as possible in a specific quantity of time (Example: how many times can you make the object travel across and back in 10 seconds). This takes timing and dexterity because you can easily miss-hit a flip. Also, the object will travel faster or slower, depending on the angle that the game is held (upright verses tilted, affecting the drag) and how far one pulls back the flipper (affecting the striking force).</li><li><strong>King of the Hill</strong>: Try to flip the object with just the right quantity of force to stop at the top of the arc (obviously, the fidget would need to be held upright – this would be easy if you played it upside down :D ).</li><li><strong>Double Object Chicken</strong>: Install two objects, one on each end of the arc rail; try to flip the objects at the same time so that they come as close as possible to each other at the apex of the arc rail, but without touching each other.</li><li><strong>Crazy Double Object Chicken</strong>: Install two objects (of the same type would work best), one on each end of the arc rail; try to flip the objects at the same time so that they hit each other at the apex of the arc rail and both bounce back to their respective sides.</li><li><strong>Crazy Chicken King of the Hill</strong>: Install two objects; try to flip them so that they collide in such a way that one stops and remains at the apex of the arc rail, while the other object is sent back to its respective side.</li><li><strong>Annoy Your Friend</strong>: This fidget has repetitive visual movement and an audible clicking sound; when your friend is talking to you:<ul><li>Hold up your fidget in front of your face;</li><li>Using your good eye, stare at your friend through the arc opening (an expressionless face is helpful);</li><li>As your friend is talking – and only when talking – flip the object back and forth;</li><li>Continue doing this until he/she gets annoyed with you. Usually, you will have a pretty good idea when that has occurred. However, you can know with surety that you have won the game if your friend stops talking completely, cocks his/her head to one side, and stares back at you with an irritated expression.</li></ul></li><li><strong>Double Annoy Your Friend</strong>: Install the ‘Arc with Stopper’ arc rail, and two objects, one on each end of the arc rail (perhaps the Sad Face object would be appropriate; or confuse them and use Hearts). Follow all of the 'Annoy Your Friend' game instructions (above), but this time flip both objects, preferably in a doubly rapid, alternating pattern.<ul><li>NOTE: The ‘<strong>Arc with Stopper</strong>’ has a protrusion at the apex which prevents the objects from travelling to the opposite side of the arc rail.</li></ul></li></ul><p>There are many more games just waiting to be created with this Arc Flipper Fidget Toy. See what games you can some up with.</p><p>Now, back to the details….</p><p><strong>The Arc Flipper Fidget Toy can be printed without supports</strong>, however many of the optional traveling objects require supports, though not all of them. </p><p>Note: <strong>You do not need to print all of included 25 Model Files</strong> to have a working fidget toy. 20 model files are variations of the traveling object, and all perform the same function. You only need one or two of these, depending on whether you are going with a single or a double traveling object configuration.</p><p><strong>The basic model consists of the following six pieces:</strong></p><ul><li>2 unique body halves ('Half 1' and ‘Half 2’);</li><li>2 springs/flippers ('Springs' – you print two of these, and flip one over);</li><li>1 arc rail ('Arc' or ‘Arc With Stopper’ - See "Double Annoy Your Friend' above); and</li><li>1 traveling object (there are many to choose from; more than one can be installed):<ul><li><strong>Traveling Objects NOT Requiring Printed Support</strong> (these travel best because they have a lower center of gravity, they are also more compact and use less filament):<ul><li>Ball</li><li>Hour Glass</li><li>Square</li></ul></li><li><strong>Traveling Objects Requiring Printed Support</strong> (there are two types of bases, round cylinder and square/rectangular; the square bases travel slightly better than the round ones):<ul><li>Football Round</li><li>Football Square</li><li>Heart Hollow Round</li><li>Heart Hollow Square</li><li>Heart Round</li><li>Heart Square</li><li>Pumpkin Round</li><li>Pumpkin Square</li><li>Sad (face) Round</li><li>Sad (face) Square</li><li>Smiley Round</li><li>Smiley Square</li><li>Soccer Ball Round</li><li>Soccer Ball Square</li><li>Soccer Ball Square Lg.</li><li>Star Round</li><li>Star Square<ul><li>NOTE: the original football, heart, pumpkin, soccer ball, and star shapes are generic models available within the Tinkercad program. I did not design them. I decided to incorporate them for variety (and because it was quick, easy and mildly amusing). It would be easy to make custom traveling objects from an infinite variety of designs.</li></ul></li></ul></li></ul></li></ul><p><strong>PRINTING:</strong></p><ul><li>Print the two unique halves, two springs, the arc that you want to print, and the object(s) that you want to print.<ul><li>NOTE: if you are printing more than one travelling object at the same time, and if your slicer allows you to slice the print in ‘One at a Time’ mode (as opposed to ‘All At Once" mode, use the "one at a Time’ mode, you will get better prints of these small objects.</li></ul></li><li>I printed using PETG (I don't know why you couldn't use many different filaments)</li><li>0.4mm nozzle</li><li>100% infill (using a smaller percentage doesn't save that much filament)</li><li>0.16mm layer height</li></ul><p><strong>POST PRINTING:</strong> </p><ul><li>Clean up any printer blobs and supports, if applicable.</li><li>Make sure that the arc rail is smooth, the connection points on the two halves are free of printing debris, and that the rectangular holes in the traveling object(s) are free of debris.</li><li>Also, <strong>the tolerances on this model are tight</strong>. Make sure that the arc rail top and bottom surfaces are flat, especially at the ends where there is a circular enlargement (my printer would leave an extra blob of filament right in the center of that enlargement).</li><li>NOTE: If you are doing a lot of 3D printing, I recommend getting access to a set of small ‘hobby files’ and a few pieces of sand paper of fine and very fine grit. I do some clean up (sanding and/or filing) on nearly every thing I 3D print. It would be nice if prints came out perfect, but they don't.</li></ul><p><strong>ASSEMBLY:</strong> </p><ul><li>Assembling the model is quick and easy (see attached diagram in the photos). <strong>Follow these steps</strong>:</li></ul><ol><li>Lay one body Half 1 on its side so that the interior is facing out.</li><li>Notice that all of the traveling objects have the rail holes positioned toward the bottom of the object. Insert the traveling object(s) in the arc rail so that top or larger portion of the object is on the outside curve of the arc. Typically, one would use one or two travelling objects.<ul><li>NOTE: If you are not sure which objects that you want to install, you can test them without fully assembling the model by following steps 1-4, and flipping the object back and forth. The pieces will usually stay together long enough to get an idea how they look and function.</li></ul></li><li>With the object(s) installed on the arc, insert the two enlarged ends of the arc rail in the receiving notches in the half body (see attached photo diagram).</li><li>Insert the two springs in their respective locations, mirror image.<ul><li>NOTE: There are two appendages on the springs, the longer ones are the right and left flipper levers, and the shorter ones point up and slightly protrude out of the two top corner openings of the body half (these hammers strike the traveling objects).</li></ul></li><li>With the above pieces installed, carefully insert body Half 2 and push the two halves together. <ul><li>NOTE: This might be a very tight fit, and it will be difficult to disassemble. If you are wanting to be able to disassemble the model, you might want to partially test fit the body halves before final assembly. If they are very tight and difficult to pull apart when only partially fitted together, you might want to sand the connecting posts a bit to ease up the friction fit.</li></ul></li></ol>
With this file you will be able to print Arc Flipper: Fidget Toy, Clicker, and Rhythm, Timing & Dexterity Game with your 3D printer. Click on the button and save the file on your computer to work, edit or customize your design. You can also find more 3D designs for printers on Arc Flipper: Fidget Toy, Clicker, and Rhythm, Timing & Dexterity Game.