Arc Reactor using Adafruit Neopixels + Rechargeable LiPo
thingiverse
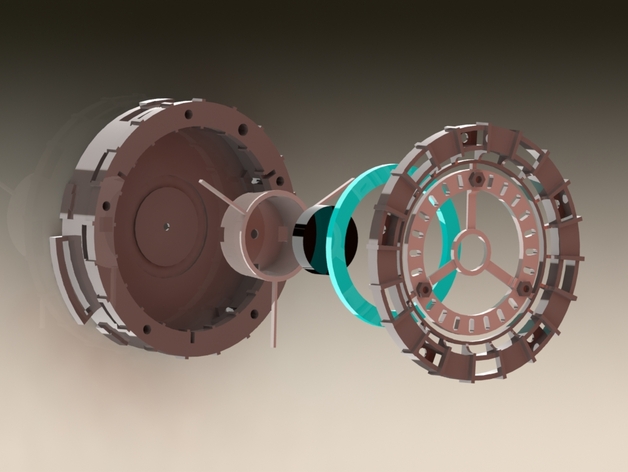
Hey there everyone, I figured I'd upload this arc reactor I've been working on for a while now. I've printed it off and it all works, so I'm happy to share it around. There are three pieces - the base (largest), the faceplate and the inner... bit, I guess. This arc reactor is designed to fit all the components needed to get it lit up and lookin' pretty. An Adafruit Arduino Gemma will fit right in the very middle. The inner ring on the faceplate is designed to match up with an Adafruit 24 NeoPixel ring, and there's one slot per LED, allowing them to shine through clearly. There are two external rectangular holes on opposite sides of the base. I designed them one for a micro-USB socket, the other for an on-off slide switch. I ended up using a small SparkFun micro-USB LiPo charger, and the board fits into the base along with everything else. There's also a circular cut-out on the inside of the base to fit an inductive coil - for inductive charging. I haven't yet tried this out, but the space is there if someone wants to give it a go. I have the source files made in SolidWorks I can upload - let me know if anyone's interested. Instructions I'll be doing a more detailed Instructable on how to put this thing together at some point, including electronics and such. Until then, this should give you a good overview of what goes where. Firstly, you'll want to print off the three sections. Black would be a good choice as a base colour, but you'll want to paint this for it to come up looking its best. There's a little bit of overhang on the base piece, but it should print fine without support material (I didn't have any issues, and my printer struggles with overhangs). The whole thing is designed to go together using M3 screws and nuts. The inner part pushes into place in the base, the three 'arms' each pressing into a small grove. A single M3 screw then pulls this part tight to the base, with an M3 nut fitting in the indentation on the outside. The faceplate attaches to the base via five longer M3 screws. Screws longer than ~23mm should do the job, although anything longer than ~28mm you'll need to trim down to get a flush fit. For physical assembly - that's it. The outer ring of the reactor is hollow, originally I was planning on running a short length of EL wire through here, but after reconsidering a couple of loops of copper wire look pretty good too. Speaking of copper wire, for the best look the reactor is designed to have thin copper wire wrapped around every second section of the outer ring - over the solid sections. This finishes it off quite nicely, but makes it impossible to open the reactor up again without first unwinding the copper - only do this once you're happy with the insides! Electronics wise, I designed this arc reactor with the following components in mind: AdaFruit Arduino Gemma Microcontroller AdaFruit 24 NeoPixel Ring AdaFruit Single NeoPixel (for centre, sits on top of Gemma) SparkFun LiPo Charger Basic (either mini or micro) Any small LiPo: I used a 400mAh one from SparkFun, anything bigger might be tricky to fit. Small slide switch If anyone has any questions, feel free to ask via comment - I'm happy to help out. EDIT: I've written a few details about the wiring for those who were asking: http://chrisbarrbuilds.com/2015/02/3d-printed-arc-reactor/
With this file you will be able to print Arc Reactor using Adafruit Neopixels + Rechargeable LiPo with your 3D printer. Click on the button and save the file on your computer to work, edit or customize your design. You can also find more 3D designs for printers on Arc Reactor using Adafruit Neopixels + Rechargeable LiPo.