Arca Swiss quick release adapter with lever
thingiverse
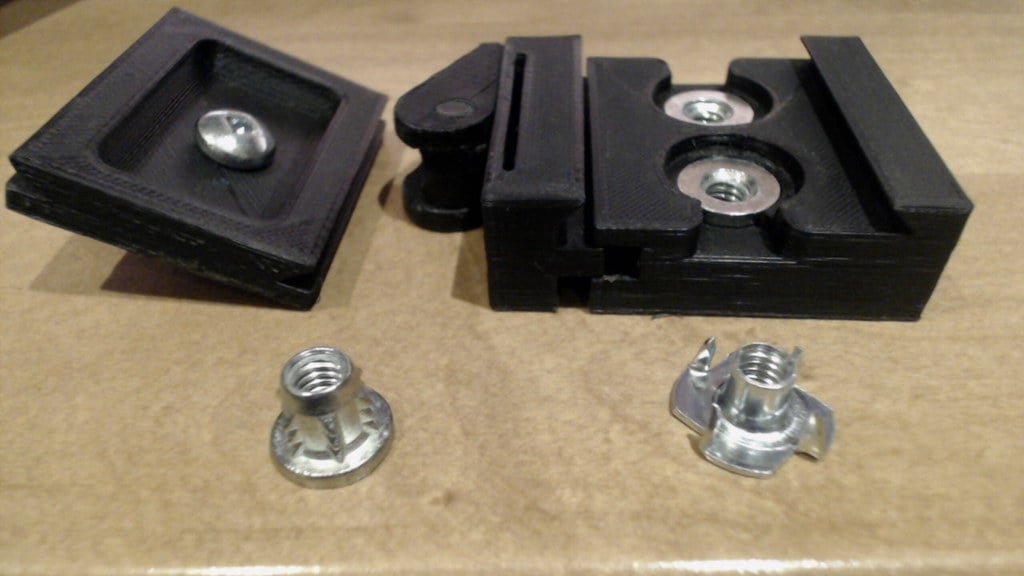
MontanaMonk did a nice job with his adapter https://www.thingiverse.com/thing:3446148. My remixed adapter differ as it uses a lever to secure the plate in place. I could not find the 3-prong tee-nut, so I used (9mm) 4-prong tee-nut (Paulin 222-014), or 1/2in long 1/4-20 Flanged Star Nut (Paulin 222-924) for the 1/4-20 screw. They are shorter, and interfere with the screw, so I used two and leave the middle place for the screw. The jaw is not captive, so you will need to make sure it can be moved freely, file it if required. To assemble you will need the following hardware - 1-2x tee-nut tee-nut (Paulin 222-014), or 1-2x Press-In-Serts Flanged (Paulin 222-924) - 1x 6-32 2" screw - 2x 6-32 nut And print the following - Lever (100% infill, better to rotate it for rigidity) - Jaw (40% infill was OK) - Base matching your te-nut/star tee (40% infill) - One or more plate of your preference (40%, and probably higher infill) (original "Plate" is OK, But I would highly recommend one with stud to prevent accidental fal, see Plate-Hollow-Studl) To assemble, - Break the lever loose, it is a print in place design, make sure the temperature is OK, and the flow not to high. - Make sure the jaw can be inserted/removed for the base (file, sand as required) - Make sure the screw goes freely inside the jaw (drill if necessary) - Press one nut in the lever, insert the screw from the nut side to make sure it goes in, then remove. - Press one nut in the base (jaw side) - Insert (and screw) the screw through the base from the side opposed to jaw, it will go out though the screw and tighten in place extending roughly 22mm out - Install the jaw - Screw the lever, the slot in the jaw will provide some spring loading. Don't over tigth. - Install the tee-nut / star nut either with pressure or screw a bolt+washer from the bottom. Inserting a 1/4-20 Screw and using a vise worked fine for me. If you prefer the screw mechanism from the original design, but want the different tee/star nut hardware, install a longer screw (2 1/2 inch ) and use the original jaw + knob. If you don't have a 1/4 photo screw, or while you wait from them getting from china, you can use a 1/2 inch hex 1/4-20 screw. You will need to file out the first 4-5mm of thread so it goes through the plate. If you want a thub screw, print the thumb screw included (credit https://www.thingiverse.com/thing:1065438 ) and the Plate-thick-hollow-stud so the thumb screws can fit in. I added a couple files, with small fine tune - Base-lever-2xstartee13mm_V1.1.stl and Base-lever-2x4prong_V1.1.stl moves the screw to protrude out 2mm more, which will work better for larger plate. If you plan to replace screws with M3-50, that will help too. - Jaw_lever-V1.1.stl has the slot moved inward, giving slightly more spring, and more grip - Jaw_lever-V1.2.stl is like 1.1, but I removed 0.5mm from the bottom to avoid sticking with larger tripod where the jaw gets restricted by touching the mounting plate. They all work nicely together, so you can you any of the jaws with the base without issues. After making a couple, I found that the star-tee nut is easier to insert than t-slot, and look nicer in my humble opinion. T-nut tend to grab material on their way if not inserted perfectly square, if you use t-nut, install them with a machine screw. washer and nut, this way they will get in perfectly
With this file you will be able to print Arca Swiss quick release adapter with lever with your 3D printer. Click on the button and save the file on your computer to work, edit or customize your design. You can also find more 3D designs for printers on Arca Swiss quick release adapter with lever.