Arcade Coin Door
thingiverse
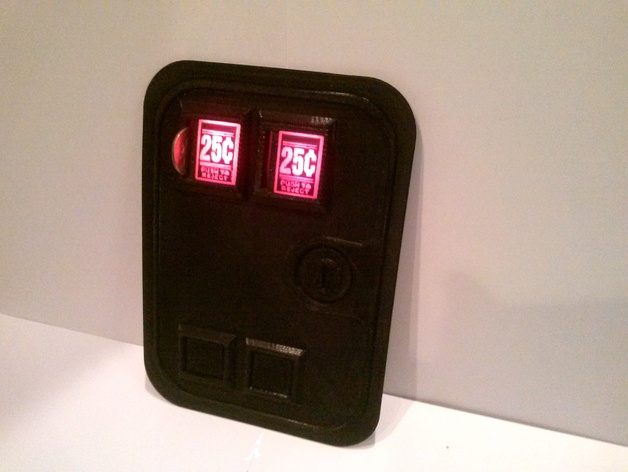
Insert Coin Made for my emulator cabinet project, this Faux Arcade Coin Door is the first of a collection of Arcade related things I have made as of late. It looks like the real thing; The slot is big enough to accept a quarter (or a token) but it was made for looks. When lit with LED's it looks genuine. It can be modified to be used on many projects: turn it into a fridge magnet or a piggy bank; use your imagination! This was based on the sketchup model by XyloSesame https://3dwarehouse.sketchup.com/model.html?id=6c1173844346904c06dde090b695257 But modded heavily, as I had issues with the original, but it was good enough to get the scale correct. I added fake coin returns and it's about the scale of a mini coin door. Be sure to read the instructions. There's a trick to printing the reject buttons. Instructions Print the file, "Coin_Door_Final.stl" in black at medium resolution. you will need a level bed then print two copies of "coin_button_scaled.stl" There's a trick to it: they must be printed at medium quality (.2mm layer height) no support or raft. start the print using black filament. immediately after the first two layers have been printed, pause, and switch to a translucent color of filament (I used translucent Red PLA) and finish the print. You will need to press the reject buttons into the bezel, from the front. Use a little super lube grease on the inside of the bezel opening and the outside walls of the button, because it's a tight fit. Start by pressing the top edge of the button into the slot, slide the button up, and get the bottom edge lined up and started in. flip the entire panel over, and using your hand, smack it hard to press the button into the bezel. the button face should be flush with the bezel. be sure the button face is flush against the work surface before smacking it. I included "Coin_Button_Smaller.stl" so it could be modded into a pushable reject button. you will need to add a spring and a fastener to it, look at genuine coin reject buttons to get an idea of how they work. Wire up some LEDs for the buttons, using a matching color really makes them pop. I used two wide-angle bright red LED's wired in parallel, using a 100-Ohm resistor on each, and wired them to a USB cable to power them, but you can wire them up as you like, depending on your application. adding a piece of white paper behind the button and LED helps diffuse the light, and makes it look even better, btw. The rest is up to you! I included a mockup stl file for reference; It's not meant for printing. If you make this, please post it, especially if you do buttons in different colors! I'd love to see the results! Happy gaming! *note, there is one small flaw in the coin door, to the left of the leftmost bezel. It shouldn't be noticeable in most applications. I plan on fixing it and posting a revised part in the near future for you perfectionists out there. I may also make different lock faces for the door as well. If you want different text on a button, drop me a PM and I'll take it under advisement. I just added "coin_button_blank_scaled.stl" which is a blank version of the press-fit coin button, so you can customize it with your own text or graphic, just be sure any graphic you add to it is .4 to .5 mm thick. Update: user rjelbert designed a modification of the buttons which you can find at his make here:https://www.thingiverse.com/make:485746 He was able to print the text onto paper, and use it as an insert on his version. be sure to check it out if you're having trouble printing the text directly onto the buttons.
With this file you will be able to print Arcade Coin Door with your 3D printer. Click on the button and save the file on your computer to work, edit or customize your design. You can also find more 3D designs for printers on Arcade Coin Door.