Arduino isolated programmer
thingiverse
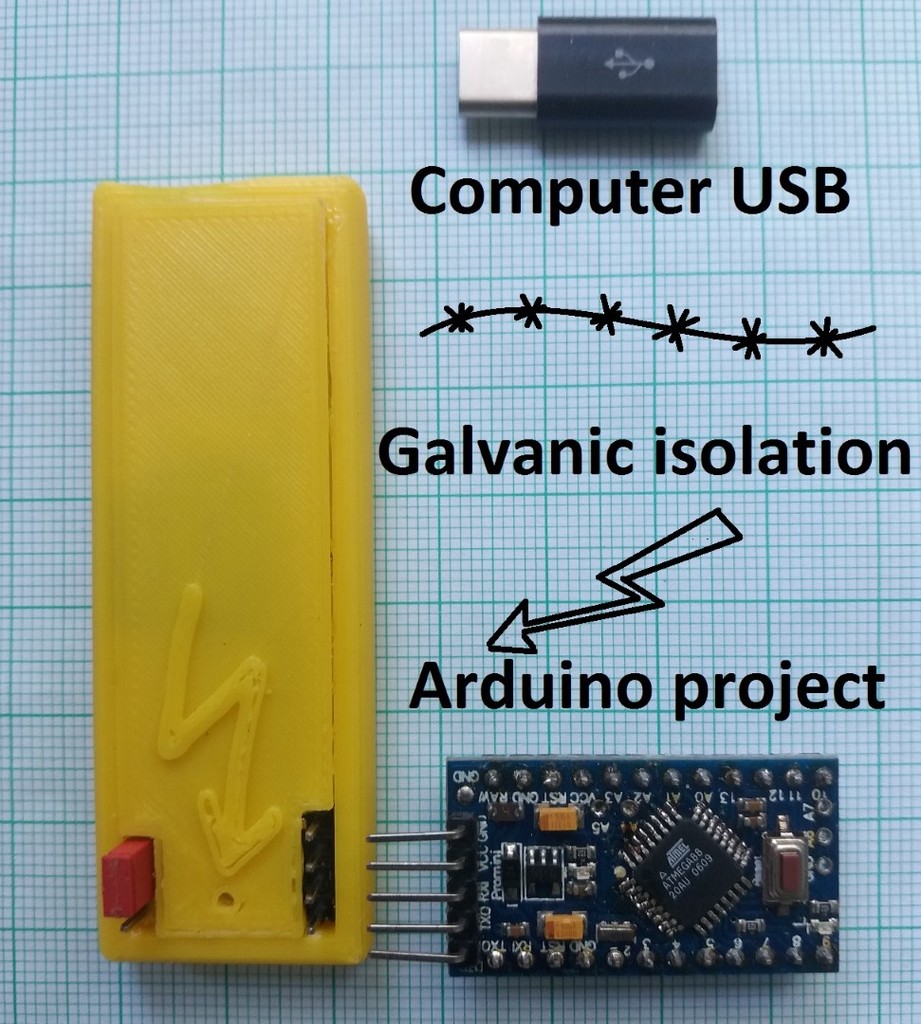
Programmer hardware for Arduino provides galvanic isolation between computer and Arduino device. Prevents ground loop disturbances too. Clean strong Rx Tx DTR signals, tested from 110 to 2,000,000 Baud. Isolated supply built in: 5V or 3.3V 270 mA. Useful when the device to be programmed is on a different potential from the computer on which the IDE runs. It could protect your laptop from damages via ground loops or kickback from high power devices as well. Built around the ADUM-1201 chip, and opto isolator for the DTR (reset). Power is provided by B0505S-1W module, selectable 5 or 3.3V voltages. Serial converter : CH340G micro USB module, is available in different formats. The 3D print file covers two models depending on the positioning of the USB. Other than CH340G (CH340E, CP2102) should work but not tested. CH340E modules for example have no DTR signal, the RTS signal is called DTR on the PCB. Do not rely on the Rx Tx etc. printed text on the "USB to Serial" module, maybe the signals are just the opposite how one would think. Swap the two wires if you don't get communication, or even better, follow the signals to hardware pins of the CH340 chip. See the schematics, the signals are clearly marked as pin2 and pin3 of the CH340G. Labels are confusing on CP2102 modules too, e.g. the module's output was Rx and input marked as Tx. To test the communication please shortconnect IN / OUT and see the echo on a terminal program. The DTR signal will be Low during upload. Maximum size for the CH340 module is 18x22mm. The ADUM chip and the optocoupler is soldered on a SOP20 to DIP adapter board, together with small parts. Between the two is the B0505S-1W isolated power supply module. Concerning isolation, the SOP20 PCB is the bottleneck of the project. In order to increase isolation gaps, shorten the PCB tracks between the two isolated sides on the SOP20 side. There is a 3mm gap between SOP tracks which could be increased to 5mm. Remove unused tracks between the optoisolator and jumper strips, and from the other SSOP20 side too (may keep some for the 662K regulator), drill out one PCB point completely (see picture). Use teflon isolated flexible wire for connections. There is a LED to indicate the voltage on the output. The B0505S module can supply 270mA (datasheet value). You could tap off power for your device from the jumper if necessary. Tested with Arduino Mini 5V and 3.3V version. Take care when working with voltages greater than 42V ! This design prototype is not suitable for industrial or commercial purposes. Update : CP2102, opto TLP126 version , works well with Arduino Mini Atmega 168, 3.3V. .
With this file you will be able to print Arduino isolated programmer with your 3D printer. Click on the button and save the file on your computer to work, edit or customize your design. You can also find more 3D designs for printers on Arduino isolated programmer.