Arduino Nano Bootloader ...loader (Arduino as ISP programmer)
thingiverse
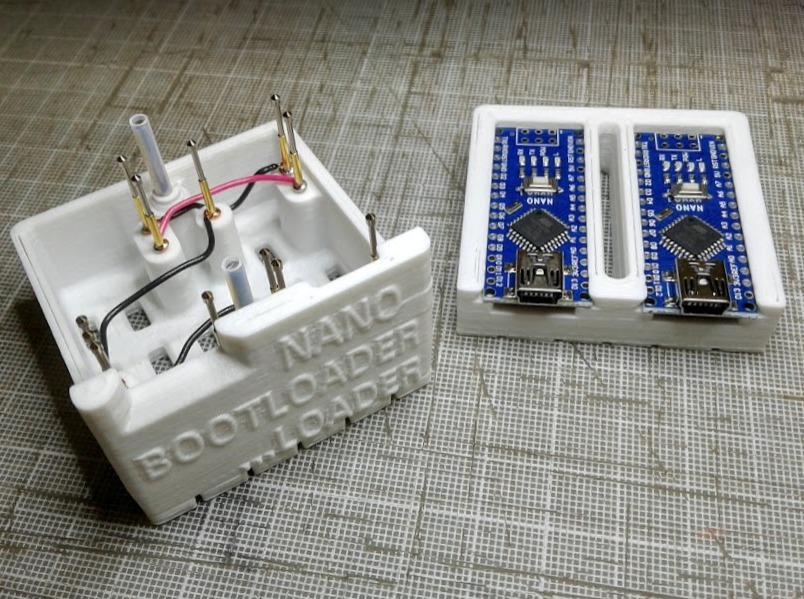
If you buy Arduino Nano's from China and you need to use them pin-less, this might be a good project for you. I am putting these Nano's into products and find hooking them up very time consuming and risky. This little tool is based on Arduino IDE to program a master NANO to act as an ISP (Arduino as ISP). All the pins are connected based on the included IDE example sketch "11.Arduino ISP" Power, ground, D11, D12, and D13 are one for one. The source Nano will use D10 connected to the target Nano Reset. The contact I am using are P100-E2 Dia 1.36mm (eBay). I am also using a solid 22awg wire to connect them to provide some rigidity so that the pins that are side by side don't accidentally short (the non-looped wires). The wire manages the depth the pins fit into the case. I put the wire at the crimp of the contact housing, biased slightly closer to the contacts. You will need to drill out the holes when printing these on most printers. The head of the contacts freely fits through the upper carriage. The contact bodies are a close-fit to the base. Trying to get them press-fit proved destructive to several contacts so I just drilled them out to 1.5mm [.059"] in ABS. Maybe smaller for PLA. You want them to remain as straight and rigid as possible. I will probably glue them down over time, but this does work fine as-is. The guide posts are bicycle spokes with some Teflon tubing to make up the gap. I opted not to clamp the two pieces as the operation only takes seconds. However, you can use longer threaded posts and a thumb-nut if you want to be able to set it aside while installing programs to the target Nano and other operations. One word about the print files; I used a 3D Systems CubePro to print these. CubePro is fanatically accurate and often under-sizes features so nominal prints fit together well. I've put in all the caveats in the print to make sure this is pretty darn close right out of the box, but if you find your Nano's fitting tight in the carrier, widen the slot a little. I always clean the edges of my Nano's first. In my build, the Nano's fit quite loose. You can also dump the sidewalk (border on the base). I put it there because the slicer's sidewalk wanted to fill the gaps. Oh, the gaps are there to minimize warping. You need a good strong hold on the build plate for these if you print with ABS. However, PLA should be simpler. I ran both parts as "Solid". If you need a simple tweak on the model, please post your request in comments and I can see what I can do to help. I can tell you that I just reduced a 1/2 hour job into mere minutes. Edit: 04/25/2019 I've added a version that includes all pins for the Nano. You're on your own on how to configure it. Both models are in MM.
With this file you will be able to print Arduino Nano Bootloader ...loader (Arduino as ISP programmer) with your 3D printer. Click on the button and save the file on your computer to work, edit or customize your design. You can also find more 3D designs for printers on Arduino Nano Bootloader ...loader (Arduino as ISP programmer).