Ardumower Arctic Hare improvements
thingiverse
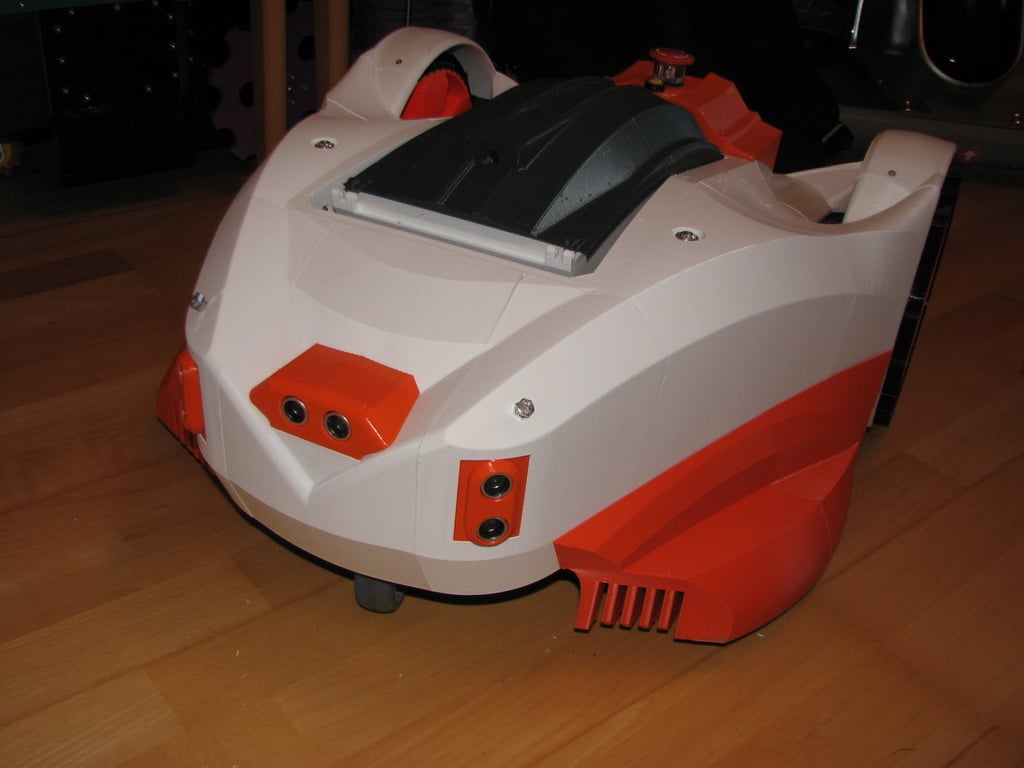
This is a remix of raess fantastic printable chassis for Ardumower DIY Lawn mower. All credits to raess, I just fixed some thinks. Most parts are now printable without support, some will need little support, but much less than original. Also, some parts are more strength, screws, washers and nuts now fits better. https://youtu.be/MN0EQpaiLVo Things I've changed so far: - Parts Back-left and Back-right I changed the area where the wheel sits. Now this part can be printed without support. Also, the connection part is now joined to back-right/back-left part so you don't need to print it separately. - Parts Front_right / Front_left The parts are printable without support. Also the holes for mounting the part to back_right/back_left are modified so a washer and nuts for M3 scews fits. - PCB brackets (chassis mounting points)left/right, perfect printable without support - PCB Cover back/front. Both parts printable without support. PCB Cover front with Rasperry PI camera - Parts Motorbox lid (traction motor) right/left. Right printable without support, left minimal support needed (100% overhang threshold). The mounting holes for chassis damper must be completed with an drill. - Motorbox left: I added a mounting hole for a switch (its a keyed switch) with an diameter of 22mm. If you don't need this switch here, just print the original Motor box from raess. - Motorbox right: I added mounting holes for a DC Plug and one for a control light (RAFI). The diameter of holes are 12mm and 10mm. If you don't need them, just print the original Motor box from raess. - Wheelhouse: the wheelhouse consists of two parts now. Both can be printed without support. The "Base" part is more robust on the back side. - Nose with optional sonar: The nose now consists of three parts instead of two. Also it is possible to mount up to three US sensors (or other sensors for sure). The part in middle can be printed without support. Left and right part will need support, but less than raess parts. On middle part, the screw holes of US sensor are not complete. If you want to use US sensors, drill them through the part manually. I did it this way so you can use the new nose even if you don't want to use sonar here. The attached file also contains some sonar lids for the left/right part. Print them, if you don't want to place US sensors here. - Middle section part on back of chassis, on top of motors: I split this part into two parts. The lower one connects the wheelhouses and the upper chassis with the dampers on back side. There is a smaller cut-out on the lower side. If you need cables on this part (Buttons, Displays etc.) put them through this cut-out and close it with a small lid. Also there is a lid/cover, which closes the box. In my opinion, there will be lots of different versions of this cover depending on your needs. Someone will put a Display here, buttons, kill switch, LIDAR tower or what else. Therefore, I only created a very basic versions without any holes and cutouts. It just closes the box and might be the basis for your development. - New Wheel / rim: The outher shell is more robust now, so there is no risk for break anymore. Also the back side is closed, so no derbs will be collected. No support needed but you must drill the center holes for motor adapter once (only 2 Layers) Also, there is a 1 Layer thick bridge to support the mouting flags of wheel cap. Just cut them away after print is finished. The rim looks more massive now and has more infill areas. But it weights only 10g more than the original one (approx 315g, I printed both versions with 4 perimeters and 20% infill) To join the parts together, you need some screws. Most will be M3 cylinder head with nuts and washers. Sometimes you need other screws like plastic screws or wood screws. PLEASE NOTE: This is still work in progress, I will add additional parts by time and also may change files. I was able to print and mount everything provided here, other people reported they had success too. You find additional details here https://www.ardumower.de/index.php/de/forum/eure-ardumower-umsetzung/1827-paddy-s-ardumower-arctic-hare?start=%1$d Please use only the STL files provided on Thingiverse, and not from the Ardumower forum (link above) because I will update any change only here. But you should definetly have a close look to http://www.ardumower.de if you want to build your own lawm nower robot. UPDATE 2019-01-11: Cut cover added, three parts for each side. Because the comb-like part is separate, it is easy to replace if it breaks during mow. Update 2019-01-24: New battery box, two parts to fit my large 155x73x95mm battery. Both parts printable without support. Beware, the new box is much taller, it might collid with ground easily and it might collid with blades. If you need a large box but one which is not so tall (95mm), give me a note. To fit the new battery box, PCB box has now larger cutout. It can be printed without support. Please note, the original battery box of raess will not fit in my version of PCB Box UPDATE 2019-01-26: Alu mounting brackets changed. Initial design collids with new battery box. The new version uses countersunk screws and has more screw holes to connect alu profile. It is more rigid now. UPDATE 2019-02-19: Center frame back and center frame front. Both act as inner frame of upper chassis (around PCB box). These parts are necessary because they will increase the strengt of the entire chassis. Part center frame front has been modified to allow the chassis to move when hitting obstacles. Sadly, this mean there is a larger gap now between PCB Box and chassis. Both parts can be printed without support. I printed Center front frame part standing upright. UPDATE: 2019-02-28: New tire. It is smaller and may fit on your printers surface (210x210mm required). Also you need less filament. I printed it with 3 perimeter, Noozle 0.4mm, extrusion width 0.45mm, layer height 0.2mm, bottom layer 8 (yes, eight), 4 top layer and 0% infill. If you don't like it, the origin tire of raess fits also, they are compatible at all. UPDATE: 2019-03-08: Kill Switch cover. This cover replaces the lid with "ARDUMOWER" letters to be able to add Kill switch and power switch. I tried to give it a cool look so design matches PCB cover. It can be printed without support as shown on pictures UPDATE 2019-03-14: New front wheel bracket with integrated lift switch (micro switch). This triggers if someone or somethings lift the mower from ground. Also, there is now a micro switch based bumper. Two micro switches recognize displacement of cover and triggers bumper. You need these parts: front bracket, switch cover, switch trigger and front bracket cover. Also you need three micro switches like Marquardt 1050 (roller type) UPDATE 2019-03-22: New box for perimeter receiver. It fits on front bracket. The smaller part (Perimeter cover) needs a little support. UPDATE: 2019-03-31: Finally I was able to build some sonar mounting points. These small boxes fit to HC-SR04 modules with approx 45x20x15mm dimensions. You need to de-solder pin headers of the module and either solder cables directly to module or rotate the pin header 180 degrees (like I did). Otherwise, modules will not fit.The sonar mount for sides needs to be printed twice where one has to be mirrored. Because I found my bumper too sensitive, I build a smaller bumper trigger bar too. UPDATE: 2020-04-06: Two things happened to me during last season. First, one of the wheel (rim) was broken where it connects to motor (four screws). It was caused by a weak print and not caused by design. However, I needed to print the entire wheel just because a small portion failed. Therefore I split the rim into two parts, an inner and an outher part which gets bolted together. This way it is easier to replace and easier to print. Second the cut cover was too low, so at bumpy lawn, it reaches the ground and trigger the bumper. To avoid this, I created a smaller (less lower) version of the three parts needed for cut cover (cut cover font back small and chomb small)
With this file you will be able to print Ardumower Arctic Hare improvements with your 3D printer. Click on the button and save the file on your computer to work, edit or customize your design. You can also find more 3D designs for printers on Ardumower Arctic Hare improvements.