Ares Stoner Bullpup Project
thingiverse
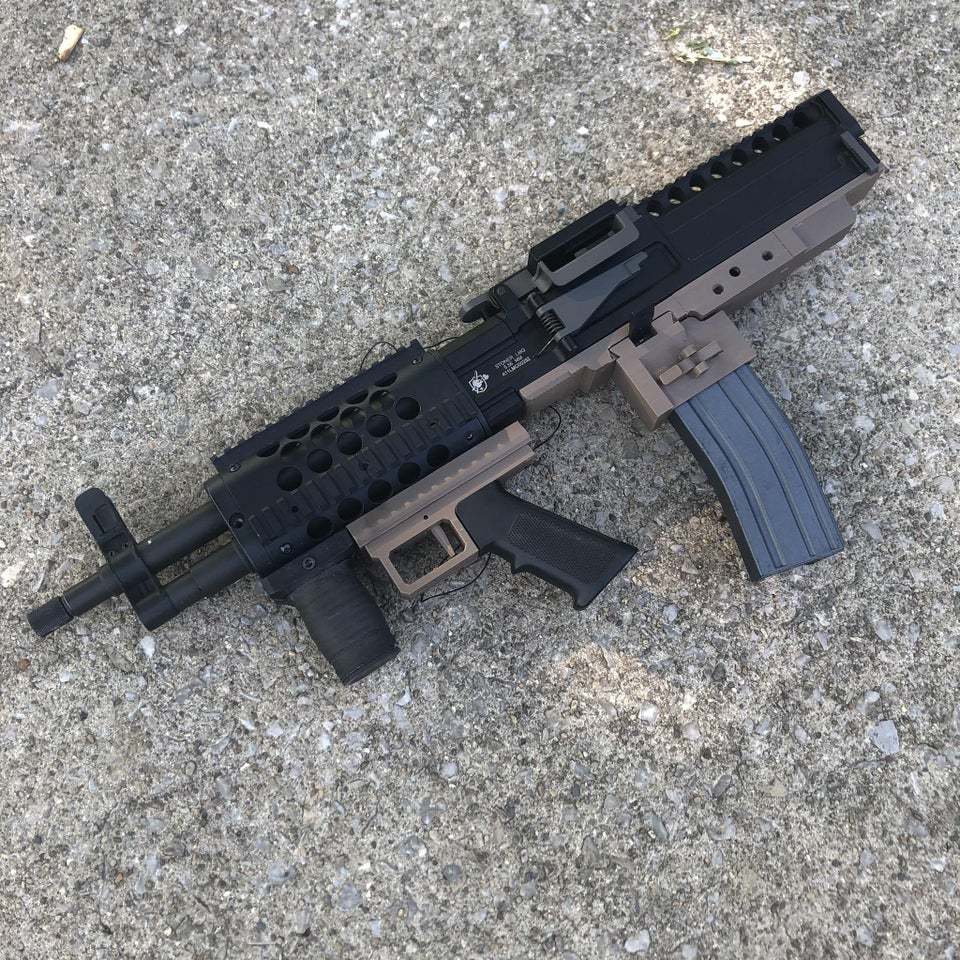
This is for the Ares Stoner ONLY Will not work on CA or others brands Printed on QIDI X-Maker. If it works on that model it should work on yours. Before diving in, keep in mind this a personal project and some parts may need heavy sanding or modification to fit your needs. What you will need: Basic mosfet with dual signal wires. I used Gate AAB. M4 body pin. Various length 3mm screws. What I used for this project: https://www.amazon.com/binifiMux-360pcs-Countersunk-Phillips-Machine/dp/B08N5XDHMW/ref=sr_1_2?dchild=1&keywords=Screws&pd_rd_r=92cf978c-c837-44b5-b07d-e4727bbab69e&pd_rd_w=OBSJl&pd_rd_wg=t5kbf&pf_rd_p=b4950e17-f2f6-494c-bba5-69a9d0aa3887&pf_rd_r=MNDJZSSW41BQKXZ25179&pid=suRggFf&qid=1621797492&refinements=p_n_feature_five_browse-bin%3A3177274011%7C3177285011%2Cp_n_feature_fourteen_browse-bin%3A11434052011&s=industrial&sr=1-2 Motor grip mounting screws. Small electronic microswitches. Order a variety pack to find one for your needs. This is what I used for the project: https://www.amazon.com/Momentary-Tactile-Button-Switch-Assortment/dp/B07LCBLB8N/ref=sr_1_6?dchild=1&keywords=small+micro+switches&qid=1621797279&sr=8-6 :::Files::: MAIN BODY: The model is divided into three pieces for smaller print beds. Utilizes stock feeding nozzle, stock body pins and screws. Once completed, clean off all supports and meld pieces together via heat or glue. TRIGGER ASSEMBLY: Divided into 3 pieces; picatinny mount, trigger housing and trigger. Uses TM style M4 grip. Secure it with standard grip screws. Secure the trigger housing to the picatinny mount using 3mm screws. Secure the trigger with M4 body pin. BUTTPAD: Simple single piece to replace stock. WIRING: My design utilizes Gate AAB mosfet and a microswitch. Battery storage is PEQ unit mounted to right side rail. WIRING SETUP: Dremel an adequately sized opening into the stock battery tube to enable access to the mosfet and to give plenty of room for wires. You will be creating leads that will run from the mosfet to the motor and a lead from the mosfet to the desired battery storage location. Solder the dual signal wire to the microswitch once dual signal wire is routed through the picatinny rail and picatinny mount. Secure it inside the trigger assembly via glue or epoxy. Finding a spot to glue in your microswitch varies on your microswitch type. No spring is required for the trigger reset, it will reset from the microswitch. Route wires into the battery tube opening you created in the side. Connect leads to the motor, mosfet, signal wire and battery. PRINTER SETTINGS: PETG 235 Degree extruder 70 Degree bed .15mm Layer height 30% infill 2mm retraction distance 60mm/s retraction speed 50mm/s print speed
With this file you will be able to print Ares Stoner Bullpup Project with your 3D printer. Click on the button and save the file on your computer to work, edit or customize your design. You can also find more 3D designs for printers on Ares Stoner Bullpup Project.