Artillery Sidewinder X1 Borescope mount
thingiverse
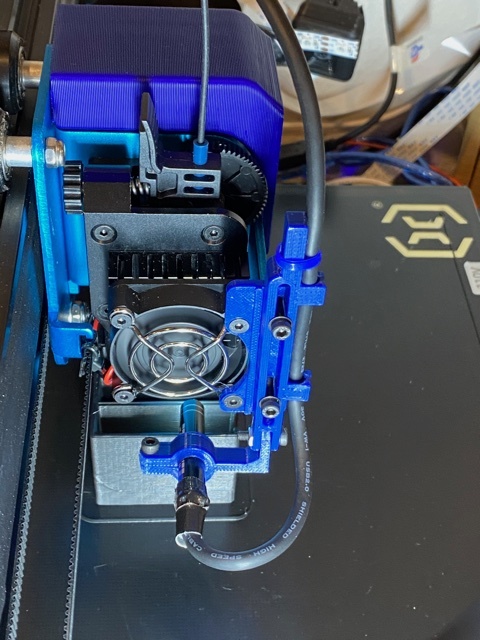
# Artillery Sidewinder X1 Borescope mount This mount may also fit the Genius, however I did not test it! The project was inspired by this video: https://www.youtube.com/watch?v=GAp23w_dnNc&t=1s It also uses the camera suggested in that video: https://www.amazon.com/gp/product/B071HYRPND NOTE: **you will likely break a camera or two before getting it to work!**. You will also need to solder. Please watch the video to see what is involved. I did a number of things different than described in the video: - No need to cut open the camera case. Using pliers, gently but firmly manipulate the cable plug at the end of the camera, losen it by angling it up and down. **Be careful** when the plug finally lets go to not rip the cable out of the camera and damage it. Also take care to not deform the tube, that will make it harder to extract the camera. Some plugs come lose easy with no residue in the metal tube, others used a lot of glue. You may need to clean that out before being able to carefully pull out the camera. - Unlike the video, I did reuse the LEDs in the camera and did not add additional lights. In my case that was sufficient. Just connect the LED input to the 5V power directly. - I did refocus the camera lens - By reusing the tube and LED lights, I was able to use the simple mount shown in this project The difficult steps are: - Get the cable plug out without ripping out the wires - Hardest: removing the super glue and freeing up the lens focus thread. Some cameras have more glue then others, I did break two cameras in the process - Finding a good focus that gives just the right amount of depth of field The attached screen shot shows the result in my case. Focus isn't great but useable. The two plugs are to secure the cable in the Borescope tube, one for thin and one for thick USB cable. They are intended to be printed in a slightly flexible material like TPU. You could also use hot glue or similar, but only after you are happy with the focus! ## Parts needed - Above linked camera (maybe 2 in case you break one) - A few M3 screws and nuts - A USB cable to replace the stiff cable the camera comes with For now I just used some duct tape to secure the USB cable on the other side of the gantry. BTW, initially I tried to use the LED wiring to avoid the USB cable. Unfortunately the flatband cable is not well suited for a fast USB signal, so I never was able to get a reliable USB signal passed along that way. Onshape design: https://cad.onshape.com/documents/b0b6dafc86f1531aad7b04df/w/de2eb2b131da647234f840e4/e/1f4bf6e24fc48469a917627d BTW the fabulous fan mount comes from here: https://www.thingiverse.com/thing:4799645
With this file you will be able to print Artillery Sidewinder X1 Borescope mount with your 3D printer. Click on the button and save the file on your computer to work, edit or customize your design. You can also find more 3D designs for printers on Artillery Sidewinder X1 Borescope mount.