Artillery Sidewinder X1/X2 Genius 1/pro Mainboard cooling
thingiverse
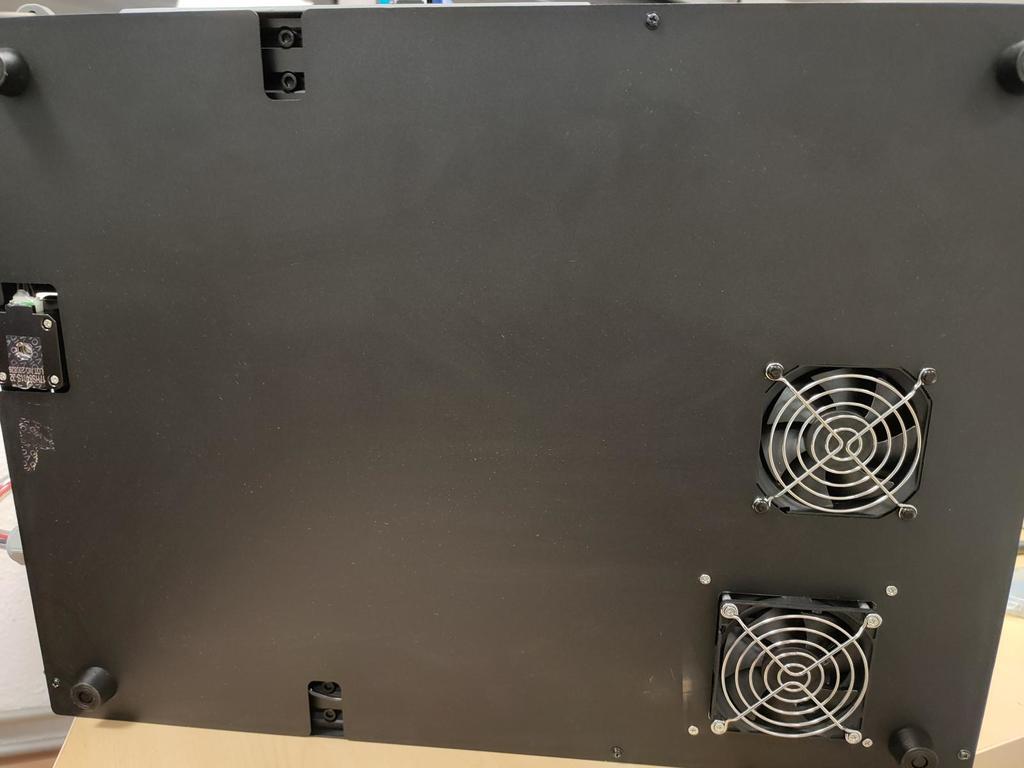
First English, further down German Zuerst English weiter unten Deutsch Hello Community, this is my design for a better mainboard, power supply and stepper cooling. Either a second fan is required or the original fan is relocated, depending on the situation as you wish. What is needed? Cordless screwdriver with 4mm drill Jigsaw with a metal blade or something similar 1x fan design: Here for you print both STL files (Fan bracket, Fan cover) In addition, 12x screws with a size of 3x10mm are used. 2x fan design: Here you only print the STL file (Fan bracket) In addition, 8x screws with a size of 3x10mm are used. 1 & 2 fan design: Find a place directly above the mainboard (not too close to the foot / edge) Cuts a square at the previously selected place measuring 81x81mm. Now you screw the fan to the holder and mark the holes. Drill the previously marked holes with a 4mm drill and screw everything together. If you only want to install one fan, screw the fan cover tight and plug the fan cable into the intended location. If you want to install a second fan, you first have to connect (solder) the cables Hallo Community, dies ist mein Design für eine bessere Mainboard, Netzteil und Stepperkühlung. Es wird entweder ein 2. Lüfter benötigt oder der Original Lüfter versetzt je nachdem wie ihr es wünscht. Was wird benötigt? Akkuschrauber mit 4mm Bohrer Stichsäge mit Metallblatt oder Ähnliches 1x Lüfter Design: Hier für druckt ihr beide STL Dateien (Fan bracket, Fan cover) Zusätzlich werden noch 12x Schrauben in der Größe 3x10mm verwendet. 2x Lüfter Design: Hier für druckt ihr nur die STL Datei (Fan bracket) Zusätzlich werden noch 8x Schrauben in der Größe 3x10mm verwendet. 1&2 Lüfter Design: Sucht euch einen Platz direkt über dem Mainboard aus (Nicht zu nah am Fuß/Rand) Schneidet ein Quadrat an die vorher ausgewählte Stelle in der Größe 81x81mm. Nun verschraubt ihr den Lüfter mit dem Halter und zeichnet die Löcher an. Bohrt die vorher angezeichneten Löcher mit einem 4mm Bohrer durch und verschraubt alles. Wer nur einen Lüfter verbauen will schraubt nun zusätzlich die Lüfterabdeckung fest und steckt das Lüfterkabel an die vorgesehene Stelle. Wer einen 2. Lüfter verbauen will muss die Kabel zuerst verbinden (löten)
With this file you will be able to print Artillery Sidewinder X1/X2 Genius 1/pro Mainboard cooling with your 3D printer. Click on the button and save the file on your computer to work, edit or customize your design. You can also find more 3D designs for printers on Artillery Sidewinder X1/X2 Genius 1/pro Mainboard cooling.