Assistive Devices for Assistance Dogs
prusaprinters
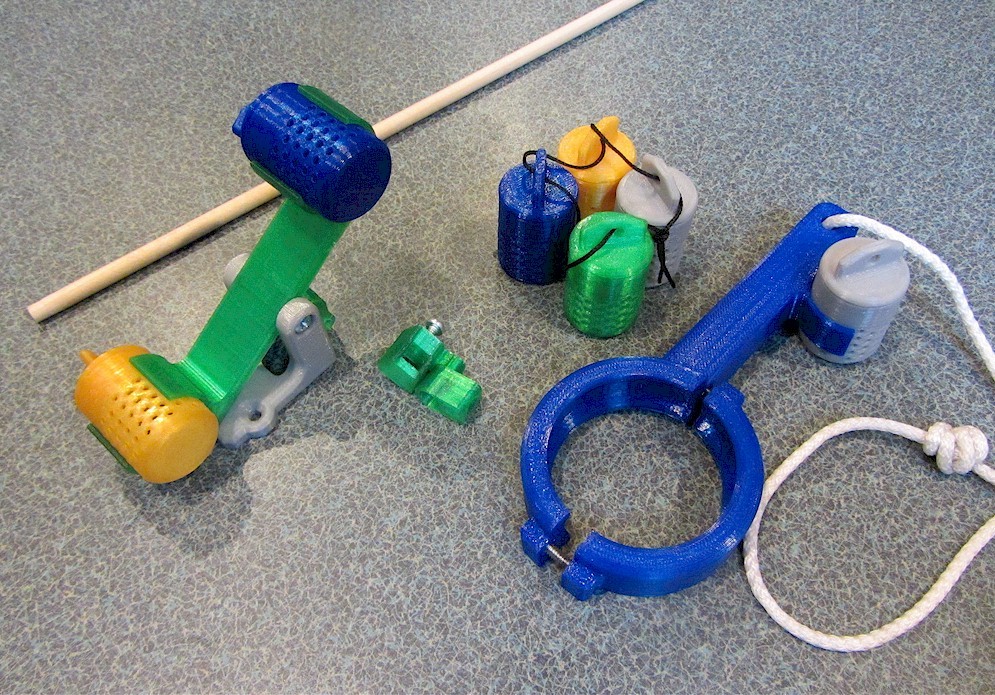
<p>It's not just their people that need a helping hand - assistance dogs also need help manipulating an environment not designed for them. This starter kit includes a light switch paddle, a doorknob puller, and also a unique set of scent coded training fobs that make it easier for dogs to distinguish between multiple targets in a cluttered environment.</p> <p>Each of the pairs of colored training fobs can be filled with different scents -<em>e.g.</em>: I've got oregano in both the green ones and garlic flakes in both the blue ones. Dogs are very good at distinguishing between scents, so when given the owner's copy of a fob to sniff (say, blue/garlic), they can easily find the matching target (blue/garlic) to work on.</p> <h3>Print Settings</h3> <p><strong>Rafts:</strong></p> <p>Doesn't Matter</p> <p class="detail-setting supports"><strong>Supports: </strong> <div><p>No</p></div> <p><strong>Resolution:</strong></p> <p>0.2mm</p> <p class="detail-setting infill"><strong>Infill: </strong> <div><p>20%</p></div> <h3>Post-Printing</h3> <p><strong>Assembly</strong></p> <div><p>For the scent fobs, print 2 each of the fob body and the fob cap in the same color. Print different pairs using different colors so that you (a human) can easily identify them.</p> For the doorknob handle, both pieces are part of the same handle STL file. You will also need two 3/4" long 6-32 screws to secure the handle to the knob, and a length of 3/16" dia. rope for the dog to pull on. Attach the handle so that it is angled upward when the door is closed. <p>For the light switch paddle, print one wall bracket, one switch nub, one lever and two links. The lever assembles to the wall bracket with two 6-32 x 3/8" screws. The links assemble to the switch nub and the lever with two more 6-32 x 3/8" screws. The two links are connected with an 18" length of 1/4" dia. dowel (cut longer or shorter depending on your dog's height). If the switch nub does not want to stay on the end of the switch, there is a hole for another 6-32 clamping screw.</p> <p>Slip the switch nub over the end of the light switch and then screw the wall bracket to the wall so that when the switch is up, the lower part of the paddle lever is pressed in. The lever should be at nose height.</p> <h3>Custom Section</h3> <p><strong>Training</strong></p> <p>Put matching smelly stuff in each pair of fobs. Try using things with distinct odor that aren't too much like food (don't use cheese or chicken). I've used spices, but you could also put in a cotton ball with a drop or two of some aromatic oil. The tops secure to the fobs with a bayonet-type screw. Collect one of each color fob together to form the owner's "command" set of fobs. Clip different color/odor fobs into the upper and lower parts of the switch lever and into the doorknob handle. You can also tie a fob to any article you might want fetched.</p> <p>I'm not an expert in dog training at all, but training will require separate steps of training different actions (such as pushing on a paddle, pulling a rope, or fetching a pouch) and of training matching-to-sample behavior - that is, how to select the thing that matches the smell of fob offered by the owner. I've only just started working with my own dog, but here is a video describing how to train matching-to-sample: <a href="http://stalecheerios.com/dog-training/match-to-sample-clicker-training/">http://stalecheerios.com/dog-training/match-to-sample-clicker-training/</a></p> <p>I'll be posting more as I learn more myself.</p> </div></p></p> Category: Pets
With this file you will be able to print Assistive Devices for Assistance Dogs with your 3D printer. Click on the button and save the file on your computer to work, edit or customize your design. You can also find more 3D designs for printers on Assistive Devices for Assistance Dogs.