Astromech Skin Mounting Block
thingiverse
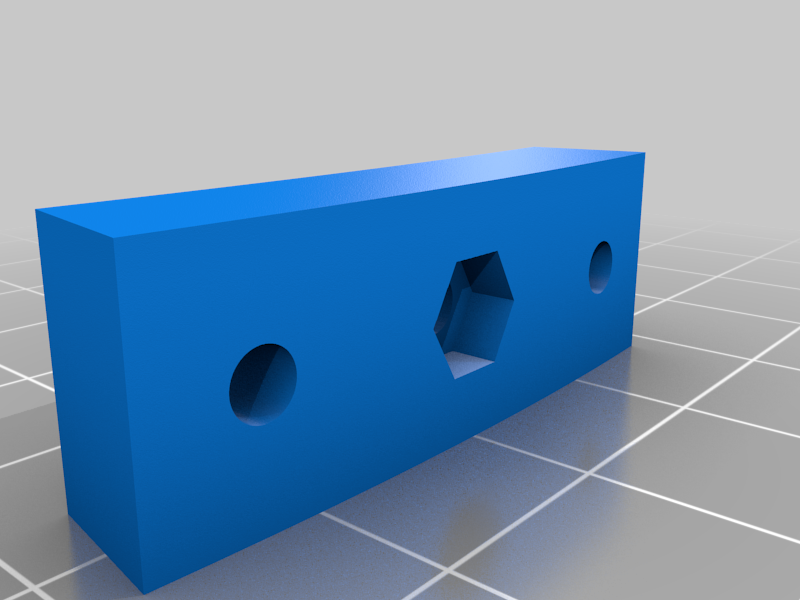
This handy magnetic block is used to hold Astromech skins to the frame for easy removal. You need to add 2x North & 2x South 10mm x 5mm magnets with countersunk hole to each block. I purchased mine from a magnet specialist online. The magnets are designed not to meet without the addition of a washer behind each magnet, this both allows for any tolerance in your print and increases the forward force on the magnet, therefore increasing the strength. The install process once you have printed at least four blocks for the front and four blocks for the rear are as follows: 1) Attach inner skins to your frame using clamps to align front and back as you would like them to be fixed into their final position. Check alignment of all details as part of this line-up process. 2) Find suitable areas for your blocks (with both magnetic sections attached together) on your frame and fix into position with either additional clamps, tape or other temporary means. I would suggest the four corners of your front and rear skins with the possible addition of a central connector block, both front and rear centre. 3) Remove skins and drill holes into frame by using the two existing 3mm holes on the rear magnetic blocks. Then screw all rear magnetic blocks into position. 4) With the front magnetic blocks still attached mount your skins back into position. Now from the inside of your frame drill through the two existing 3mm holes in the magnetic blocks to mark your skins. If you're feeling brave you can drill all the way through but I marked all the mounting holes on my skins, removed the skins and drill the holes in the skins while off the body. 5) You can now mount the front magnetic blocks onto your skins and marvel at the simplicity of removing your skins when required! 6) Once you are happy with the skin mounting system you can attach the outer skin layer and panels by your chosen method. You can do all of the above with your inner and outer skins attached together already, you will however be able to see the screws used to mount the magnetic blocks. Personally I have never tried this as I am not keen on visible screws on skins. This block is tried and tested on one of my own personal Astromechs. Works better with more flexible styrene skins but can be used with aluminium skins too, just be careful when removing the skins so not to flex them too much causing the two skin layers to separate.
With this file you will be able to print Astromech Skin Mounting Block with your 3D printer. Click on the button and save the file on your computer to work, edit or customize your design. You can also find more 3D designs for printers on Astromech Skin Mounting Block.