
Astronomical Telescope "Hadley" - an easy assembly, high performance Newtonian
prusaprinters
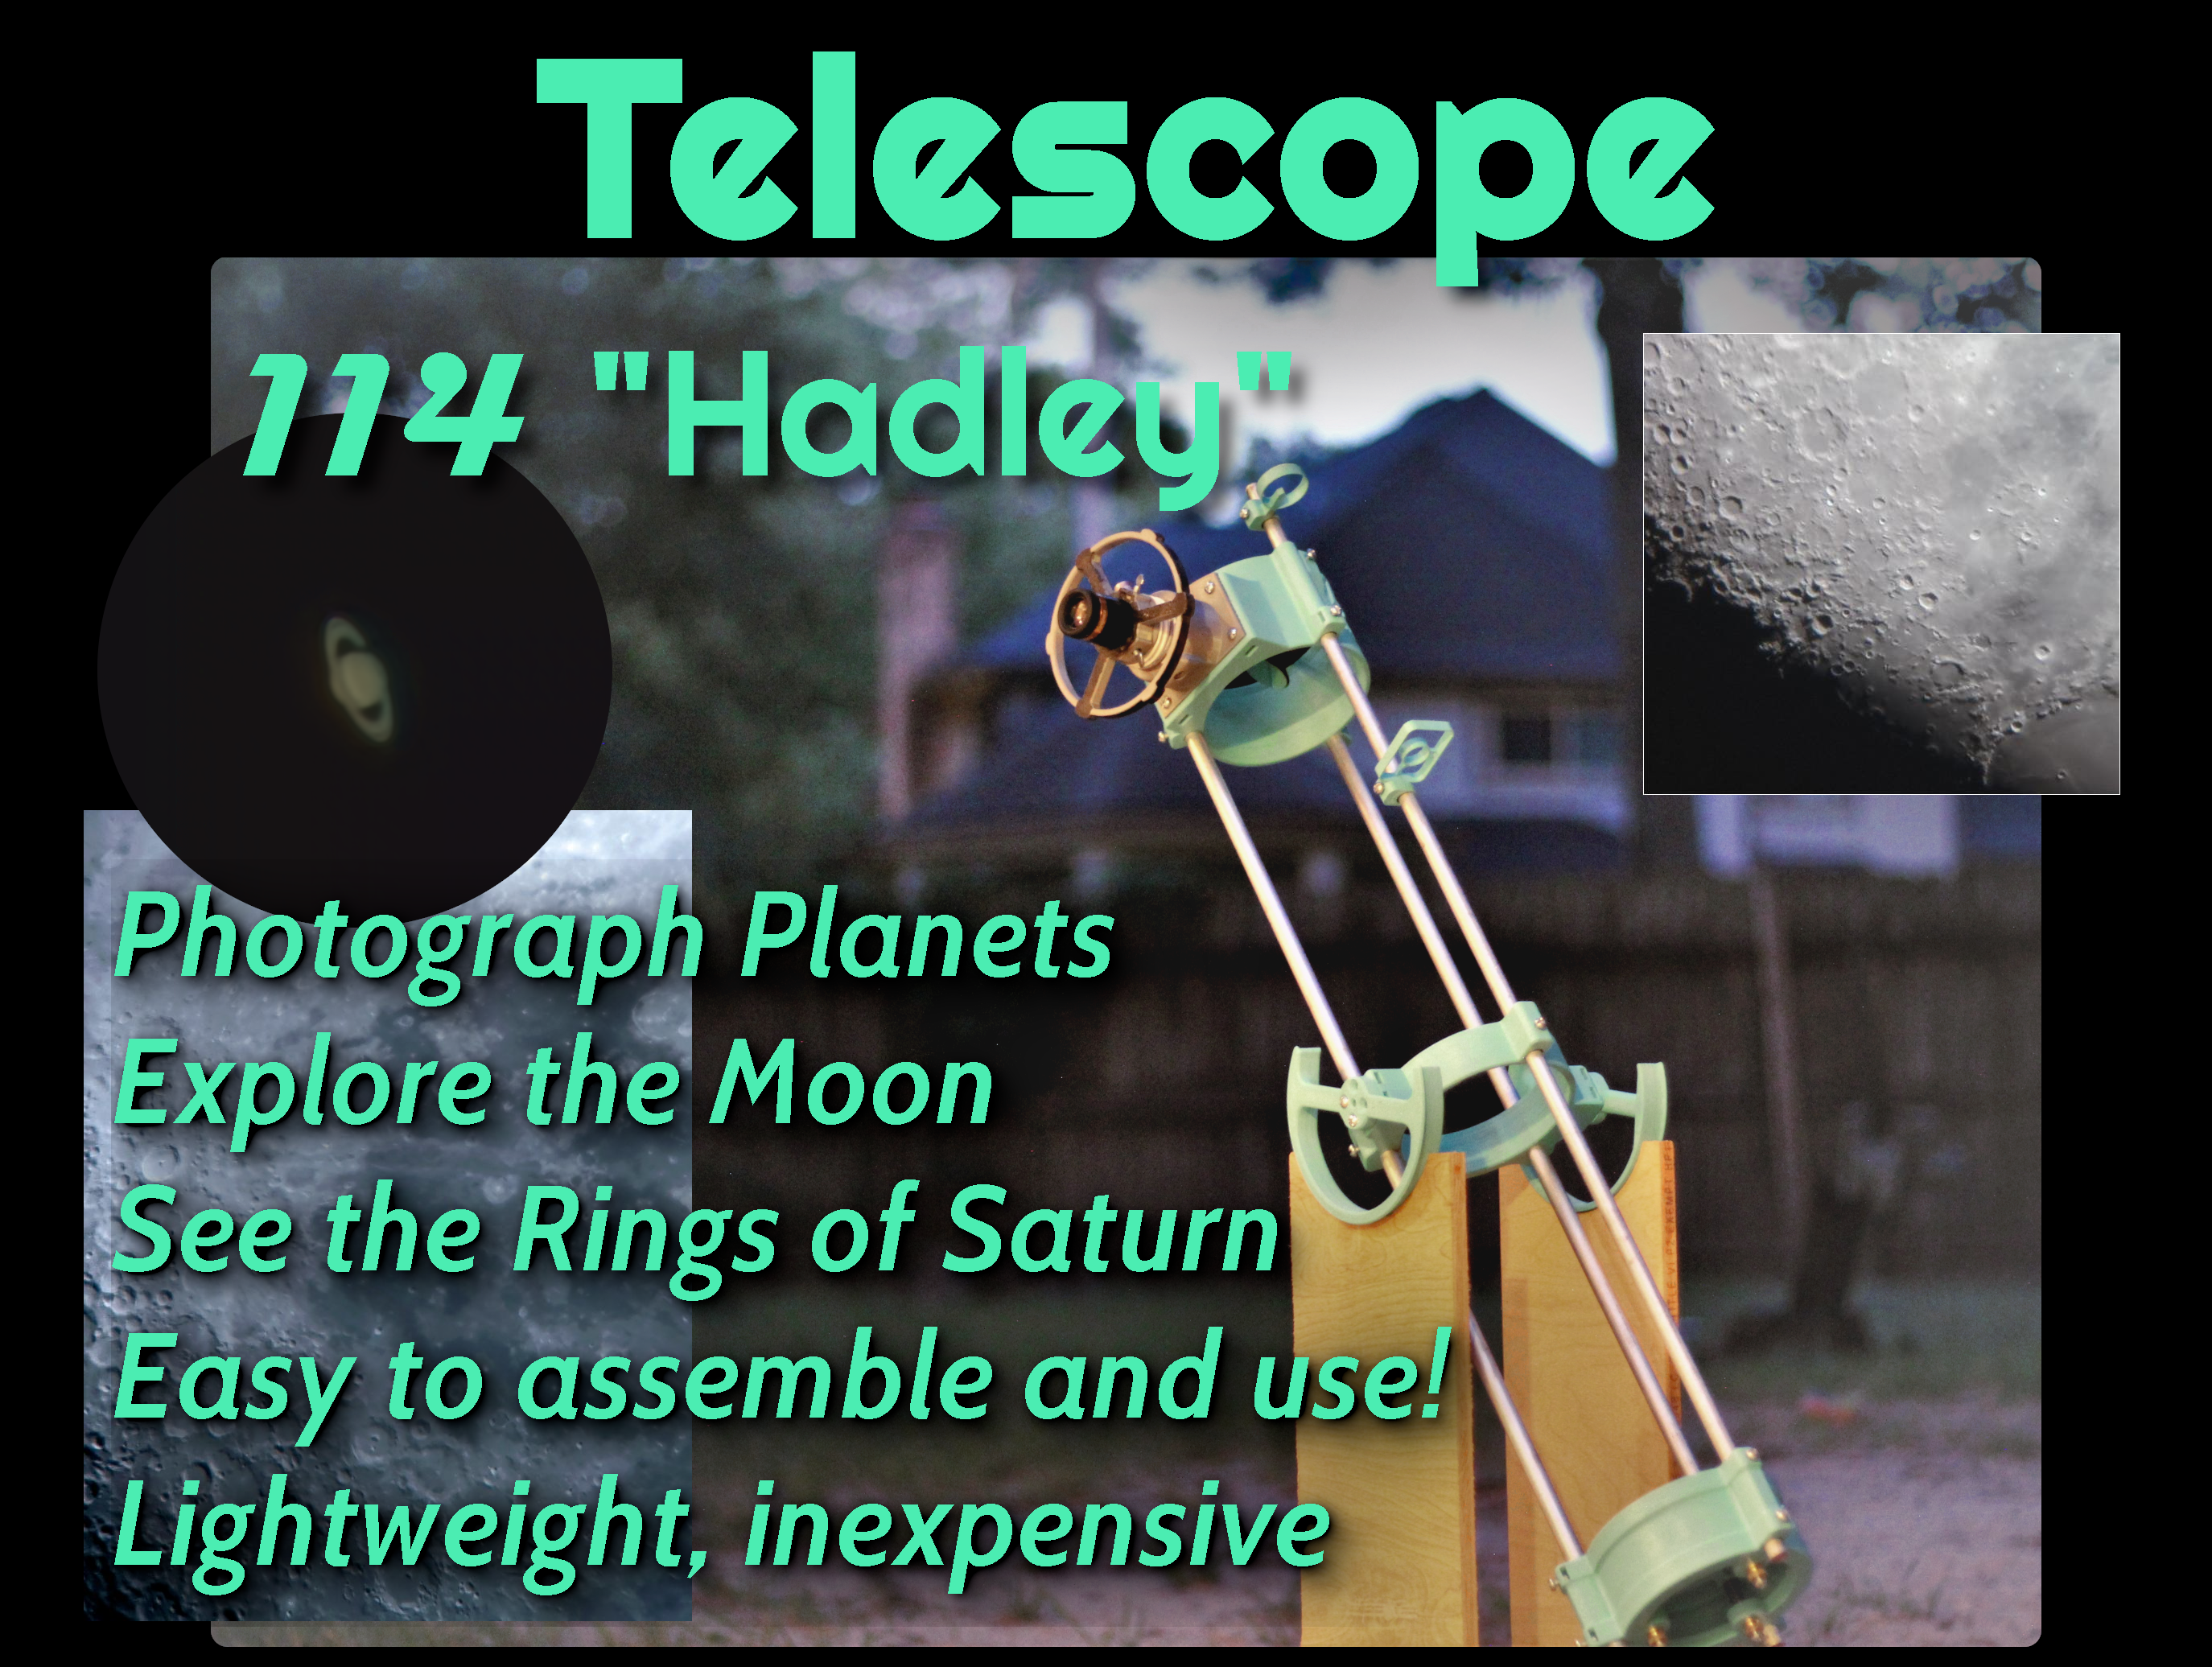
<h3>You can now purchase screw/mirror kits at <a href="https://kissner-optik.netlify.app/?">Kissner Optik</a>.<br><br><br>Printed rockers are here!<br>Metric users: <a href="https://www.printables.com/model/268580-hadley-telescope-remix-metric-mods-more">click here</a>, and see other remixes.<br>Lastly, never point one of these at the sun - it can melt your eyes.<br> </h3><h5>Featured in Sky and Telescope magazine, this <a href="https://petapixel.com/2022/07/28/photographer-creates-diy-telescope-to-snap-incredible-photos-of-the-moon/">PetaPixel Article</a>, <a href="https://hackaday.com/2022/11/04/3d-printed-newtonian-telescope-has-stunning-looks-hadley-breaks-the-bank/">Hackaday</a> and <a href="https://www.techeblog.com/astrophotographer-3d-printed-hadley-astronomical-telescope-moon/">others</a>. Official Discord server <a href="https://discord.gg/ycaa8nX7sa">here.</a></h5><h5>The initial wave of support/adoption has been overwhelming - I've confirmed hundreds of separate Hadley's out in the wild, and suspect there are far more than that. Thank you.</h5><figure class="image"><img src="https://media.printables.com/media/prints/224383/rich_content/82d72878-f8db-4354-8e2f-54d49f43efb5/collage_6k_20220822_171525-1.jpg#%7B%22uuid%22%3A%22617969aa-f366-43e8-9281-5c4f2101b943%22%2C%22w%22%3A4000%2C%22h%22%3A4000%7D"></figure><p> </p><p><br><strong>Early adopters: Please check in from time to time. I am revising this based on user feedback. Immediate plans include a more comprehensive usage/optimization guide, detailed visual instructions, a dedicated metric version and some more useful mods. </strong></p><p> </p><p> </p><h3><strong>Meet Hadley.</strong></h3><p>Hadley is a very performant telescope that - after printing - should be as easy as IKEA furniture to assemble. Just screws and glue.<br><br><i>Building a telescope is the best way to learn how one works.</i></p><p>The mission here is to make an attractive alternative to the shoddy, hard to use "hobby-killer" scopes in the $100-200 range. It still needs a mount (basic woodworking or a beanbag, or even a sturdy clamping tripod for now), but it performs intuitively and flawlessly. "Hadley" is a 114/900mm reflector with a spherical primary, effectively a perfect parabola at this size.</p><p>This functions equally well as a terrestrial scope (great for bird-watching) or a slow (f8) zoom lens for a camera - but it really shines in its primary purpose, which is for visual and photographic astronomy on planets and the moon. It is my hope that by releasing this, more people will find an open door to planetary observation and entry level astrophotography.</p><figure class="image image-style-align-center image_resized" style="width:50%;"><img src="https://media.printables.com/media/prints/224383/rich_content/a274c946-52db-4075-8ea2-591a797a1f29/picture11.jpg#%7B%22uuid%22%3A%22641d7e1a-b6de-44ae-9397-a84b868066a0%22%2C%22w%22%3A593%2C%22h%22%3A574%7D"></figure><h4><strong> CHANGELOGS:</strong></h4><ul><li>Added better knobs, other tweaks</li><li>Endorsed wigglemore's version as <a href="https://www.printables.com/model/268580-hadley-telescope-remix-metric-mods-more"><strong>the new official metric version</strong></a></li><li>Added several revised spiders</li><li>Launched a small shop for a few people wanting kits<br><strong>August</strong></li><li>Added STEP files</li><li>Began support for a <a href="https://www.printables.com/model/259710-hadley-official-m4metric-remix">metric version</a></li><li>Added a <a href="https://www.printables.com/model/262764-hadley-telescope-rocker-frame">nice printed rocker</a> to the linked <a href="https://www.printables.com/social/134622-maff/collections/189408">family of mods</a>.</li><li>Added a synta/dovetail shoe as an add-on. Use this to attach a finderscope or red dot sight! <br><strong>July</strong></li><li>Added a light baffle as an add-on</li><li>Scaled up the knobs for better clearance</li><li>added a printed baffle. Install upside-down, opposite focuser under the UTA.</li><li>Added several “mods” for Hadley, as well as some one-off parts such as the focuser - for other DIY astronomers.</li><li>Created a <a href="https://www.printables.com/social/134622-maff/collections/189408">collection</a>, where I will store these to avoid cluttering up the main page.</li><li>Added a means to mount equatorially.</li><li>Added a “TEST PRINT” file for making sure your selected screws and rods (M4 for metric users) fit / that your printer is dialed in enough.</li><li>There is now an<a href="https://www.amazon.com/gp/product/B08C2XPD27"> amazon listing</a> for mirrors! A friend grabbed three from there, it seems to check out.</li></ul><figure class="image"><img src="https://media.printables.com/media/prints/224383/rich_content/6ec5b37b-de59-40bd-b9b7-181681e7b2f0/image.png#%7B%22uuid%22%3A%2265ec393d-df1b-42e1-87ed-42141fca85cd%22%2C%22w%22%3A989%2C%22h%22%3A462%7D"></figure><p><img src="https://media.printables.com/media/prints/224383/rich_content/d440b7f0-86e3-4124-ac75-905097d55ec9/picture6.jpg#%7B%22uuid%22%3A%22fe6db4b6-0ce7-4919-afdb-d58b97c161f4%22%2C%22w%22%3A1509%2C%22h%22%3A850%7D"></p><h4><strong>Design: Conscientious Topology, or “Prints Without Supports”</strong></h4><p><br>This is the second iteration on this idea after my first telescope -- a large red reflector (152/1300mm). My first project was personal and hard to build; The "Hadley" arose as a quest for universal design/accessibility, practicality and replicability.</p><p>Each part was designed bottom to top with FDM in mind, and underwent a lot of testing to ensure it works well. Every STL comes in the ideal orientation, and for everything but the focuser (which is reinforced by the backspan of the eyepiece barrel) - the parts are oriented not only to <strong>print support-free, </strong>but also so that there's minimal shearing in the plane of the layers - everything is in its strongest orientation for its job.</p><p>It only uses one type of screw thread (in two or three lengths), one type of nut, and simple/cheap mirrors - the best compromise in cost/performance.<br><br> </p><p><img src="https://media.printables.com/media/prints/224383/rich_content/09d85e78-f78a-45ec-925a-f2a49d9b49ab/picture15.png#%7B%22uuid%22%3A%2298f8fb0f-643c-48d5-95f2-0b116d179665%22%2C%22w%22%3A571%2C%22h%22%3A669%7D"></p><p><br><strong>The choice of mirror</strong></p><p>It happens that parabolic mirrors are prohibitively expensive. But in certain focal ratios/sizes, a spherical mirror is a close enough stand in. And this is big, because a mirror with a <i>spherical</i> cross section is (comparably) trivial to make to near-molecule precision... considering.</p><p>As it happens, many commercial scopes make a similar compromise, although most of these are well outside the "good" range. Exercise caution when buying a commercial telescope in the 100-150mm range. </p><p>At time of posting, these mirror sets (114/900mm spherical primary and elliptical secondary pair) can be found for about $20 on ebay or aliexpress. This is prone to fluctuation.</p><p><br> </p><figure class="image image-style-align-center"><img src="https://media.printables.com/media/prints/224383/rich_content/63e1752f-fed6-4d95-892b-f565c1879ac8/picture1.jpg#%7B%22uuid%22%3A%2267a927f1-2a33-4be3-a210-842e78ee512a%22%2C%22w%22%3A613%2C%22h%22%3A816%7D"></figure><h4><br><strong>3D - printing a telescope</strong></h4><p>This is a fairly involved project -- it takes around $100 in material (plus eyepieces, a good pair might total $50) but extremely rewarding.</p><p>Post processing: a pass with a flame to clean up strings, and perhaps using an electric screwdriver to run bolts through the captive sections (secondary spider, and printed knobs, if you did those) might be wanted to clear printer slop from the screw holes.</p><h3>Printing</h3><p>Please read the descriptions on the files/the attached README. There are many redundant items that have a minor effect, such as the choice of decorative planets, the shape of your stars, etc. The spider needs a pause-print code at the topmost layer of the hex cavities (your slicer can do this!) during which you insert 3 #10-24 nuts. (Metric versions, insert 3x M4 nuts)</p><p> </p><p> </p><h3><strong>Assembly Instructions/Bill of Materials</strong></h3><h4><br><strong>BILL OF MATERIALS</strong></h4><p><strong>A: Get a full screw/mirror/eyepiece kit from me at </strong><a href="https://kissner-optik.netlify.app/?"><strong>Kissner Optik</strong></a><strong>!</strong></p><p><strong>B: Metric users: </strong>Scroll through the remixes, there is now full support!<br><br><strong>C: Imperial unit users:</strong></p><p>Hardware:<br><strong>Rods</strong><br>-3x metal rod or pipe; 0.5" OD, 3' length. Aluminum or steel. Oak dowels work for cost savings, but may not hold up. 12mm or 13mm is fine for metric users. Some remixes have support for either!<br><strong>Main Screws: The main screws fall into five classes. Short, medium, long; short thumb, long thumb. It's a flexible system, these are only examples.</strong><br>-25x #10-24 machine screws, 7/16" or ½" length. The workhorse screw. NOTE: If you choose countersunk screws, they will be too short!<br>-8x #10-24 machine screws, ¾" length. The 4 to 8 bolts holding the round altitude bearings need to be longer than the rest, as they're holding the entire telescope. (More backspan, less point stress on a print, less creep)<br> (OPTIONAL: all screws can be ¾ length, they will just stick out. For max savings, you can just get a box of 100 screw+nut in this size and forget about ½")<br>-2-4x #10-24 machine screw, THUMB HEAD. Optionally, all your screws can be thumb or knurled socket head, and there's a few places where you'd really want one. (in focuser and sights). <br>The thumb screws for the focuser/sliding parts can be anywhere from 0.5" to 1".<br><strong>Long screws/Collimating bolts etc.</strong><br>-7x #10-24 machine screw, 1.5-2". Ideally, socket head or thumb. These are for collimating the mirrors, and holding up the secondary mirror. You can optionally also run these through the <i>center</i> of each bearing, for hanging an extension spring. The bottom of the spring attaches to your rocker (wooden or otherwise), for added steering friction on the scope. </p><p>-51x #10-24 hex nut <br>-3x #10-24 nyloc nuts<br>-4x spring (SEE BELOW) (needs to be moderately stiff, and to slide over a #10-24 screw without issues. Otherwise any spring should work)<br>-114mm/900mm spherical mirror set. These can be found in huge quantities online.</p><p>(<a href="https://www.amazon.com/gp/product/B08C2XPD27">amazon</a>, <a href="https://www.ebay.com/sch/i.html?_from=R40&_trksid=p2334524.m570.l1313&_nkw=d114f900+spherical+mirror+&_sacat=0&LH_TitleDesc=0&rt=nc&_odkw=d114f900+spherical+mirror+set&_osacat=0&_udhi=31">ebay</a>, <a href="https://www.aliexpress.com/wholesale?catId=0&initiative_id=SB_20220616084214&isPremium=y&SearchText=d114f900+objective+lens+mirror&spm=a2g0o.productlist.1000002.0">aliexpress </a>- I've found them as low as $20, but $25-30 seems more common)</p><p><br>-silicone glue ($5 loctite is fine/what I used). Avoid superglue or epoxy. </p><p>-Eyepieces. I recommend SVBONY, on amazon/ebay/etc. A "23mm aspheric" (you might need to click the assortment and specify just the 23mm) ($10-15) OR "25mm plossl" -- AND a "6mm goldline" ($30-35). These are low and high power, respectively, and you want to be able to do both. Low power is great for the moon, and larger deep sky objects such as nebulae and galaxies. High power is important for planets in rich detail -- this telescope is powerful enough to observe the rings of saturn or storms of jupiter.</p><p>Optional:<br>-3x #10-24 knurled nut (these can also be printed) or thru-knobs, instead of printed knobs.<br>-Flat black spraypaint/masking tools<br>-teflon tape, pads for bearing action<br>-extension springs for bearing pressure<br>-some plywood, scrap lumber etc. to build a "rocker box" (OR 4 x rods/pipes/etc to make a printed rocker)</p><p> </p><p><strong>Springs</strong>: If you get a spring assortment with large enough springs you will probably find sufficient springs. Ender 3 springs are fine, although you'll have to compress the secondary spring a bit. If you have to be specific:<br><br>The springs should simply have an ID of more than 0.21" and a free length of 15mm+. I believe <a href="https://www.mcmaster.com/9434K58/">https://www.mcmaster.com/9434K58/</a> should work but lighter duty might be better. If the springs are heavy enough, as these are, I'd suggest adding washers above and below so they don't dig into the print / cause creep.</p><p> </p><figure class="image"><img src="https://www.bbastrodesigns.com/optical%20path%20and%20tube%20assembly%20callouts.jpg" alt="Newtonian Reflecting Telescope Designer"></figure><p>Mel Bartels, https://www.bbastrodesigns.com</p><h4><br><strong>Assembly</strong></h4><p>Assembly is straightforward. In time, I will publish an assembly manual, LEGO/IKEA style. For now, a diagram detailing the collimation assembly is shown. This is the only “hard” part.<br><br>Every joint consists of a clearance hole, and a perpendicular slot - a nut slides into this slot (it may be a tight fit; needle nose pliers are your friend here). The machine screw then slides through, keeping the entire joint captive. DO NOT OVER-TIGHTEN - I've never had PLA snap, but on my PETG scope, I've had many screw joints fail.</p><p>If something snaps, you can weld it back together with a soldering iron or a 3D-pen. </p><p> </p><p>The collimation assembly: The order stack for that complicated piece is as follows:<br>Mirror - silicone glue on 3 circles - cell. Make sure to insert the 3 nuts before gluedown.</p><p>Nyloc nuts into the hex inserts - cell - spring - LTA assembly - knurled nut or #10-24 knob - screw. This assembly lets you steer the angle of the mirror with precision.</p><figure class="image"><img src="https://media.printables.com/media/prints/224383/rich_content/4972b5c4-4c7c-40a6-bec8-cd72cee93fb2/81c582d6-0059-4f2d-8f69-cee9a9d2ebe4.png#%7B%22uuid%22%3A%22d200d142-4de1-459c-aaea-e26550729ab7%22%2C%22w%22%3A943%2C%22h%22%3A573%7D"></figure><p>For the secondary, pull a 2" bolt through a nut, all the way. Run this down through the secondary mirror holder - so that the nut is captive in the hex groove. Run it through a spring, and then the center hole of the spider, and a nut on top. This is best done <i>before</i> inserting the trio of long collimation bolts on top (again, 2" machine screws, ideally thumb head).</p><p> </p><p>The secondary/Upper cage should be placed with about 3 inches of slack on the top: the 900mm focal length is split between the primary-secondary, and the secondary-focuser (ideally ending in the center of focuser travel – so rack the focuser in halfway).<br>This may be tested by <strong>(after </strong><a href="https://garyseronik.com/a-beginners-guide-to-collimation/"><strong>collimating</strong></a><strong>, very important) using </strong>an eyepiece (the lowest power you have) with the focuser racked mostly out, and aiming at a distant tree - slide the upper cage up or down until the view becomes sharp. </p><p>Alternatively, use the moon - perfect aiming can be achieved by simply minimizing the shadow the telescope casts in the moonlight. I often do this with the telescope propped on a beanbag or stool. Use the focuser racked to the middle of its travel range for this, as this will achieve a perfect “infinity” focus instead of a further-off terrestrial focus.</p><p>This is something that can be fine tuned further once you get more eyepieces and an intuitive sense of how the Newtonian works, as these have a different sweet spot/there are (eventual) optimizations to be made. Be sure to take note of how many turns it takes from one eyepiece to another.<br><br>Regarding the center-bolt in the spider: It should have some play where the nut sits atop the spider. This is to help the secondary pivot about the middle during collimation.<br> </p><figure class="image"><img src="https://media.printables.com/media/prints/224383/rich_content/47a947f0-3879-47e2-99f9-36443b372446/1487d3ba-45da-451c-a47f-7e9d53edcb62.png#%7B%22uuid%22%3A%221f113c19-319d-4f58-8dd3-820583e117c6%22%2C%22w%22%3A1223%2C%22h%22%3A805%7D"></figure><figure class="image"><img src="https://media.printables.com/media/prints/224383/rich_content/bfdc4fb0-cb9a-4ff3-a5ad-79bcf814c6a0/5af3e33e-408c-4644-ad39-7e550176431b.png#%7B%22uuid%22%3A%2244d05efa-014f-4e1b-b8ea-c508f46254f0%22%2C%22w%22%3A1403%2C%22h%22%3A709%7D"></figure><p>Detail of upper assembly, with optional but encouraged baffle mod installed. If you got 36" poles, there should be a few inches sticking out for the telescope to focus to infinity.</p><h3><img src="https://media.printables.com/media/prints/224383/rich_content/1d87f964-8d98-4226-a63a-12c35fc3cc44/image.png#%7B%22uuid%22%3A%22e2f18c4e-10cd-4837-999b-d5562c7a766e%22%2C%22w%22%3A1015%2C%22h%22%3A786%7D"><br><strong>FAQ</strong><br> </h3><h3> </h3><p><strong>What can I see with Hadley? </strong><br>The moon and its craters, seas and rilles in incredible detail. Rich planetary detail - the rings of saturn (as shown); storms on Jupiter, dust clouds and canyons on Mars. A few of the brightest deep sky objects - nebulae, certain galaxies, and rich clusters of stars - depending on how dark your skies are.</p><p><strong>Do I need to center-dot my mirror?</strong><br>In my opinion, collimation can be achieved with a cap <i>without</i> center marking the mirror. F/8 is slow enough that collimation tolerances are loose.</p><p><strong>What if I use metric/ can't find imperial screws?</strong><br>For now, there are remixes available and notes under said remixes. <a href="https://www.printables.com/model/259710-hadley-official-m4metric-remix">Official support</a> for m4/m5 hardware is being actively developed. </p><p><strong>Which spider do I use?</strong><br>That's up to you – look for the picture at the top which discusses diffraction spikes. You might notice all images from the famous “Hubble Space Telescope” have four pointed stars, and JWST's images all have six points (ignoring all the other diffraction artifacts). This is due to the secondary mirror support – and with Hadley, you get to pick which one you have!</p><p><strong>What parts need a captive nut?</strong><br>Just the spider. Heat-serts and other remix versions are on the way. If you're printing your own thumb-nuts, those need a captive nut as well.</p><p> </p><p><strong>Why did I start with imperial?</strong> My prototype was mostly M4 - but it was such a hodgepodge of differing lengths, threads etc. I realized if I released it, the BoM would be prohibitively complicated and expensive, like many other 3DP telescope designs out there. I wanted to avoid that pitfall. I wanted this new version to be doable <i>without ordering anything (except the mirror). </i>So to support that - I only used what I could find in the stores. Sadly, metric machine screws are much harder to find in bulk here.<br><br>I am working to provide a modified spider to accommodate the taller M5 nuts. </p><p><br><strong>Can I put this on an equatorial mount/use it for astrophotography?</strong><br>Yes, although it's a little "slow." I provide modified files in my <a href=" https://www.printables.com/social/134622-maff/collections/189408"><strong>collection </strong></a>on this site. An interface for 6 inch tube rings is found <a href="https://www.printables.com/model/224891-hadley-scope-family-adapter-for-tube-ringsequatori"><strong>here. </strong></a>If you want to make a Hadley Astrograph, try an f/4 mirror, heavier springs and a larger secondary (44mm). </p><p> </p><p><strong>Can I attach a finderscope?</strong><br>Yes, same as above. I've provided an <a href="https://www.printables.com/model/224915-hadley-scope-family-finderscope-mount"><strong>interface </strong></a>for a 6x30, and a dovetail shoe is now included. A TELRAD interface shouldn't be too hard to make, either.</p><p> </p><p><strong>Can you add x part?</strong><br>Within reason, I want to make this as functional as possible. But my time is scarce as a grad student and job seeker so things are slow.</p><p><strong>Does this scale up or down?</strong><br>Yes, but so do the screw-holes and engineering challenges. I have someone trying to make an eight-inch Hadley, so we'll see how that goes. Longer term, I will release 5 and 6 inch versions, <i>as well as refractor versions.</i></p><p><strong>Modifications, etc:</strong><br>You can find extra parts, improvements, alternates in my collection <a href=" https://www.printables.com/social/134622-maff/collections/189408"><strong>here</strong></a>. Support these files as well!</p><p><strong>Discord: Where can I get more support/collaborate?</strong><br>I am trying out a <a href="https://discord.gg/ycaa8nX7sa">discord server</a> for this project. <br>Additionally, this <a href="https://discord.gg/PcwncmjUvu">Observational Astronomy server</a> is a phenomenal space for space. Connect with other amateur astronomers, get advice, do observing challenges and more!</p><p>Message #resources<br> </p><p><strong>How can I support this?</strong><br>Tips are always appreciated, as is support on <a href=" https://www.printables.com/social/134622-maff/collections/189408"><strong>Printables</strong></a>. I'm also (barely) on <a href="https://www.patreon.com/posts/initial-release-67659789"><strong>Patreon</strong></a><strong>, </strong>where I host shelved projects I don't have time to provide support/documentation. Designing, testing and improving takes a lot of time, parts, and filament - and support gets me more of all three.<br> </p><p> </p><h4><br><br><img src="https://media.printables.com/media/prints/224383/rich_content/c35db4b6-16de-4d8c-9780-b6272b542cb4/img_8385.jpg#%7B%22uuid%22%3A%22bc120963-e3ba-4f13-96bb-2c7f3bfd0ede%22%2C%22w%22%3A5184%2C%22h%22%3A3456%7D"><br><br>Support a project hundreds of hours in the making:</h4><p><a href="https://www.patreon.com/Kissner"><strong>Patreon</strong></a></p>
With this file you will be able to print Astronomical Telescope "Hadley" - an easy assembly, high performance Newtonian with your 3D printer. Click on the button and save the file on your computer to work, edit or customize your design. You can also find more 3D designs for printers on Astronomical Telescope "Hadley" - an easy assembly, high performance Newtonian.