Astrophotography rings for Samyang Rokinon 85mm 1.4 with EAF
thingiverse
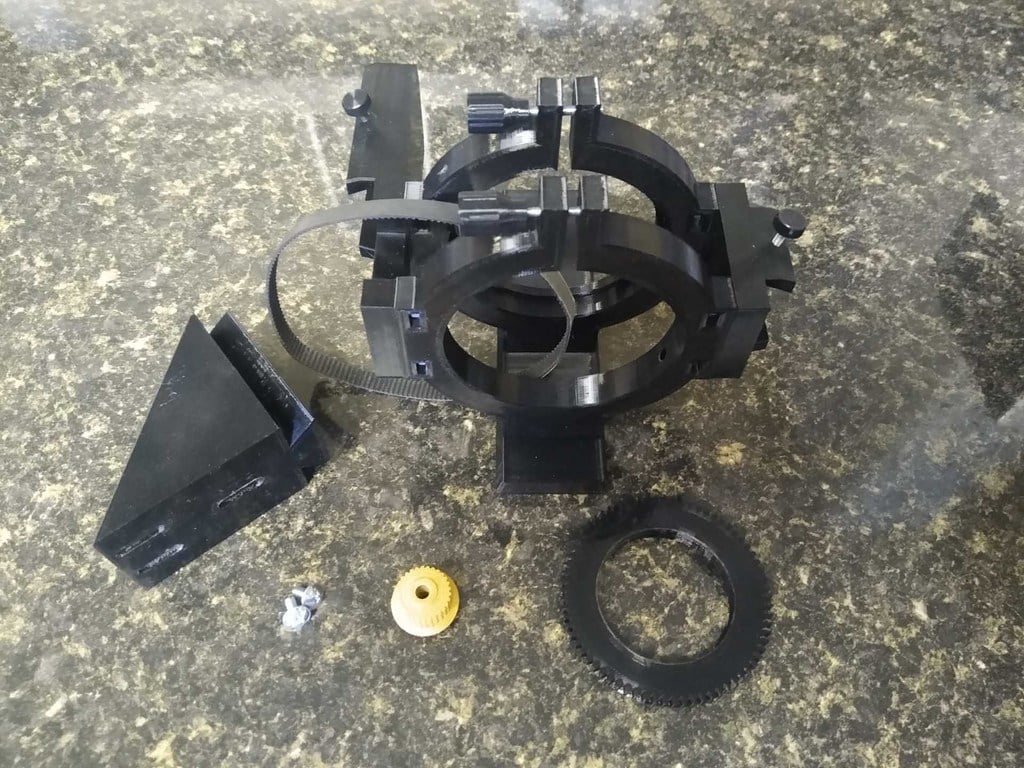
These parts were designed by me, but inspired by Roman Hujer's ring set. Roman was kind enough to provide his openSCAD design file which taught me so much and was instrumental in me learning how to proceed with this design. Thank you to Roman! These parts basically adapt a manual focus Samyang/Rokinon 85mm f/1.4 manual focus lens for astrophotography on a motor driven mount with support for Electronic Auto Focus with a ZWO EAF motor. There is also a one-piece filter step ring for attaching a 48mm astronomy filter to the 72mm front of the Samyang lens. The lens is inserted from the front (skyward) side. Toothed belts are available in long lengths and can be cut and glued/taped to proper length. Toothed pulleys for the EAF can be found here on Thingiverse, as well as knobs for the screws. Hardware needed: 2 ea M3x10 Allen head screw (for EAF and accessory shoes) 2 ea M3x25 Hex head screw with hex nuts (for front and rear clamp rings) 12 ea M4x12 (or 16) Allen head screw with hex nuts (to attach rings to dovetail and shoes to rings Small set (grub) screws for the toothed pulley. Use an appropriate size. henryarnold https://www.thingiverse.com/thing:2350264 (press-on cap for M3 Allen Head) airald https://www.thingiverse.com/thing:1377830 (knob and cap for M3 Hex head - scaled 200% in Z to increase length in slicer) droftarts https://www.thingiverse.com/thing:16627 (the source for the 30 tooth pulleys) If you want to frequently remove the lens from the rings, then I suggest using the pulley without the outer rim. It makes it much easier to slip the belt off. You can find YouTube videos for splicing a belt, but here is my basic method: 1) Determine the proper length of the belt - be careful not to go too small. You can always trim it down and glue it again if it is a bit too long. 2) Cut the belt at both ends in the middle of a tooth with a brand new hobby knife. Don't try to cut all the way through in one pass. Make multiple passes. (Cutting in the middle of the tooth gives more glue area later.) 3) Put a piece of good (non-stretchy) tape sticky side up on a flat table. Don't touch the sticky. Don't use electrical tape, it is too stretchy. Clear packing tape works. Duct tape works. Aluminum HVAC tape works. 4) Lay one end of the belt (teeth up) on the tape. You want the end of the belt near the middle of the tape! 5) Now butt the other end of the belt right up to the first end and then "roll" it down onto the sticky tape. 6) Now you can trim the width of the tape to match the belt. 7) If you bend the belt concave at the seam, the seam will open up a little and you can apply some super glue to the joint, then place the belt seam flat on the table (teeth up) to close the seam back up and put a little weight on it and leave it to dry for a good amount of time. You want the super glue to have time to really dry. Note: You have to slide the lens part way out of the rings to loop the belt around the lens. Position the belt between the two rings and the seam goes on the far side of the lens away from the motor. (Another reason to let the glue fully dry is you don't want glue on your lens!) Tension the belt using the motor screw slots. Note, the belt doesn't have to be tight at all to work well. The focus ring is not that stiff, and a toothed belt doesn't slip. Enjoy!
With this file you will be able to print Astrophotography rings for Samyang Rokinon 85mm 1.4 with EAF with your 3D printer. Click on the button and save the file on your computer to work, edit or customize your design. You can also find more 3D designs for printers on Astrophotography rings for Samyang Rokinon 85mm 1.4 with EAF.