AtGames Legends Pinball (ALP) cabinet door latches
prusaprinters
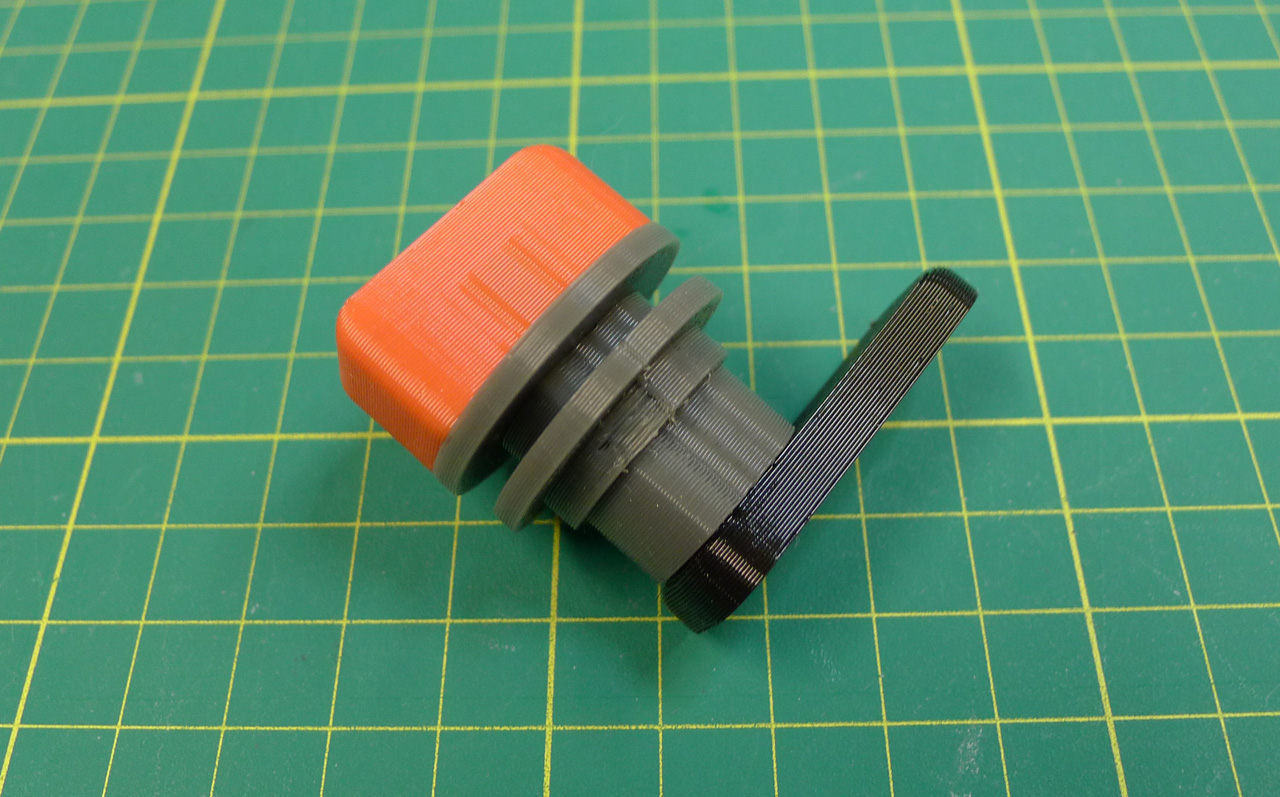
<p>The AtGames Legends Pinball (ALP) has two openings to the interior of the cab - both covered with locked doors. I'm sure there are those who want to restrict access to the ALP interior and appreciate the locks, but I'm not one of them. And I'm concerned with losing the key at some point.</p><p>I really only want the doors closed. And I want to open them up from time to time without needing a key. Yes, I can put a key hook on the cabinet (I've been using one for a while), but I'd rather just do away with needing it.</p><p>This model replaces the ALP lock with a simple knob and latch. It fits the same mounting hole as the original lock and requires no changes to the cabinet. It holds the door securely in place despite any heavy pinball action. It can be removed and the original lock restored if necessary. </p><p>Note that while the design is reasonably strong and the new latch keeps the doors closed, the thing is still made of plastic and will probably not hold up to abuse (prying, bashing, etc.) so keep using the original lock if you need the strength of metal.</p><p>This model may be a useful replacement for other barrel locks in other situations, but I've only tested it with the ALP.</p><p><strong>Additional parts needed</strong> (qty is for two units)<strong>:</strong></p><ul><li>2 M4 screws - minimum length: 8mm; max: 12 or so.</li><li>2 M4 flat washers</li><li>2 M4 brass threaded inserts (and a soldering iron to insert them)</li><li> Some adhesive. I prefer hot-glue for this assembly since it can be easily removed if necessary, but pretty much anything that will glue plastic pieces together is fine.</li></ul><p><strong>Printing</strong></p><ul><li>No supports needed. There is some minimal bridging going on for the knob and shaft, but any printer should be able to handle it easily.</li><li>I used .32mm layer height for all parts since vertical detail is minimal. One personal exception: I used the variable layer height feature of the Prusa Slicer to add more detail to the top curve of the knob. I also did a color-change for the arrow on top of the knob (shown in one of the pictures.) BTW, if you don't want the “arrow” on top, you can cut it off in your slicer.</li><li>Print orientation of the parts is crucial for strength. The shaft and latch are oriented properly as presented.</li><li>The shaft may need a brim to keep it in place during printing. During my tests, I found several brands of PLA that really didn't want to stick to the bed.</li><li>I used PLA for all the parts and that's working fine. I have since printed the latch and the knob out of a high-shore TPU (I use Priline which is 98a) to great effect. I would not recommend low-shore flex filament (like Ninjaflex). I haven't tried PET-G, but that should work as well.</li></ul><p><strong>Assembly</strong></p><ol><li>As shown in the pictures, remove the original lock and put the new barrel in from the exterior of the door (make sure you're working on the correct side of the door.)</li><li>Secure the barrel on the inside using the keeper part and glue them to each other. Then glue the barrel to the backboard from the inside. You don't need much glue for either job - just a dot in each spot as indicated by the red rings in the picture. </li><li>Optionally (recommended) install a threaded insert into one end of the shaft.</li><li>Glue the knob to the other (non-threaded-insert) side of the shaft. </li><li>Insert this assembly through the barrel from the outside and attach the bolt/latch with the M4-8 screw and washer. The shaft has a hole through the center so you can use a longer screw (up to 12mm or so) if that's what you have. If you're not using the threaded insert, use the longer screw and some glue to secure the latch to the shaft.</li></ol><p>That's it. Repeat for the second lock.</p><p><strong>Tip</strong>: To remove hardened hot-glue, apply a few drops of isopropyl alcohol (IPA) to the glue joint and wait a few seconds. Use your fingernail or similar to lift/separate a small part of the glue joint. Apply a few more drops of IPA and wait a few more seconds. You should be able to completely and cleanly remove the rest of the glue and/or separate the glued parts. This process works very well with low-temp hot glue used on PLA and the melamine-like surface of the ALP doors. I'm not sure how well it would work on more porous surfaces.</p>
With this file you will be able to print AtGames Legends Pinball (ALP) cabinet door latches with your 3D printer. Click on the button and save the file on your computer to work, edit or customize your design. You can also find more 3D designs for printers on AtGames Legends Pinball (ALP) cabinet door latches.